MVC 5 – OWIN and Katana

OWIN was the first step towards elegant design for the whole asp.net stack. By separating the hosting concerns from the framework, Microsoft was able to build modular services and add it to the stack such as Web API, SignalR and now the whole asp.net core.

Katana was the first implementation for OWIN on IIS, you won’t feel much change as it is still running using the System.Web assembly but at least it enables you to run your middlware under IIS.

To understand more about the motivation, the moving parts and samples of OWIN, you can watch the following video in Arabic.


Building a LOB application with MVC 5 – Part 4 – Controllers, Routes and Areas

This is the fifth part of building line of business application using MVC 5, you can read the previous parts through the following links

  1. Building a LOB application with MVC 5 – Part 0
  2. Building a LOB application with MVC 5 – Part 1
  3. Building a LOB application with MVC 5 – Part 2 – Models and Generic Repository
  4. Building a LOB application with MVC 5 – Part 3 – EntityFramework

In the previous part, we introduced EntityFramework code first migration and created the generic repository using EF, then we applied the migration to create a database and ran some unit tests to make sure our Repository layer is working fine.

In this part, we will introduce Controllers, routes and areas

MVC Controllers

The “C” in MVC, if you recall some design patters, you may heard of the Front Controller pattern, this is basically the guy at the front door who receives the request, validate it, call whatever services for you and later forward you to the suitable view.

To understand how controllers work and how the URL you type in the browser is mapped to a piece of code, lets see how the MVC application life-cycle works, but take into consideration that MVC is based on the same System.Web used in Web Forms, so they share some life cycle events

  1. A request is received by the IIS Server and forwarded to an MVC handler, this is a normal HTTP handler
  2. MVC handler gets the request and invokes the routing API which we will explain later and it examines the route table to see which controller and action should handles the request
  3. The MVC handlers creates the controller using the method CreateController from the interface IControllerFactory, the default implementation for this interface is DefaultControllerFactory, it simply create a new instance from the controller class, if your controller constructor doesn’t have parameter-less constructor, this method will fail and throw and exception, later when we see dependency injection, we will see how to override the default controller factory by calling ControllerBuilder.Current.SetDefaultControllerFactory in Application_Start in Global.asax.cs
  4.  Invoke authentication filters, we will read more about filters and authentication in future posts
  5. Bind query string parameters, form values and route values to the action method parameters using the default model binder, we will see later how to build custom model binders
  6. Invoke the action and action filters
  7. Execute the results(View, Content, Empty, JSON, File) and any result filters
  8. Send the response to the user

You can read more about the MVC Application Life-Cycle here

Convention over Configuration

You can think of a controller as a way to group a module features together in one place, for ex: a CustomerController will have all the code related to Customers like Browse Services, view service details ..

By Default MVC 5 works with the convention over configuration model, it means you will not find a code that maps the exact URL to the exact controller name and action, nor you will find a config that tells how to relate the action name with the view page, this is all following a specific convention.

  1. URL mapping to controllers and actions is configured using routing template
  2. Every controller in the controllers folder will have a folder inside the Views folder with the same name without “Controller” word
  3. Every action inside  controller will have  a view inside the Views\controller folder with the action name unless you specified another view name explicitly

Now, lets create some controllers that will be used in out Appointment Manager application

  1. In the AppointmentManager.Web project, right click the Controllers folder and choose Add -> Controlleradd controller.PNG
  2. You have 3 options, either an empty controller which is self explanatory , with read/write actions which is created with some get, post, delete and put methods, and the last one is used when you have an entity framework context inside your web project which is not recommended, this option created a CRUD controller for the selected entity, ex: if you selected our DB Context and choose the entity as Appointment, then it will generate CRUD for the appointment class, in our case, we will choose Empty
  3. Enter the name as “Customers” and Click Add, this will create an empty controller with a single action called Index

If you have a look at the Index action, you will find it has some few properties

 public ActionResult Index()
        {
            return View();
        }
  1. The method is public
  2. The return type is ActionResult or anything that inherits from IActionResult
  3. It used a helper method called View to return an object that inhers from ActionResult , there are many other help functions like File(), Json(), Empty()

By default the action has no view, and if you run the application now and navigated to http://localhost:16106/Customers/, you will have the following screen, your application may be running on a different port

view not found.PNG

This is the convention over configuration part, it tried to find a view with the name Index which is the action name in the path View/Customers and Views/Shared, and since we didn’t specify a view name in the return View() method, then it fails.

To create a view, you can either go to related view folder for your controller and create a view with the same name as the action using Right Click, Add new item, and Select view.

or you can just right click in the action method and choose “Add View”

Now, Lets create the needed controllers along with its actions and views

  1. Customers
    1. Services
    2. Providers
    3. ProviderDetails
    4. BookAppointment
    5. Calendar
  2. ServiceProviders
    1. Calendar
    2. AppointmentDetails
    3. ManageServices
    4. AvailableTime

Create empty view for each action, after you are done, your views folder should be the same as below, you can of course change the name as you like, and you can now navigate to each path and make sure it opens without errors, the path should be controller name/action name, ex: Customers/Calendar

views.PNG

Routes

When we opened the URL http://localhost:16106/Customers, it automatically knew that URL should be handled by the Customes controller, the Index method, this is configured in the file App_Start\RouteConfig.cs

This is the content of the file:

 public class RouteConfig
    {
        public static void RegisterRoutes(RouteCollection routes)
        {
            routes.IgnoreRoute("{resource}.axd/{*pathInfo}");

            routes.MapRoute(
                name: "Default",
                url: "{controller}/{action}/{id}",
                defaults: new { controller = "Home", action = "Index", id = UrlParameter.Optional }
            );
        }
    }

the most important line is the one that defines the “Default” route, you can find the url property that has the value “{controller}/{action}/{id}”, and the line below it, it specifies default values from these placeholders, in this case if the URL was http://localhost:16106/ without anything else, this means the controller will be HomeController, and if you specify  the controller but no action, like the case in http://localhost:16106/Customers, then, the action will have the default value “Index” which why the Index action is called when we didn’t specify it.

You can add as many routes as you want, but make sure to make the most specific at the top, think of it like exception handing, if you put a try and catch and inside the catch you put the root Exception class, then any other catches will not be called as the Exception class will map to all exceptions.

ex:

 routes.MapRoute(
                name: "Default",
                url: "{controller}/{action}/{id}",
                defaults: new { controller = "Home", action = "Index", id = UrlParameter.Optional }
            );

            routes.MapRoute(
               name: "Calendar",
               url: "Calendar",
               defaults: new { controller = "Customers", action = "Calendar", id = UrlParameter.Optional }
           );

In this case, the calendar route will never get a chance to fire, because the path: /calendar will be alreayd cought by the default route and the controller will be mapped to Calendar and you will find an exception that it can’t find any controller with the name Calendar, so you have to put the calendar route before the default route

There is also Attribute based routeing, where you simply put an attriibute before the action name or controller name like the below

 [Route(template:"Customers/BrowseServices")]
        public ActionResult Services()
        {
            return View();
        }

You can read more about attribute based route here on asp.net site 

Areas

You noticed that we didn’t add a controller for the admin side, but in the admin case, we will have many controllers, ex: Services, ServiceCategories, Users …

It will be like a sub project, how can we isolate it from the rest of the project?

The answer is MVC Areas, it helps us to isolate business domains in a separate folder that can be handled by separate teams, in an eCommerce scenario, we would have an area for Shopping cart, another for inventory management, and another one for shipping

To create an area, right click the project itself and choose Add => Area and type Admin as the area name and click Add, you will have a new folder called Areas and inside it you will have the folder Admin and just inside this folder you will have the same project structure

area

create the following controllers inside the Admin area, to do that, follow the same instructions that we used to create the customers  and service providers controllers but this time select the controllers folder inside the admin area

  1. Services
  2. ServiceCategories
  3. Users
  4. Reports


So far, we created the needed controllers, routes, and views, in the next post, we will start working on the views and add some UI that makes the application life.


You can get the full source code from GitHub Repository https://github.com/haitham-shaddad/AppointmentManager

Building a LOB application with MVC 5 – Part 3 – EntityFramework

This is the fourth part of building line of business application using MVC 5, you can read the previous parts through the following links

  1. Building a LOB application with MVC 5 – Part 0
  2. Building a LOB application with MVC 5 – Part 1
  3. Building a LOB application with MVC 5 – Part 2 – Models and Generic Repository

In the previous part, we created all the model objects, a Generic repository interface and a generic service layer interface with its implementation.

In this part, we will build the generic repository implementation using EntityFramework 6, and before we proceed, I will introduce EntityFramework first.

What is EntityFramework?

EntityFramework is Microsoft’s Object Relational Mapper (ORM) framework, it is used to map objects to database tables and vice versa, it uses mapping file or metadata to generate a dynamic SQL at run time.

This is a different model than the one we used to do, which basically depend on Stored Procedures and code generation tools to save time, there is a debate regarding performance of dynamic SQL against compiled stored procedures, but in my point of view, this is not a major concern now and you can utilize caching to overcome the difference, besides, with EntityFramework you can still utilize Stored Procedures for important operations that may need special performance needs.

EntityFramework Usage Models

EntityFramework can be used in 3 ways

  1. Database First: Start with the database, and use it to generate code, this model should not be used for new projects, it is not flexible as you can’t edit the generated code directly but through a partial classes and all the mapping exist in a single file which make it hard to share between team members if more than one wants to apply changes at the same time.
  2. Model First: Start with a model and design the entities, attributes and its relationships, use this model to generate both the classes and database, once this happened for the first time, it will be the same as Database First
  3. Code First: Start with a pure classes and then use something called Migration to generate the database, this model is the recommended way to go and EF 7 has no database first model, it is all about Code First now, with Code First, you can have snapshots of your code and database, and you can rollback at any point to any previous version.

Build the Generic Repository

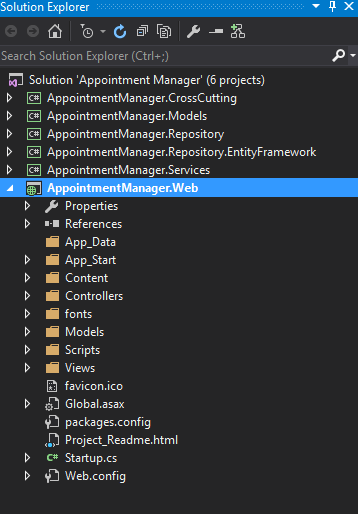
To start generating our generic Repository implementation, we will add the EntityFramework package to the AppointmentManager.Repository.EntityFramework project as this will be our repository project.

In order to do that, we will use NuGet which is a package manager for .Net, we use it to install, uninstall and update packages instead of referencing DLL files directly from a shared folder, the package can be a simple DLL or code file, JavaScript, special configuration or entries in web.config

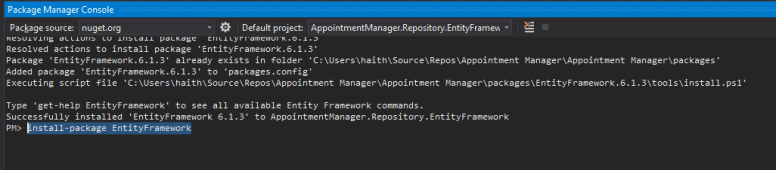
To install the package, Click Tools -> NuGet Package Manager -> Package Manager Console

Make sure “AppointmentManager.Repository.EntityFramework” is selected in the default project drop down list, then type the following command and press enter

install-package EntityFramework
NuGet EntityFramework

In the project  “AppointmentManager.Repository.EntityFramework”, do the following:

  1. Add Reference to “AppointmentManager.Repository”  and “AppointmentManager.Models”
  2. Add a new class named EFRepository
public class EFRepository<T, K> : IRepository<T, K> where T : class
    {
        private DbContext _context;
        private DbSet<T> _entitySet;

        public EFRepository(DbContext context)
        {
            if (context == null)
            {
                throw new ArgumentNullException(nameof(context));
            }

            this._context = context;
            _entitySet = _context.Set<T>();
        }

        public T Add(T item)
        {
            _entitySet.Add(item);
            _context.SaveChanges();
            return item;
        }

        public bool Delete(T item)
        {
            _entitySet.Attach(item);
            _entitySet.Remove(item);
            _context.SaveChanges();
            return true;
        }

        public bool DeleteByID(K id)
        {
            var item = _entitySet.Find(id);
            _entitySet.Remove(item);
            _context.SaveChanges();
            return true;
        }

        public T GetByID(K id)
        {
            return _entitySet.Find(id);
        }

        public IQueryable<T> GetAll()
        {
            return _entitySet;
        }

        public IQueryable<T> GetAll(Expression<Func<T, K>> orderBy)
        {
            return _entitySet.OrderBy(orderBy);
        }

        public IQueryable<T> GetAll(int pageIndex, int pageSize)
        {
            return _entitySet.Skip((pageIndex - 1) * pageSize).Take(pageSize);
        }

        public IQueryable<T> GetAll(int pageIndex, int pageSize, Expression<Func<T, K>> orderBy)
        {
            return _entitySet.Skip((pageIndex - 1) * pageSize).Take(pageSize).OrderBy(orderBy);
        }

        public IQueryable<T> Find(Expression<Func<T, bool>> predicate)
        {
            return _entitySet.Where(predicate);
        }

        public IQueryable<T> Find(Expression<Func<T, bool>> predicate, int pageIndex, int pageSize, Expression<Func<T, K>> orderBy)
        {
            return _entitySet.Where(predicate).Skip((pageIndex - 1) * pageSize).Take(pageSize).OrderBy(orderBy);
        }

        public bool Update(T item)
        {
            _entitySet.Attach(item);
            _context.SaveChanges();
            return true;
        }
    }
 

Build the project and make sure it compiles successfully

Add a new class called AppointmentManagerContext, this class is needed only for the migration to work, we will not be using it as the EFRepository class is using the base DbContext class, you can still change it and add properties of type DbSet<T> for each entity in the application, this will be helpful specially if you want to do some joins between different entities.

 public class AppointmentManagerContext : DbContext
    {
        protected override void OnModelCreating(DbModelBuilder modelBuilder)
        {
            modelBuilder.Entity<User>()
             .Map<Customer>(m =>
             {
                 m.Requires("UserType").HasValue((int)UserRole.Customer);
                 m.ToTable("Users");
             }
             ).Map<ServiceProvider>(m =>
               {
                   m.Requires("UserType").HasValue((int)UserRole.ServiceProvider);
                   m.ToTable("Users");
               }
               )
               .ToTable("Users");

            modelBuilder.Entity<ServiceProviderReview>().HasRequired<Appointment>(a => a.Appointment);

            base.OnModelCreating(modelBuilder);
        }
    }

After that, we need to generate our database using Code First Migration, open the Package manager console and type the following command, make sure the project AppointmentManager.Repository.EntityFramework is selected

Enable-Migrations

You may encounter an issue regarding the TimeSlot class that it has no key defined, just add an integer property called ID to this class and rerun the command again
Then run the following command to add the first migration which will compare the model classes to the database and add code to generate the database, later when we add new classes or properties, we will run the command again which will add another migration that will generate code to add the new properties to the database.

Add-Migration -Name Initial

After running the command, you will notice that a new class named Initial_[time].cs, where [time] is the date time for the time the file was generated

migration.PNG

Before we proceed, I would like to explain the content for the method OnModelCreating:

Since we have all classes inheriting from the BusinessEntity class, and we have the Customer and ServiceProvider classes inherit from the User class, we must tell EntityFramework how it will generate tables for these classes.

By default, EntityFramework will generate a new class for each entity with its properties including these properties of the parent class which is fine in the BusinessEntity class as we want all common properties like ID and CreationDate to exist in all tables.

But for the Customer and ServiceProvider classes, we need a table per hierarchy, both classes must be mapped to a single table called Users, to do that, we added the code at line 5 where we tell EF to map the User class to another 2 sub-classes and for each one we told it to use the same table name “Users”, this way EF will combine the properties of the 3 classes and add it to one table.

There are another 2 types of inheritance, table per type (TPT), in our case, it would have been 3 tables (User, ServiceProvider and Customer), The third option is table per class (TPC) which will generate only 2 tables (ServiceProvider and Cutomer) and each table will have the properties in the parent User class.

So far, we still don’t have our database created, and to do that, we will have to run this command in the package manager console

Update-Database

After you do, you will have the following error

Introducing FOREIGN KEY constraint 'FK_dbo.Appointments_dbo.Users_ServiceProviderID' on table 'Appointments' may cause cycles or multiple cascade paths. Specify ON DELETE NO ACTION or ON UPDATE NO ACTION, or modify other FOREIGN KEY constraints.
Could not create constraint or index. See previous errors.

This is the time we will have to change the generated migration Initial file manually to override the cascade action.

Open the intiial file, in line 70 and line 148, change cacadeDelete to false and run the update-database command again

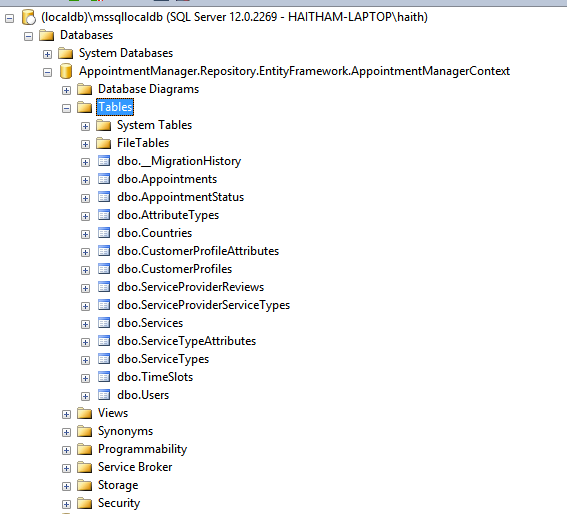
Now we have our backend ready, and the database is created, but we didn’t specify any connection strings, so where has been the database created? by default there is a connection string named DefaultConnection and it reference the localdb database, so open management studio and connect to server (localdb)\mssqllocaldb

you should find the database created with the name of the context class, if you want to override that, you can add a connection string named Defaultconnection in the project configuration file with the database name and server you want and then run the update-database command again.

db.PNG


Lets make sure now our backend is working fine, create a new unit test project and name it “AppointmentManager.Repository.EntityFramework.Test”

Add reference to the following projects:

  1. AppointmentManager.Repository.EntityFramework
  2. AppointmentManager.Repository
  3. AppointmentManager.Models

Rename the default file “UnitTest1” to GenericRepositoryTest

Rename the default method to TestInsertion and put the following code

[TestClass]
    public class GenericRepositoryTest
    {
        [TestMethod]
        public void TestInsertion()
        {
            var context = new AppointmentManagerContext();
            IRepository<ServiceType, int> serviceRepository = new EFRepository<ServiceType, int>(context);

            var serviceType = new ServiceType()
            {
                CreatedBy = "admin",
                CreationDate = DateTime.Now,
                LastModificationDate = DateTime.Now,
                Name = "Test service"
            };

            serviceType = serviceRepository.Add(serviceType);

            Assert.IsNotNull(serviceType);
            Assert.AreNotEqual(serviceType.ID, 0);

            serviceType = serviceRepository.GetByID(serviceType.ID);
            Assert.IsNotNull(serviceType);

            serviceRepository.Delete(serviceType);
            serviceType = serviceRepository.GetByID(serviceType.ID);
            Assert.IsNull(serviceType);
        }
    }

Right click the method in VS and choose Run Tets and make sure the test succeeds, you can double check by putting a break point before the line that deletes the serviceType object and check the database and ensure the record is there

By this, we have a read repository that we can use to manage our data, in the next part we will start building the UI.


You can get the full source code from GitHub Repository https://github.com/haitham-shaddad/AppointmentManager

Building a LOB application with MVC 5 – Part 2 – Models and Generic Repository

In the previous part of building line of business application with MVC 5, we introduced MVC and created the solution structure

if you didn’t read the first 2 parts, please go ahead and read it from the below links

  1. Building a LOB application with MVC 5 – Part 0
  2. Building a LOB application with MVC 5 – Part 1

In this part, we will introduce Models and build the needed business entities in our business application, we will also explain how to save the data using Entity Framework, below are the exact topics we are going to discuss about models:

  1. Developing Models
  2. Using Display and Edit Data Annotations on Properties
  3. Validating User Input with Data Annotations
  4. What Are Model Binders?
  5. Entity Framework 6


Developing Models

Every software project has a model, this model may or may not map exactly to a database, the model is a collection of classes and relationships between these classes, every class has some properties, these properties can be primitives like int, string, Boolean, or it can be complex like Customer, Order ..

In our application, the model will be as below

Models

To add the model to your visual studio solution, add the following classes to the AppointmentManager.Models, after you are done, your models project should look like the following.

NB: I have added the code for main classes only, the rest are very simple and can be added by looking at the class diagram


Models Project

  1. BusinessEntity, this is the base class that all model entities will inherit from, it contains some common properties between all classes like ID, Creation date and last modification date, the settings of these properties will be done in one place in our repository to minimize the effort needed
    public abstract class BusinessEntity
        {
            public int ID { get; set; }
    
            public DateTime CreationDate { get; set; }
    
            public DateTime LastModificationDate { get; set; }
    
            public User CreatedBy { get; set; }
    
            public User LastModifiedBy { get; set; }
        }
     
  2. ValueObject, this is the base for all model objects that have no identity, unlike entities that have an ID that distinguish it from other entities, value objects have no ID, it is identified by its value, ex: a Money class has no ID, only the amount identities it, in our case, a TimeSlot has no ID, it can be identified by the start time and duration
    public class ValueObject<T>
        {
            T Value { get; set; }
        }
     
  3. User
    public class User : BusinessEntity
        {
            public bool IsActive { get; set; }
    
            public string FirstName { get; set; }
    
            public string LastName { get; set; }
    
            public string EmailAddress { get; set; }
    
            public string MobileNumber { get; set; }
        }
     
  4. Customer
     public class Customer : User
        {
            public string Address { get; set; }
    
            public virtual ICollection<Appointment> Appointments { get; set; }
    
            public virtual ICollection<CustomerProfile> Profiles { get; set; }
    
        }
     
  5. CustomerProfile
    public class CustomerProfile : BusinessEntity
        {
            public string Name { get; set; }
    
            public string CustomerID { get; set; }
    
            public int ServiceTypeID { get; set; }
    
            public ServiceType ServiceType { get; set; }
    
            public virtual Customer Customer { get; set; }
    
            public virtual ICollection<CustomerProfileAttribute> Attributes { get; set; }
        }
     
  6. Service
    public class Service : BusinessEntity
        {
            public string Name { get; set; }
    
            public string Description { get; set; }
    
            public int ServiceTypeID { get; set; }
    
            public virtual ServiceType ServiceType { get; set; }
        }
     
  7. ServiceProvider
          public class ServiceProvider : User
            {
                public string Title { get; set; }
    
                public string StreetAddress1 { get; set; }
    
                public string StreetAddress2 { get; set; }
    
                public string City { get; set; }
    
                public string State { get; set; }
    
                public string CountryID { get; set; }
    
                public string ZipCode { get; set; }
    
                public string BusinessTelephoneNumber { get; set; }
    
                public string WebSite { get; set; }
    
                public string TaxIdentificationNumber { get; set; }
    
                public string LicenseNumber { get; set; }
    
                public bool IsAvailableSaturday { get; set; }
    
                public bool IsAvailableSunday { get; set; }
    
                public bool IsAvailableMonday { get; set; }
    
                public bool IsAvailableTuesday { get; set; }
    
                public bool IsAvailableWednesday { get; set; }
    
                public bool IsAvailableThursday { get; set; }
    
                public bool IsAvailableFriday { get; set; }
    
                public virtual Country Country { get; set; }
    
                public virtual ICollection<Appointment> Appointments { get; set; }
    
                public virtual ICollection<ServiceType> ServiceTypes { get; set; }
    
                public virtual ICollection<TimeSlot> Availability { get; set; }
    
                public virtual ICollection<ServiceProviderReview> Reviews { get; set; }
            }
     
  8. ServiceProviderReview
    public class ServiceProviderReview : BusinessEntity
        {
            public string ServiceProviderID { get; set; }
    
            public int Rating { get; set; }
    
            public int AppointmentId { get; set; }
    
            public string CustomerId { get; set; }
    
            public string Comment { get; set; }
    
            public virtual ServiceProvider ServiceProvider { get; set; }
    
            public virtual Appointment Appointment { get; set; }
    
            public virtual Customer Customer { get; set; }
        }
     
  9. TimeSlot
     public class TimeSlot : ValueObject<TimePeriod>
        {
            public TimePeriod Value
            {
                get; set;
            }
        }
    
        public class TimePeriod
        {
            public DateTime StartTime { get; set; }
    
            public int DurationInMinutes { get; set; }
        }
     
  10. Appointment
    public class Appointment : BusinessEntity
        {
            public int ServiceProviderID { get; set; }
    
            public int CustomerID { get; set; }
    
            public int CustomerProfileId { get; set; }
    
            public int AppointmentStatusId { get; set; }
    
            public int TimeSlotId { get; set; }
    
            public DateTime AppointmentTime { get; set; }
    
            public int DurationInMinutes { get; set; }
    
            public bool IsPaidByProvider { get; set; }
    
            public AppointmentStatus AppointmentStatus { get; set; }
    
            public Customer Customer { get; set; }
    
            public ICollection<Service> Services { get; set; }
    
            public ServiceProvider ServiceProvider { get; set; }
    
            public CustomerProfile CustomerProfile { get; set; }
    
            public TimeSlot TimeSlot { get; set; }
    
            public ServiceProviderReview CustomerReview { get; set; }
        }
    

Now, we defined our model, lets define how will we store the model objects into the database using the Repository layer defined in the AppointmentManager.Repository project, we will be using SQL Server as a persistence medium.

As we know, we should always program against interfaces and also we should not repeat our selves, this is why we will create a generic Repository that will abstract the CRUD operations.

Create a new interface called IRepository in the AppointmentManager.Repository project and add the following code to it.

 public interface IRepository<T, K> where T : class
    {
        T Add(T item);

        bool Update(T item);

        bool DeleteByID(K id);

        bool Delete(T item);

        T GetByID(K id);

        IQueryable<T> GetAll();

        IQueryable<T> GetAll(Expression<Func<T, K>> orderBy);

        IQueryable<T> GetAll(int pageIndex, int pageSize);

        IQueryable<T> GetAll(int pageIndex, int pageSize, Expression<Func<T, K>> orderBy);

        IQueryable<T> Find(Expression<Func<T, bool>> predicate);

        IQueryable<T> Find(Expression<Func<T, bool>> predicate, int pageIndex, int pageSize, Expression<Func<T, K>> orderBy);
    }

As you can see, this interface has all the data access logic you may need in most of the business cases, also all methods returns IQueryable which allows the caller to add extra filtering.

As we explained in Part 1, the data access layer will be called by the service/business logic layer , so we need also a generic service layer that will call the data access layer generic repository.

To do that, create a new interface in the AppointmentManager.Services project and name it IService

 
public interface IService<T, K> where T : class
    {
        T Add(T item);

        bool Update(T item);

        bool DeleteByID(K id);

        bool Delete(T item);

        T GetByID(K id);

        IQueryable<T> GetAll();

        IQueryable<T> GetAll(Expression<Func<T, K>> orderBy);

        IQueryable<T> GetAll(int pageIndex, int pageSize);

        IQueryable<T> GetAll(int pageIndex, int pageSize, Expression<Func<T, K>> orderBy);

        IQueryable<T> Find(Expression<Func<T, bool>> predicate);

        IQueryable<T> Find(Expression<Func<T, bool>> predicate, int pageIndex, int pageSize, Expression<Func<T, K>> orderBy);
    }
 

Now, in the same project, create a new class and name it BaseService and make it inherits the IService class, make sure to add a reference to AppointmentManager.Repository

public class BaseService<T, K> : IService<T, K> where T : class
    {
        private IRepository<T, K> _repository;

        public BaseService(IRepository<T, K> repository)
        {
            this._repository = repository;
        }

        public T Add(T item)
        {
            return _repository.Add(item);
        }

        public bool Delete(T item)
        {
            return _repository.Delete(item);
        }

        public bool DeleteByID(K id)
        {
            return _repository.DeleteByID(id);
        }

        public IQueryable<T> Find(Expression<Func<T, bool>> predicate)
        {
            return _repository.Find(predicate);
        }

        public IQueryable<T> Find(Expression<Func<T, bool>> predicate, int pageIndex, int pageSize, Expression<Func<T, K>> orderBy)
        {
            return _repository.Find(predicate, pageIndex, pageSize, orderBy);
        }

        public IQueryable<T> GetAll()
        {
            return _repository.GetAll();
        }

        public IQueryable<T> GetAll(Expression<Func<T, K>> orderBy)
        {
            return _repository.GetAll(orderBy);
        }

        public IQueryable<T> GetAll(int pageIndex, int pageSize)
        {
            return _repository.GetAll(pageIndex, pageSize);
        }

        public IQueryable<T> GetAll(int pageIndex, int pageSize, Expression<Func<T, K>> orderBy)
        {
            return _repository.GetAll(pageIndex, pageSize, orderBy);
        }

        public T GetByID(K id)
        {
            return _repository.GetByID(id);
        }

        public bool Update(T item)
        {
            return _repository.Update(item);
        }
    }

So far, We have a base service to be used for our business logic, a base interface to be used in our data access layer.
Still we didn’t write any code to save our entities into the database as this will require EntityFramework which will be introduced in the next part.

You can get the full source code from GitHub Repository https://github.com/haitham-shaddad/AppointmentManager

Building a LOB application with MVC 5 – Part 1

In the previous part of building line of business application with MVC 5, we have setup the project on TFS Online, added the user stories and introduced the application business, if you didn’t read it already, please go ahead and read it from the below link

Building a LOB application with MVC 5 – Part 0

After you are done, The project backlog should be similar to the below screenshot

backlog full.PNG

In this part, we will start with an introduction to MVC, Create the solution structure and go through the moving parts.

Introduction to MVC

For many years we have been using Web Forms, Creating pages, user controls and custom dynamic controls, but when the project size gets bigger, it gets complicated and the whole framework was also tied to .Net framework release which was slow.

In 2009, Microsoft released the first version of MVC and it was not tied to .Net framework release cycle which made the release cycle of MVC much faster.

Now we have MVC 5.2 and in few months we should have MVC 6 which is a complete rewrite of MVC, but we won’t talk about it in this series.

MVC makes it easier to maintain a larger project and a large team, and as we will see, you can divide the project into sub-projects using something called Areas.

MVC has 3 main components

  1. Models

    Contains your model classes, DTO, and your business services, normally the business logic layer will be in a different assembly

  2. Views

   This is how your model and content will be represented, MVC can render your data in HTML view, JSON, Stream or even file.

  1. Controllers

The controller will accept the user request, acting as a front end dispatcher, validate the user input, call the business logic and choose what view to use in order to render the data

You can read more about MVC through Microsoft official site http://www.asp.net/mvc

Create Solution structure

Now, lets open Visual Studio and create the project structure, you will notice that we will create a lot of projects, and I will explain what is the usage of each one.

  1. Open visual studio as Administrator, I am using VS 2015 Enterprise, But if you have VS 2013, it should be the same experience
  2. Click View Menu-> Team Explorer in order to link the project to TFS
  3. Click the green icon > Manage Connections > Connect to Team ProjectTFS Browser
  4. In the popup, click Servers -> Add
  5. Enter the link for your visual studio account, ex: https://%5Byouraccount%5D.visualstudio.com
  6. Visual studio will authenticate you and add the server to the list of TFS servers
  7. Make sure the server is selected in the “Select team foundation server” drop down
  8. Select the team project from the list on the right, in our case it is Appointment Manager
  9. Click ConnectTFS Servers.png
  10. Once the dialog is closed, you will find the server name and below it there will be a list of projects you already have, click the Appointment ManagerTFS Select Project
  11. Once the project is selected, it will ask you to clone the project into your local machine, click on “Clone this repository” link and choose a folder on your H.D and click Cloneclone project.PNG
  12. Once the project is cloned to your local work-space, you will click on the “New” link under the Solutions in the screenshot above, this will open the New VS project dialog
  13. Type blank in the search text box and find the “Blank Solution” template, Enter the name as “Appointment Manager”, the location will be the folder that you chose when you cloned the project, keep it as isnew project dialog
  14. Now from the menu, click View -> Solution Explorer
  15. Right click the Solution and select Add->New Project
  16. Select Windows from the left tree, and Class Library from the list of project templates
  17. Enter the name for the project as AppointmentManager.Models, we will explain later what is this used for, once the project is created, delete the default class Class1.cs
  18. Repeast Steps 14 till 17 for the following projects
    1. AppointmentManager.Repository
    2. AppointmentManager.Repository.EntityFramework
    3. AppointmentManager.Services
    4. AppointmentManager.CrossCutting
  19. Add another project but in this time select web from the left tree, and “Asp.Net Web Application”, name the project AppointmentManager.Web
  20. Another dialog will open, select MVC and keep the Authentication as Individual User Accounts for now, your screen should be similar to this new web project dialog.png


By this, you have created the solution structure, I will explain below what will each project be used for

Solution Structure in Details

Now, you should see something like the below in your visual studio solution, I will explain now what each project will be used forsolution structure.PNG

AppointmentManager.CrossCutting

This project will contain all the classes that will be used across all layers, ex: Logging, caching, security and any other utility classes

AppointmentManager.Models

This project will contain all entity classes related to our bunsiness, these classes will be mainly plain old CLR objects (POCO), it has no business logic, just the properties in each class and any other attributes like Required, Length.

Sample of these classes are: Appointment, ServiceProvider, Booking..

AppointmentManager.Repository

This project will contain everything related to data access layer, however it won’t contain a specific implementation, here will be only the abstraction, ex: IAppointmentRepostitory will describe all methods needed for the appointment data access

AppointmentManager.Repository.EntityFramework

This will contain the implementation for the interfaces defined in AppointmentManager.Repository project using Entity Framework, this will make it easy for us later to change the implementation to other ORM or data access

AppointmentManager.Services

This will contain all the business logic layer code, any data access will be delegated to the repository layer.

AppointmentManager.Web

This project will contain all the UI stuff, like MVC Views, JavaScript, CSS, Bundeling, Configuration, and User request handling and validation

This layer will call the service layer to handle any business logic layer.

So the flow will be as the below diagramLogical diagram.png


So far, we have created the project structure, explained what is each part and if you set the startup project to AppointmentManager.Web and run the project, you will have a web application running with the default template.

In the next series, we will start adding some functionality to the application and will discuss more about the web project structure

You can get the full source code from GitHub Repository https://github.com/haitham-shaddad/AppointmentManager

Building a LOB application with MVC 5 – Part 0

There are a lot of tutorials and blog posts about MVC, Web API and other Asp.Net technologies, but it has been always a problem getting all these parts together in once place and utilize it to build something bigger.

In this post, I will start a series where we will introduce and build a complete functioning lin of business web application using Asp.Net MVC 5, I will start with introducing the business behind the application, and in each part, we will introduce a new feature of MVC and use it to build a new feature in our LOB application, this will allow us to know how to use MVC in practical example and we will also go deep dive in each feature to build more advanced features.

Introduction to the LOB Application

The application we are going to build together is called Appointment Manager, it will be a flexible application that allows users to register either as service provider or consumer, below are the list of features for each role

  1. Service providers. ex:doctors, mechanics, carpenters
    1.  Check his Calendar
    2. View appointment details
    3. View ratings for his work
    4. Select which services he provides
    5. Manage his available time slots for each service
  2. Service consumers
    1. Browse service categories
    2. Browse service providers in a specific category
    3. View specific service provider details, history and rating
    4. Book an appointment
    5. Check his Calendar
    6. Rate a service Provider
  3. Admin
    1. Manage Service Categories
    2. Manage Attribute for each service category, ex: Mechanic category will have Car model, Year and his services will include Oil change, A/C, …
  4. Shared Features
    1. Register
    2. Login, Logout
    3. Edit Profile

By the end of this series we will have the application built and we will have full knowledge of MVC 5 framework

Introdction to the Technical Part

In each part, we will introduce a key component in MVC and use it to build another feature in the application, below are the features we are going to discuss in MVC

  1. Introduction to MVC
  2. Models
  3. View
  4. Controllers
  5. Routing
  6. Localization
  7. Bootstrap
  8. EntityFramework
  9. Identity and Security
  10. Bootstrap
  11. SignalR

Setting up ALM

Since this will be a real business application, we want to apply everything we do in the real life, and the first thing is to decide about how are we going to manage the application life-cycle management, fortunately, Microsoft offers a full platform for that;TFS, In our series, I will use Team services or TFS Online with GitHub as our source code repository, You can also use TFS on premise, Microsoft offers TFS express for free, you can download and install it and use it through the series

I will start by creating the project and then enter the list of features into a user stories.

Since TFS online support Git, I will use it as our source code control and I will link it later to GitHub

Create the project on TFS Online

In order to be able to use TFS online, you have to have a visual studio account, if you don’t already have one,go to VisualStudio.com and register using your MS Account, it is free

  1. Open your browser and navigate to https://[your account].visualstudio.com
  2. Under “Recent Projects & Teams” Click New TFS New
  3. Enter the Project name, description, Process Template and Version control as Git, TFS support different process templates such as Scrum and CMMI, if you have different needs, you can create a new template and customize it, we won’t go deeper here but you can read more about TFS templates from this link https://msdn.microsoft.com/en-us/library/ms243782.aspxNew Project
  4. Once the project is created, clink on “Navigate to the project” button
  5. Once the page is loaded, you will see a dashboard from where you can see everything about your project, ex: Code, Sprint burn down chart and user stories
  6. Click on Backlog link in the Work widget to start editing the user storiesTFS dashboard
  7. Once the page is loaded, you can add the story by typing the story title in title field and press enter or click Add button, if you can’t see the title field, just click the New link as shown in the screenshot belowbacklog

After the story is added, you can double click it to open the edit dialog which will enable you to add all the details, once this is done, click the Save icon on the top rightedit story

  1. TFS offers you the ability to categorize your user stories into something called Features, think of it as sub-modules to group the related features together, You can click Features from the left menu and add the needed features, then go to the backlog  by clicking the Stories link and Click the Mapping icon and make sure it is On, this will open a panel on the right with the list of features defined, drag the user stories from the left and drop it over the feature

So far, we talked about the application we want to build, we configured its source control and added its requirement.

In the next part we will introduce MVC 5, Create the project structure and build the home page for the application.

You can get the full source code from GitHub Repository https://github.com/haitham-shaddad/AppointmentManager