Configure preview features with Azure App Configuration

In my preview post about implementing preview features in asp.net core, I explained how to introduce the concept of feature flags in your application and manage it with the default appsettings.json.

Managing your features from appsettings is not the best approach as it requires application restarts which will distrupt the application users.

In this post, I will explain how to do the configuration with a tool that was built just for this.

Azure App Configuration has feature management feature that allows you to manage your features, turn it on or off and set the filters for each feature flag. It also enables auto refresh which basically allows you to change a feature and this change will reflect immediately in your application.

Register Azure App Configuration as a Configuration Source

Asp.net core supports multiple configuration sources. When you call the CreateDefaultBuilder method in Program.cs, it automatically registers the following configuration sources for your application

appsettings.json
appsettings.{environment}.json
user secrets
environment variables
command line arguments

The registration happens in the same order above. You can have a look at the source code in this link If a specific key exists in a configuration source, you can override its value by adding it in the next configuration source. Ex: If the key ConnectionStrings:DefaultConnection exist in appsettins.json and also exist in user secrets, the one in user secrets will be used. This is good to override some values in your local dev environment such as passwords and connection strings to avoid pushing it to your source control

To register azure app config as an additional config source, you can add the following in Program.cs after installing the package Microsoft.Azure.AppConfiguration.AspNetCore

            Host.CreateDefaultBuilder(args)
                .ConfigureAppConfiguration(config =>
                {
                    var configuration = config.Build();
                    config.AddAzureAppConfiguration(azureAppConfig =>
                    {
                        var azureAppConfigConnectionString = configuration["AzureAppConfig:ConnectionString"];
                        azureAppConfig.ConfigureRefresh(refresh =>
                        {
                            refresh.SetCacheExpiration(TimeSpan.FromSeconds(5));
                        });
                        azureAppConfig.UseFeatureFlags();
                        azureAppConfig.Connect(azureAppConfigConnectionString);
                    });
                })
                .ConfigureWebHostDefaults(webBuilder =>
                {
                    webBuilder.UseStartup<Startup>();
                });

From line 2-15, you can see that we are configuration the application configuration by adding a new configuration source in line 5. In line 7, we are reading the connection string from the previous configuration sources. This way you can add your connection string in appsettings.json or user secrets, I have added it here in appsettings.json under the name AzureAppConfig:ConnectionString. From line 8-11, we are configuring the caching time for the configuration. If you configure it for 5 seconds, the keys from azure app config will be cached and no requests will be done to azure app config to get the latest updates. Line 12 simply asks Azure App Configuration SDK to include the features when it reads all configurations and finally we use the connection string to connect to the azure config instance.

Creating Azure App Config

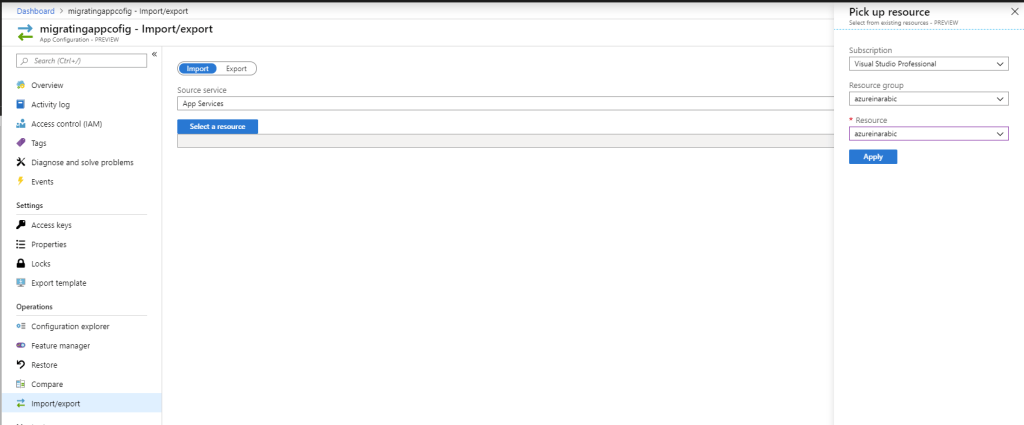
Log in to Azure Portal and create a new App Configuration resource. You can only create one free app configuration per subscription. Once it is created, go to Access Keys from the left menu and copy either the primary or secondary connection string and update your appsettings file

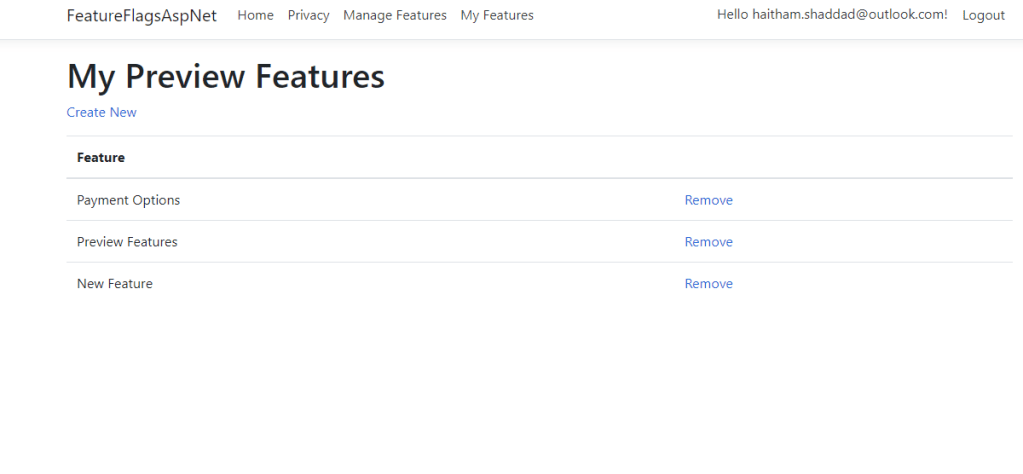
Now you should be all set. If you run the application and navigate to https://localhost:44375/PreviewFeatures, you should be able to see the page if your feature configuration allows it.

So far, we didn’t add any features to our Azure App Config instance yet, this means the application will fall back to the appsettings.json

Add Features in Azure App Configuration

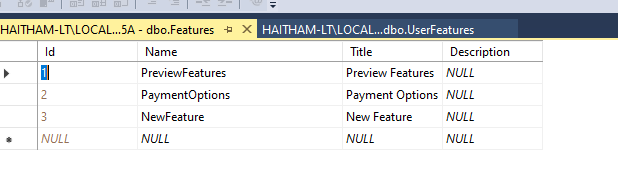
To start managing your features from Azure App Config, Click Feature Manager from the left menu and Choose Add then type the feature name as PreviewFeatures and choose Off then click add

Now refresh the URL https://localhost:44375/PreviewFeatures, and if the feature PreviewFeatures was enabled in appsettings, it will still appear. So what are we doing wrong?

Enable Auto Refresh

By default, the Azure App Configuration does not do auto refresh in your asp.net core. You have to register a middleware that does that by adding the following line in the Configure method inside Startup.cs

app.UseAzureAppConfiguration();

Now, if you run the application again, the first time it starts, it will get the most recent values from Azure App Config and now you should see the PreviewFeatures controller not working. But if you enabled it again from azure portal by toggling the On/Off flag from the Feature Manager page, and wait for 5 seconds, you should refresh and see that the PreviewFeatures is now working again.

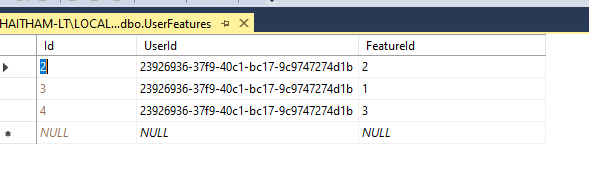
Notice that the toggle turns on or off the feature for everyone. If you need to use the feature filter, then click the 3 dots and choose Edit. Under Filters, click add and type the feature filter name, in this case UserFeatures which we created previously. Notice how the state changed from On/Off to Conditional. Now when you refresh, the filter will be executed to decide if the feature should be enabled or disabled for each user.

I have included all the updates on GitHub repo. Feel free to ask me any questions

Advertisement

Implementing preview features in asp.net core app

Feature flags are a way to turn on or off a specific feature in your application. This enables you to hide a feature on production if it is not ready for end users. It can also allow you to give the user the option to enable/disable preview feature as they like. As you can see below, Azure DevOps keeps showing the preview feature tooltip for users to try preview features. A preview feature can be a new page, a new section in a page or a new way of rendering the page.

Feature flags come handy in these situations:

Ship half-finished features: You can always ship features to production and switch off its feature flag to hide it from users.
Experimentation: Deploy a new feature and target specific user group or allow user to experiment these features and provide feedback.
Test in production & Kill a feature: If your feature is incomplete, you can release it and let users try it. if the feature misbehaved, you can simply kill it for everyone as if it was not there in the first place
Trunk-based development: Usually with every feature, you have a feature branch and eventually these branches get merged to the master branch. But now everyone can work on the same branch and release their code to production and switch off their features till it is complete.

Feature Management

With the introduction of Azure App Configuratio, the team introduced a library to manage feature flags in asp.net core. It does not depend on Azure App Configuration though, and you can configure it with appsettings.json

Lets write some code

Create a new asp.net web application (MVC) and choose the Individual Authentication to get the identity database and everything ready for user registration and login

Once the project is created, add a reference to the nuget package Microsoft.FeatureManagement.AspNetCore

Startup.cs changes

You need to inject feature management into the services collection by appending the following line to the ConfigureServices method

        public void ConfigureServices(IServiceCollection services)
        {
            services.AddDbContext<ApplicationDbContext>(options =>
                options.UseSqlServer(Configuration.GetConnectionString("DefaultConnection")));

            services.AddDefaultIdentity<IdentityUser>(options => options.SignIn.RequireConfirmedAccount = true)
                .AddEntityFrameworkStores<ApplicationDbContext>();

             services.AddFeatureManagement();
            services.AddControllersWithViews();
            services.AddRazorPages();
        }

Configuration for feature management

The feature management has to read the configuration for which features exist and which are enabled or disabled. In this article, we will use appsettings.json. By default, it looks for a section called FeatureManagement

  "FeatureManagement": {
    "WelcomeFeature": true,
    "NotWelcomeFeature": false
  }

In the above configuration, we added 2 features

  1. WelcomeFeature: This is enabled for everyone
  2. NotWelcomeFeature: This is disabled for everyone

Feature Gate

We defined the features, now we want to use them in the code. Create a new controller with an Index method and annotate the controller with the attribute [FeatureGate]. This attribute accepts the feature name defined in FeatureManagmenet section above. If you try now to run your application and access the path /PreviewFeatures, it should show the message “This is a preview feature controller”. If you change the value from true to false in appsettings for the key WelcomeFeature and refresh the page, it will show page not found. You can override this behavior by using a custom feature disabled handler by calling the UseDisabledFeaturesHandler method after calling AddFeatureManagement().

    [FeatureGate("WelcomeFeature")]
    public class PreviewFeaturesController : Controller
    {
        private readonly ILogger<PreviewFeaturesController> _logger;

        public PreviewFeaturesController(ILogger<PreviewFeaturesController> logger)
        {
            _logger = logger;
        }

        public IActionResult Index()
        {
            return Content("This is a preview feature controller");
        }
    }

Feature Filters

When you add a feature and want the users to select it, the last thing to do is to hard code this logic. With feature filters, you can defer the logic to enable/disable features to custom logic. Each feature filter has a a method called EvaluateAsync. This method returns a boolean indicating whether or not to enable the feature

Add feature filter

Create a new class called UserFeaturesFilter and append the following code

[FilterAlias("UserFeatures")]
public class UserFeaturesFilter : IFeatureFilter
{
    private readonly IServiceScopeFactory _scopeFactory;
    private readonly IHttpContextAccessor _httpContextAccessor;
    public UserFeaturesFilter(IServiceScopeFactory scopeFactory, IHttpContextAccessor httpContextAccessor)
    {
        _scopeFactory = scopeFactory ?? throw new ArgumentNullException(nameof(scopeFactory));
        _httpContextAccessor = httpContextAccessor ?? throw new ArgumentNullException(nameof(httpContextAccessor));
    }

    public async Task<bool> EvaluateAsync(FeatureFilterEvaluationContext context)
    {
        if (!_httpContextAccessor.HttpContext.User.Identity.IsAuthenticated)
            return false;

        using (var scope = _scopeFactory.CreateScope())
        {
            var featuresContext = scope.ServiceProvider.GetRequiredService<FeaturesContext>();
            var userManager = scope.ServiceProvider.GetRequiredService<UserManager<IdentityUser>>();

            var user = await userManager.GetUserAsync(_httpContextAccessor.HttpContext.User);
            var feature = featuresContext.Features.FirstOrDefault(a => a.Name.ToLower() == context.FeatureName.ToLower());

            if (user == null || feature == null)
                return false;

            var userFeature = featuresContext.UserFeatures.FirstOrDefault(f => f.UserId == user.Id && f.FeatureId == feature.Id);
            return userFeature != null;
        }
    }
}

The logic here is to get the current logged in user from the http context then retrieve the features that the user has chosen to subscribe for and if the feature name exist in the database then return true, otherwise, return false. To register this feature filter, you have to change startup.cs file with the following line

services.AddFeatureManagement().AddFeatureFilter<UserFeaturesFilter>();

Now, its time to introduce a new feature that will utilise this feature filter. Edit the appsettings to add a new feature

  "FeatureManagement": {
    "WelcomeFeature": true,
    "NotWelcomeFeature": false,
    "PreviewFeatures": {
      "EnabledFor": [
        {
          "Name": "UserFeatures"
        }
      ]
    }
  }

We added a new feature called PreviewFeatures and instead of using true or false as the value, we added the UserFeatures filter. To test this, we will add the reminder of code used in the feature filter.

Create a Feature and UserFeature classes

    public class Feature
    {
        public int Id { get; set; }
        public string Name { get; set; }
        public string Title { get; set; }
        public string Description { get; set; }

    }
    public class UserFeature
    {
        public int Id { get; set; }
        public string UserId { get; set; }
        public int FeatureId { get; set; }
        public Feature Feature { get; set; }
    }

Create a data context class that will contain these 2 entities

public class FeaturesContext : DbContext
{
    public FeaturesContext(DbContextOptions<FeaturesContext> options)
       : base(options)
    {
    }

    public DbSet<Feature> Features { get; set; }
    public DbSet<UserFeature> UserFeatures { get; set; }
}

Your ConfigureServices method should look like this after registering the new DbContext and add the needed services

    public void ConfigureServices(IServiceCollection services)
    {
        services.AddDbContext<ApplicationDbContext>(options =>
            options.UseSqlServer(Configuration.GetConnectionString("DefaultConnection")));

        services.AddDbContext<FeaturesContext>(options =>
        options.UseSqlServer(Configuration.GetConnectionString("DefaultConnection")));

        services.AddDefaultIdentity<IdentityUser>(options => options.SignIn.RequireConfirmedAccount = true)
            .AddEntityFrameworkStores<ApplicationDbContext>();

        services.AddSingleton<IHttpContextAccessor, HttpContextAccessor>();
        services.AddFeatureManagement().AddFeatureFilter<UserFeaturesFilter>();
        services.AddControllersWithViews();
        services.AddRazorPages();
    }

Now, run the Add-Migration -ContextName FeaturesContext command followed by Update-Databse command to update the database

Once you did all above steps, you can mark any controller with the new feature name and edit the database to add a record to the UserFeature table. You wil have to register first and get your user id from AspNetUsers table, and you also have to add a record in the Features table. The feature name has to be the name used in the appsettings.json file

Now try to open your controller, it should work fine, once you remove the record from UserFeatures table, it should show page not found.

Let users choose what features they want

To allow users to choose the preview features they want, you can create a new page and show all the features from Features table and let the user save their choice. The easiest way to do that is to create a new controller and choose MVC Controller based on Entity Framework, this will create a CRUD screens for the UserFeatures table

You can also create the same for Features table to let the admin manage the features.

Informing users about new features

When you deploy a new feature, you need to let the users know about this feature, this can happen using an email, or a tooltip that appears for users or just having a menu link that shows all preview features just like Azure DevOps does. You can for example put the page URL in the Features table and implement a middleware that checks the current request path and check if there are any features that has the same URL and show a popup for the user to choose this feature.

Source code

I have added all the source code for this article on GitHub, you can download and run the sample app. It has the complete solution.

If you have any questions or suggestions, please let me know.

Log to Azure Table Storage in asp.net core to

Asp.net core has abstracted the logging operations into the ILogger interface and instead of having too many frameworks for logging, you just need to add a logging provider such as Console, SeriLog, Windows Event Viewer. In this post, I will create a custom logging provider that logs to Azure table storage

Why Azure Table Storage?

Azure table storage can store petebytes of semi-structured data with high performance inserts and updates. It is also cheap which makes it very suitable for storing log messages. It also allow us to connect to the log messages from many tools such as Azure Storage explorer unlike the case when you log messages to the file system on an Azure App Service

Structure of a custom logger

Logger

This is where the actual code for logging will exist and it must implement the ILogger

public class AzureTableLogger : ILogger
{
Microsoft.WindowsAzure.Storage.Table.CloudTable loggingTable;

    public AzureTableLogger(string connectionString, string tableName)
    {
        var storageAccount = Microsoft.WindowsAzure.Storage.CloudStorageAccount.Parse(connectionString);
        var cloudTableClient = storageAccount.CreateCloudTableClient();
        loggingTable = cloudTableClient.GetTableReference(tableName);
        loggingTable.CreateIfNotExistsAsync();
    }

    public IDisposable BeginScope<TState>(TState state)
    {
        return null;
    }

    public bool IsEnabled(LogLevel logLevel)
    {
        return true;
    }

    public void Log<TState>(LogLevel logLevel, EventId eventId, TState state, Exception exception, Func<TState, Exception, string> formatter)
    {
        var log = new LogEntity
        {
            EventId = eventId.ToString(),
            LogLevel = logLevel.ToString(),
            Message = formatter(state, exception),//exception?.ToString(),
            PartitionKey = DateTime.Now.ToString("yyyyMMdd"),
            RowKey = Guid.NewGuid().ToString()
        };

        var insertOp = TableOperation.Insert(log);
        loggingTable.ExecuteAsync(insertOp).GetAwaiter().GetResult();
    }
}

public class LogEntity : Microsoft.WindowsAzure.Storage.Table.TableEntity
{
    public string LogLevel { get; set; }
    public string EventId { get; set; }
    public string Message { get; set; }
}

As you can see, we just use the Azure Table Storage SDK to connect to the storage account and create a cloud table client. The logger accepts the table name and connection string as a constructor parameter which will be injected using the LoggingProvider. This is the minimum version of a logger and it needs a lot of improvement but it is good as a start.

LoggingProvider

public class AzureTableLoggerProvider : ILoggerProvider
{
    private readonly string connectionStringName;
    private readonly string tableName;

    public AzureTableLoggerProvider(string connectionString, string tableName)
    {
        connectionStringName = connectionString;
        this.tableName = tableName;
    }
    public ILogger CreateLogger(string categoryName)
    {
        return new AzureTableLogger(connectionStringName, tableName);
    }

    public void Dispose()
    {

    }
}

In this provider, we just use the two parameters passed in the constructor to create a new logger instance

LoggingProviderExtension

 public static class AzureTableLoggerExtensions
    {
        public static ILoggerFactory AddTableStorage(this ILoggerFactory loggerFactory, string tableName, string connectionString)
        {
            loggerFactory.AddProvider(new AzureTableLoggerProvider(connectionString, tableName));
            return loggerFactory;
        }
    }

This last block is not a must but its for the sake of clean code and clarity. In this step, we just inject our logging provider into the ILoggerFactory. When the application starts, we will have to call the AddTableStorage method to be able to use the new logger.

Add the provider in startup.cs

   public class Startup
    {
        // This method gets called by the runtime. Use this method to add services to the container.
        // For more information on how to configure your application, visit https://go.microsoft.com/fwlink/?LinkID=398940
        public void ConfigureServices(IServiceCollection services)
        {
            services.AddControllers();
        }

        // This method gets called by the runtime. Use this method to configure the HTTP request pipeline.
        public void Configure(IApplicationBuilder app, IWebHostEnvironment env, ILoggerFactory loggerFactory)
        {
            if (env.IsDevelopment())
            {
                app.UseDeveloperExceptionPage();
            }
            loggerFactory.AddTableStorage("LoggingSample", "UseDevelopmentStorage=true");
            app.UseRouting();
            app.UseEndpoints(endpoints =>
            {
                endpoints.MapDefaultControllerRoute();
            });
        }
    }

Now, our application is ready to log messages to Azure Table Storage. The sample above is using local storage emulator and will create a table named LoggingSample. Lets create a controller and log some messages

    [ApiController]
    [Route("[controller]")]
    public class CustomersController : Controller
    {
        private ILogger<CustomersController> logger;

        public CustomersController(ILogger<CustomersController> logger)
        {
            this.logger = logger;
        }

        public IActionResult Index()
        {
            logger.LogInformation("This is a message from customers controller");
            return Ok();
        }
    }

In the Index action, we called the logger to add a test message. Notice that you don’t have to specify anything other than the ILogger. Asp.net core DI will inject the proper logger at runtime.

Notice the new columns added to the table such as EventId and LogLevel. These are properties in the LogEntity classes added in the first code snippet. Notice also that it logs all messages logged by the asp.net infrastructure not just the test message that we added

Next steps

Our next step would be adding a middleware that will show a nice UI that will display log messages. This can come handy when you want to debug something and need to see the error messages

Migrate your asp.net settings to Azure App Configuration

Before asp.net core, we only had the web.config file to configure and read the application settings from code. The framework didn’t have a plugable way of adding an extra configuration providers. Any other confiruation data sources meant a custom solution and custom code to read and update configuration keys.

With asp.net core, we got the new appsettings.json as one source of configuration. Along with it came the environment variables, other files, secret keys that can be used to omit connection strings and passwords from being stored on source control.

Things event got better with Azure App Service that has a settings/configuration section that can override the application settings and connection strings sections. This applies to both asp.net framework and asp.net core.

Isn’t this enough already?

It is good as a start. but, it has a major issue. If you change any value in your configuration keys, it means the application must be restarted which affects the logged in users and may cause data loss.
Another issue is that our application code and configuration exists in the same place which contradicts with the twelve factor . These configuration keys cannot also be shared with other applications except using copy/paste

Azure App Configuration

Azure App Configuration is a service that is still in preview that can be a central place for all your configuration keys and feature flags.
It is so easy to add it to your asp.net core configuration provider using the provided nuget packages.

Add the need packages

First, install the package Microsoft.Azure.AppConfiguration.AspNetCore . You may need to check that you enabled prerelease versions if you are using visual studio

In your Program.cs file, add the following code which will inject Azure app configuration as a configuration provider. Notice that you will have to add a key named “AppConfig” in your connectionStrings section in appsettings.json that will store the connection string for your Azure App Configuration

public static IWebHostBuilder CreateWebHostBuilder(string&#091;] args) =>
    WebHost.CreateDefaultBuilder(args)
        .ConfigureAppConfiguration((hostingContext, config) =>
        {
            var settings = config.Build();
            config.AddAzureAppConfiguration(settings&#091;"ConnectionStrings:AppConfig"]);
        })
        .UseStartup<Startup>();

Now, your application is ready to read any configuration keys from Azure App Configuration. All you need to do is to create a new instance by following this link

Reuse your existing configuration keys

It’s not only too easy to add Azure App Configuration to your asp.net core app but also migrating your existing keys. You don’t want to end up with a situation where you have to spend hours moving your keys manually or writing scripts to do it. Azure App Configuration can do that for you.

As you can see above, it is too simple. Just choose Import/export from the left menu then choose where you want App Configuration to import the values from:

  1. App Configuration: you can import the values from another Azure App Configuration instance
  2. App Service: which can be perfect in our case since it will import the values from your Azure App Service
  3. Configuration File: you can pass the appsettings.json directly and it will import the values from there

Once you did that, you will have all keys/connection strings imported and ready to go.

Conclusion

Azure App Configuration is a great service that still in preview but it enables you to offload your application from configuration keys and connection strings. It also has the auto refresh which will allow your app to always have the latest config keys without the need to restart your application and impact your users.
It also has feature management which is a great addition but we will talk about it in future posts.

Azure Functions anatomy – Part 2 – What is inside a Function App?

In the previous post (Azure Functions 2.0 Anatomy- Part 1), we saw the structure of a function app. In this part, I will explain the different components of an Azure Function.

Components

Every Azure Function 2.0 consists of the following components:

  • Trigger
  • Bindings (one of which is the trigger). Binding can be input or output
  • Value Converter/Binder
  • Listener

A binding can be a Blob file, a queue message, an event from event hub or event grid or any custom binding developed by anyone. One of these bindings can initiate the function call and in this case it is called a Trigger.
A binding can also be Input or Output. Input binding delivers data to the function and output binding is used by the function to write data.

Now, assume we have the following function and its configuration

        [FunctionName("SampleFunction")]
        public static void Run([QueueTrigger("myqueue-items", Connection = "AzureWebJobsStorage")]string myQueueItem, [Blob("sample-output")]Stream output, TraceWriter log)
        {
            log.Info($"C# Queue trigger function processed: {myQueueItem}");
        }

This function has 2 binding parameters. myQueueItem which is both an input binding and a trigger, and output which is an output binding.

How Azure Functions call this method and convert the queue message to a string and the stream to a Blob file?

Binding, Listener, Value Provider and Converter

When the azure function app starts, it scans all functions that exist in the app directory like we saw in the previous post, and for each function it reads the input, output and trigger from the function config JSON file.

The scanning process uses a descriptor provider which creates the input binding, output binding, trigger and an invoker

Once all functions are loaded, it tried to load the types for each function that was developed outside the portal. It uses the scriptFile and EntryPoint as you can see below. The entry point in the previous code snippet is FunctionApp1.Function1.Run method that exist in the assembly FunctionApp1.dll

{
  "generatedBy": "Microsoft.NET.Sdk.Functions-1.0.14",
  "configurationSource": "attributes",
  "bindings": [
    {
      "type": "timerTrigger",
      "schedule": "0 */5 * * * *",
      "useMonitor": true,
      "runOnStartup": false,
      "name": "myTimer"
    }
  ],
  "disabled": false,
  "scriptFile": "../bin/FunctionApp1.dll",
  "entryPoint": "FunctionApp1.Function2.Run"
}

Each function app can either have a DLL function or a function created by portal. But not both.

Now, lets see what are the other components inside a binding:

  • Listener (IListener): This one has a method named StartAsync, which basically start listening for an event to trigger the function. For Azure Blob trigger, it scans the logs for new or modified files. For Queue trigger, it check for new messages in the specified queue.
  • Value Provider (IValueProvider): Once the listener has the event that should trigger the function, it uses the value provider to fill all input parameters. If the trigger was a blog trigger, then the value will be the file, the metadata, the name and content of the file itself. For a Queue, it will be content of the message and so on and so forth.
  • Value Converter (IAsyncConverter): This will be used to convert the values found in the value provider to all the input parameters configured for the function. In the previous example, StorageQueueMessageToStringConverter will be used to convert the CloudQueueMessage instance to the string parameter named myQueueItem. The same will be used to write data to output parameters, the framework will choose the best converter that matches the Output parameter type (Stream) and the type of variable that will be used to write to stream, ex: String or any Stream Writer.
  • Executor (ITriggerExecutor): Now we know that the function should be triggered, we have the data from input binding and we bound all input parameters, now we need to call the function body. This takes place using an implementation of ITriggerExecutor which can use reflection to call the function or in a very special case, it may get executed as a web hook like the case with HTTP trigger.

In the next post, I will dig more into Azure Function App to explore the extensions and host.

Azure Functions 2.0 anatomy – Part 1

In these series of posts, I will explain the internals of Azure Functions and how it works. By the end of it, you should be able to understand what happens once an Azure Function is deployed till the moment it is triggered and invocation completes.

Is it a Web App?

Yes, every Azure Function App that uses .Net as a Language runs as as.net core web app. When the app starts, it loads all your functions and proxies and set up the routes and listeners for each function.

Web App Structure

Just like any other Azure Web App, it consists of the following folders:

  • data: This folder contains another folder named “functions” which has another folder called extensions. The extensions folder has a list of all extensions installed to your Functions App. Each file has a reference to a nuget package that has the extension implementation.
  • Log Files
  • site: it has the wwwroot which hosts the asp.net core web app and all the functions
Data -> Functions folder structure

But for Azure Functions App, the following folders are added:

.nuget

Contains all nuget packages installed when you install a new extension. A reference for each extension installed exist in a file under: data\functions\extensions. The sample extension file below specify the package :Microsoft.Azure.WebJobs.Extensions.ServiceBus

In Azure Functions 1.0, it was running on .Net 4.6 and the runtime already included all the supported triggers and bindings. But, with version 2.0, the runtime only includes http and timer binding and all the other bindings can be developed and installed separately using extensions. This allows you to develop your own extensions and upload it without the need to wait for a new version of Azure Functions.

{
  "Id": "d3a33dd0-3941-4acf-a303-72773995901d",
  "Status": 1,
  "StartTime": "2019-01-02T02:49:23.5568341+00:00",
  "EndTime": "2019-01-02T02:50:50.1029788+00:00",
  "Error": null,
  "Properties": {
    "id": "Microsoft.Azure.WebJobs.Extensions.ServiceBus",
    "version": "3.0.0"
  }
}

ASP.NET

This folder contains all data protection keys used in the web app

To have a look at this folder structure and explore it yourself, use the following URL: https://%5BFUNCTION_APP_NAME%5D.scm.azurewebsites.net/DebugConsole

wwwroot folder structure

wwwroot folder structure

As you can see, there are 3 folders. Each folder represent a single function. All DLLs for each function exist in the bin folder.

The host.json file by default only has the version number for the function

{
  "version": "2.0"
}

Inside each function, there is a function.json file that has the configuration for this function.

{
  "generatedBy": "Microsoft.NET.Sdk.Functions-1.0.14",
  "configurationSource": "attributes",
  "bindings": [
    {
      "type": "timerTrigger",
      "schedule": "0 */5 * * * *",
      "useMonitor": true,
      "runOnStartup": false,
      "name": "myTimer"
    }
  ],
  "disabled": false,
  "scriptFile": "../bin/FunctionApp1.dll",
  "entryPoint": "FunctionApp1.Function2.Run"
}

The Azure Functions run-time use this file to load the metadata for each function during application startup. The most important properties are the scriptFile which points to the DLL that has the code and the entryPoint that has the exact c# method name that will be executed when the function triggers.
The configurationSource specifies where to read the function configuration such as connection strings for the blob storage or service bus. attributes means it will be retrieved from code.
The binding key lists all bindings for this function. For this sample, it is a timer and it is the trigger, so it has a single binding. For others, it can be bindings that represents input, output and a trigger.

In the next post, I will explain the internals of each function, and how the bindings and triggers works.

Download Attachments in Single Page App and Asp.Net Core

Introduction

If you have a SPA built with any JavaScript framework and it has an attachment feature, you must hit the part where you need to allow the user to download an attachment and the App is authenticating users using Tokens.

The problem

With normal forms authentication based on cookies the browser will simply send the authentication cookie with each request to your web server without you doing anything. If you have a link that will allow the user to download a file from your server, the browse will automatically send the authentication cookie when the user clicks the link. This makes it so easy for you. But if you are using token based authentication, it is your responsibility to send a token for each request sent to the server via Ajax by using the Authorization header.

Unfortunately, you cannot control the headers sent to the server if the user is opening a link in a new browser window and the user will end up with unauthorized request.

The solution

Download the file using Ajax Request

In this solution, you have to request the endpoint that downloads the file using Ajax Request which will include the authorization header and then get all the file content in a variable and push the content to the user. This works fine if the file size is very small. But imagine the case when you are downloading a 500MB file. This is not going to work since the file is stored in a JavaScript variable before the download takes place.

Make the API that download the attachment anonymous

If the endpoint that downloads the file doesn’t require authentication then we are good. But now the file will be available for every one to download. So, we have to find a way to secure the file even when the endpoint is anonymous.

If you have some experience with Azure Storage, you may have heard of Azure Storage Shared Access Signature. The idea is simple. When the user requests a file, generate a token, save it to a temporary storage  and append it to the URL of the download file endpoint. When the user clicks the link, the endpoint will be called and the token will be validated against the temporary storage and if it matches then send the file contents. This way we will be sure that the link was generated by the application to that user. Still, if the link was shared to another user, he will be able to download the file. But this is another issue that we can worry about later.

Implementation

We will create a new asp.net core site with an endpoint to download files but I will not create a SPA in this article. That will be left for the reader. I will test the idea though using Postman.

Open Visual Studio, Create a new project of type “Asp.NET Core Web Application” then Choose “API” in the next dialog. You can still choose “Web Application (Model-View-Controller)”. I will leave authentication to the default “No Authentication”.

Right Click on the Controllers folder and choose “New Controller”, choose “API Controlller – Empty” and name it AttachmentsController. You should end up with the following

[Produces("application/json")]
[Route("api/Attachments")]
 //[Authorize]
public class AttachmentsController : Controller
{
}

Notice that I have commented the [Authorize] attribute since I didn’t setup authentication in this demo. In real life scenario, you will setup authentication and authorization using Token based Authentication.

Create a folder named Services and then create a new interface called ISecureUrlGenerator. The content should look like the following:

   public interface ISecureUrlGenerator
    {
        string GenerateSecureAttachmentUrl(string id, string url);
        bool ValidateUrl(string url, string id);
        bool ValidateToken(string id, string token);
    }

Now, add class to implement the previous interface

using Microsoft.Extensions.Caching.Memory;
using System;
using System.Collections.Generic;

namespace SecureAttachmentsDownload.Services
{
    public class SecureUrlGenerator : ISecureUrlGenerator
    {
        private readonly IMemoryCache memoryCache;

        public SecureUrlGenerator(IMemoryCache memoryCache)
        {
            this.memoryCache = memoryCache ?? throw new ArgumentNullException(nameof(memoryCache));
        }

        public string GenerateSecureAttachmentUrl(string id, string url)
        {
            var token = Guid.NewGuid().ToString().ToLower();
            StoreToken(id, token);
            var separator = url.Contains("?") ? "&" : "?";
            return $"{url}{separator}token={token}";
        }

        public bool ValidateToken(string id, string token)
        {
            var tokens = memoryCache.Get(id);
            if (tokens != null && tokens.Contains(token))
                return true;

            return false;
        }

        public bool ValidateUrl(string url, string id)
        {
            var uri = new Uri(url);
            var queryStringParams = uri.Query.Split("&");
            foreach (var param in queryStringParams)
            {
                var values = param.Split("=");
                if (values[0].ToLower() == "token")
                {
                    return ValidateToken(id, values[1]);
                }
            }

            return false;
        }

        private bool IsTokenValid(string id, string token)
        {
            var tokens = memoryCache.Get(id);
            if (tokens != null && tokens.Contains(token))
                return true;

            return false;
        }

        private void StoreToken(string id, string token)
        {
            var tokens = memoryCache.Get(id);
            if (tokens == null)
                tokens = new List();
            tokens.Add(token);

            memoryCache.Set(id, tokens);
        }
    }
}

In this implementation, I am storing the tokens in asp.net core memory cache. To enable this feature, you have to add the caching service in Starup.cs file

public void ConfigureServices(IServiceCollection services)
        {
            services.AddMemoryCache();
            services.AddMvc();
        }

You can replace the memory cache with a database if you want the tokens to be permanent and in this case you have to add an expiration date.

Before we utilize the secure URL genrator, we need a class to hold the attachments metadata since the user will request the list of attachments first and then download it.
Create a folder called Models and put the following class in it.

namespace SecureAttachmentsDownload.Models
{
    public class AttachmentMetadata
    {
        public int Id { get; set; }

        public string DownloadUrl { get; set; }

        public string Name { get; set; }

        public int FileSize { get; set; }
    }
}

Now, lets get to the part where we utilise our secure URL generator.
The flow will be as below:

  1. The user requests endpoint to return a list of attachments to be displayed to the user. Here, the DownloadUrl will have the token already. This will be secured by tokens
  2. The SPA will display this list to the user as links or buttons that the user can click to download the file. The href for the anchor tag will be the DownloadURl property
  3. The user will click the link to download the attachment
  4. The AttachmentController will be called and the endpoint will validate the token and return the file or else a 401

Open the AttachmentsController file and add the following 2 action methods

  using System.Collections.Generic;
using System.IO;
using System.Linq;
using Microsoft.AspNetCore.Authorization;
using Microsoft.AspNetCore.Hosting;
using Microsoft.AspNetCore.Mvc;
using SecureAttachmentsDownload.Models;
using SecureAttachmentsDownload.Services;

namespace SecureAttachmentsDownload.Controllers
{
    [Produces("application/json")]
    [Route("api/Attachments")]
    //[Authorize]
    public class AttachmentsController : Controller
    {
        private readonly ISecureUrlGenerator _secureUrlGenerator;
        private readonly IHostingEnvironment _hostingEnvironment;

        private readonly List Attachments = new List()
            {
                new AttachmentMetadata
                {
                    Id = 1,
                    Name = "bitcoin.pdf",
                    ContentType = "application/pdf",
                    FileSize = 1024
                },
                  new AttachmentMetadata
                {
                    Id = 2,
                    Name = "report 1.pdf",
                    FileSize = 3024
                },
                  new AttachmentMetadata
                {
                    Id = 3,
                    Name = "report 2.pdf",
                    FileSize = 2024
                }
            };

        public AttachmentsController(ISecureUrlGenerator secureUrlGenerator, IHostingEnvironment hostingEnvironment)
        {
            _secureUrlGenerator = secureUrlGenerator;
            _hostingEnvironment = hostingEnvironment;
        }

        [HttpGet]
        [Route("")]
        public IActionResult Get()
        {
            foreach (var attachment in Attachments)
            {
                var url = Url.Action(nameof(AttachmentsController.Get), "Attachments", new { attachment.Id }, Url.ActionContext.HttpContext.Request.Scheme);
                attachment.DownloadUrl = _secureUrlGenerator.GenerateSecureAttachmentUrl(attachment.Id.ToString(), url);
            }

            return Ok(Attachments);
        }

        [HttpGet]
        [Route("{id}")]
        [AllowAnonymous]
        public IActionResult Get(int id, string token)
        {
            if (!_secureUrlGenerator.ValidateToken(id.ToString(), token))
                return Forbid();

            var attachment = Attachments.FirstOrDefault(a => a.Id == id);
            if (attachment == null)
                return NotFound();

            var stream = new FileStream($"{_hostingEnvironment.WebRootPath}\\Files\\{attachment.Name}", FileMode.Open);

            return File(stream, attachment.ContentType);
        }
    }
}

Now run the application and open the URL /api/Attachments. You will get the following excepttion:

InvalidOperationException: Unable to resolve service for type ‘SecureAttachmentsDownload.Services.ISecureUrlGenerator’ while attempting to activate ‘SecureAttachmentsDownload.Controllers.AttachmentsController’.

To fix it, open the startup.cs file and add the following line to the ConfigureServices method

  public void ConfigureServices(IServiceCollection services)
        {
            services.AddMemoryCache();
            services.AddScoped ();
            services.AddMvc();
        }

Now open the URL api/attachments again and you should see the following JSON response

[
{
"id": 1,
"downloadUrl": "http://localhost:53098/api/Attachments/1?token=b78763c2-0109-4c12-b771-5f5cc5d19017",
"name": "bitcoin.pdf",
"fileSize": 1024,
"contentType": "application/pdf"
},
{
"id": 2,
"downloadUrl": "http://localhost:53098/api/Attachments/2?token=12497a4a-8f08-44ba-b9f6-914c4b484cc5",
"name": "report 1.pdf",
"fileSize": 3024,
"contentType": null
},
{
"id": 3,
"downloadUrl": "http://localhost:53098/api/Attachments/3?token=8647bb52-e47f-4580-8149-0b1d238ab0e2",
"name": "report 2.pdf",
"fileSize": 2024,
"contentType": null
}
]

As you can see, the downloadUrl property has the absolute URL for the file and the `token` query string parameter is appended. If you open the first link in a new browser window, the Action Get(id) will be called and the token will be bound to the parameter token.
In my implementation, I have put some files in a folder called Files under the wwwroot folder. But in actual projects, you may retrieve the files from a Database, FTP or any Document Management System.

If you want to make sure that it is really working, just try to change any character in the token query string and you should get a forbid response from the server. In this example you will get an exception: InvalidOperationException: No authenticationScheme was specified, and there was no DefaultForbidScheme found.
This is because I didn’t configure the authentication middleware.

You can find the source code for this article on GitHub.

This implementation has as flaw. The list of attachments are returned with the download URL and the tokens are saved in memory. If the user didn’t click the link but after sometime, the tokens may have been already expired. So, either you save the tokens in a DB or you before clicking the link, fire an Ajax request to an endpoint that gets the metadata for a single attachment. This way, the downloadUrl will be always fresh and working.

If you have any questions or suggestions, please leave a comment below.

Web API with windows authentication on asp.net Core 2

Most REST services that are being built using asp.net core now are using token based authentication either using asp.net core authentication middleware or third party products such as Identity Server. But, sometimes you only need to build your APIs for intrenal use within your organization who happens to be using Windows Authentication.

In this point, I will explain how to build a web API that utilizes AD for authentication and AD groups for authorization and how to integrate it with authorization policies.

Creating the project

Open Visual Studio 2017, Create new asp.net core Web Application and name it AspnetCoreWindowsAuth, then press Ok. Choose Web API as a project Template and Change the authentication method to Windows then press Ok to create the project.

If you select the project in the solution explorer and press F4, you will find nothing to set the authentication mode to Windows and enable/disable anonmous access just like you used to do in normal MVC web application. This is because it is moved to the launchsettings.json file under the properties folder. If you want to change it, you have to open the file and edit the value of the json property iisSettings which looks like below:

IIS SettingsYou can also modify the URL and SSL settings.

Now, if you run the project, it will run just fine and you can call the default Values controller and see the output and even windows authentication will be working as well and you can get the name of the logged in user using the User.Identity.Name property and it will return the Domain\\username although we didn’t add any authentication code yet in the pipeline

Add windows authentication middleware

Now, lets add the authentication middleware into the request processing pipeline. Add the line  app.UseAuthentication(); in the Configure method just before the  app.UseMvc(); . Remeber that the middlewares run in the same order they were added in the Configure method.

Add the following code in the ConfigureServices method before the services.AddMvc();

services.Configure(options =>
{
options.AutomaticAuthentication = true;
});

services.AddAuthentication(IISDefaults.AuthenticationScheme);

To make sure this is working fine, you can edit the Authorize attribute on the ValuesController and add the role name which should be an AD group name, ex: Employees

[Authorize(Roles ="Employees")]

Now you have asp.net core working fine with Active Directory and you can can authenticate the users according to the AD groups they belong to.

Using Authorization Policies

If you need more fine grained control over your controllers and you need to add more authorizastion logc, then you can go for authorization policies and it is really easy to configure as you can see below. Just add the following lines in the ConfigureServices method before the AddMvc statement

services.AddAuthorization(options =>
{
options.AddPolicy("OnlyEmployees", policy =>
{
policy.AddAuthenticationSchemes(IISDefaults.AuthenticationScheme);
policy.RequireRole(""S-1-5-4");
});
});

Here we defined a policy called OnlyEmployees and it requires the users to be windows authenticated and in the Role named Employees which is eventually mapped to AD group named employees. Notice that I didn’t write the name Employees in the RequireRole method. Instead, the value “S-15-4” was used, which is the SID for the AD Group named Employees. I found that this is how the group names are mapped to Roles in asp.net core and even if you tried to retrive the list of claims that the user have, it will translate to all SIDs of the groups that the user belongs to in AD.

To utilize this policy you have to annotate the controller or method with it as below

[Authorize(Policy = "OnlyEmployees")]
[Route("api/[controller]")]
public class ValuesController : Controller
{

}

By now you should have a working solution that depends on windows authentication and AD groups. Notice that this will only work with windows and most probably IIS.

You can find the code on GitHub if you want to use it or add to it.

https://github.com/haitham-shaddad/aspnetcore-windows-auth