
Feature flags are a way to turn on or off a specific feature in your application. This enables you to hide a feature on production if it is not ready for end users. It can also allow you to give the user the option to enable/disable preview feature as they like. As you can see below, Azure DevOps keeps showing the preview feature tooltip for users to try preview features. A preview feature can be a new page, a new section in a page or a new way of rendering the page.

Feature flags come handy in these situations:
Ship half-finished features: You can always ship features to production and switch off its feature flag to hide it from users.
Experimentation: Deploy a new feature and target specific user group or allow user to experiment these features and provide feedback.
Test in production & Kill a feature: If your feature is incomplete, you can release it and let users try it. if the feature misbehaved, you can simply kill it for everyone as if it was not there in the first place
Trunk-based development: Usually with every feature, you have a feature branch and eventually these branches get merged to the master branch. But now everyone can work on the same branch and release their code to production and switch off their features till it is complete.
Feature Management
With the introduction of Azure App Configuratio, the team introduced a library to manage feature flags in asp.net core. It does not depend on Azure App Configuration though, and you can configure it with appsettings.json
Lets write some code
Create a new asp.net web application (MVC) and choose the Individual Authentication to get the identity database and everything ready for user registration and login

Once the project is created, add a reference to the nuget package Microsoft.FeatureManagement.AspNetCore
Startup.cs changes
You need to inject feature management into the services collection by appending the following line to the ConfigureServices method
        public void ConfigureServices(IServiceCollection services)
        {
            services.AddDbContext<ApplicationDbContext>(options =>
                options.UseSqlServer(Configuration.GetConnectionString("DefaultConnection")));

            services.AddDefaultIdentity<IdentityUser>(options => options.SignIn.RequireConfirmedAccount = true)
                .AddEntityFrameworkStores<ApplicationDbContext>();

             services.AddFeatureManagement();
            services.AddControllersWithViews();
            services.AddRazorPages();
        }
Configuration for feature management
The feature management has to read the configuration for which features exist and which are enabled or disabled. In this article, we will use appsettings.json. By default, it looks for a section called FeatureManagement
  "FeatureManagement": {
    "WelcomeFeature": true,
    "NotWelcomeFeature": false
  }
In the above configuration, we added 2 features
- WelcomeFeature: This is enabled for everyone
- NotWelcomeFeature: This is disabled for everyone
Feature Gate
We defined the features, now we want to use them in the code. Create a new controller with an Index method and annotate the controller with the attribute [FeatureGate]. This attribute accepts the feature name defined in FeatureManagmenet section above. If you try now to run your application and access the path /PreviewFeatures, it should show the message “This is a preview feature controller”. If you change the value from true to false in appsettings for the key WelcomeFeature and refresh the page, it will show page not found. You can override this behavior by using a custom feature disabled handler by calling the UseDisabledFeaturesHandler method after calling AddFeatureManagement().
    [FeatureGate("WelcomeFeature")]
    public class PreviewFeaturesController : Controller
    {
        private readonly ILogger<PreviewFeaturesController> _logger;

        public PreviewFeaturesController(ILogger<PreviewFeaturesController> logger)
        {
            _logger = logger;
        }

        public IActionResult Index()
        {
            return Content("This is a preview feature controller");
        }
    }
Feature Filters
When you add a feature and want the users to select it, the last thing to do is to hard code this logic. With feature filters, you can defer the logic to enable/disable features to custom logic. Each feature filter has a a method called EvaluateAsync. This method returns a boolean indicating whether or not to enable the feature
Add feature filter
Create a new class called UserFeaturesFilter and append the following code
[FilterAlias("UserFeatures")]
public class UserFeaturesFilter : IFeatureFilter
{
    private readonly IServiceScopeFactory _scopeFactory;
    private readonly IHttpContextAccessor _httpContextAccessor;
    public UserFeaturesFilter(IServiceScopeFactory scopeFactory, IHttpContextAccessor httpContextAccessor)
    {
        _scopeFactory = scopeFactory ?? throw new ArgumentNullException(nameof(scopeFactory));
        _httpContextAccessor = httpContextAccessor ?? throw new ArgumentNullException(nameof(httpContextAccessor));
    }

    public async Task<bool> EvaluateAsync(FeatureFilterEvaluationContext context)
    {
        if (!_httpContextAccessor.HttpContext.User.Identity.IsAuthenticated)
            return false;

        using (var scope = _scopeFactory.CreateScope())
        {
            var featuresContext = scope.ServiceProvider.GetRequiredService<FeaturesContext>();
            var userManager = scope.ServiceProvider.GetRequiredService<UserManager<IdentityUser>>();

            var user = await userManager.GetUserAsync(_httpContextAccessor.HttpContext.User);
            var feature = featuresContext.Features.FirstOrDefault(a => a.Name.ToLower() == context.FeatureName.ToLower());

            if (user == null || feature == null)
                return false;

            var userFeature = featuresContext.UserFeatures.FirstOrDefault(f => f.UserId == user.Id && f.FeatureId == feature.Id);
            return userFeature != null;
        }
    }
}
The logic here is to get the current logged in user from the http context then retrieve the features that the user has chosen to subscribe for and if the feature name exist in the database then return true, otherwise, return false. To register this feature filter, you have to change startup.cs file with the following line
services.AddFeatureManagement().AddFeatureFilter<UserFeaturesFilter>();
Now, its time to introduce a new feature that will utilise this feature filter. Edit the appsettings to add a new feature
  "FeatureManagement": {
    "WelcomeFeature": true,
    "NotWelcomeFeature": false,
    "PreviewFeatures": {
      "EnabledFor": [
        {
          "Name": "UserFeatures"
        }
      ]
    }
  }
We added a new feature called PreviewFeatures and instead of using true or false as the value, we added the UserFeatures filter. To test this, we will add the reminder of code used in the feature filter.
Create a Feature and UserFeature classes
    public class Feature
    {
        public int Id { get; set; }
        public string Name { get; set; }
        public string Title { get; set; }
        public string Description { get; set; }

    }
    public class UserFeature
    {
        public int Id { get; set; }
        public string UserId { get; set; }
        public int FeatureId { get; set; }
        public Feature Feature { get; set; }
    }
Create a data context class that will contain these 2 entities
public class FeaturesContext : DbContext
{
    public FeaturesContext(DbContextOptions<FeaturesContext> options)
       : base(options)
    {
    }

    public DbSet<Feature> Features { get; set; }
    public DbSet<UserFeature> UserFeatures { get; set; }
}
Your ConfigureServices method should look like this after registering the new DbContext and add the needed services
    public void ConfigureServices(IServiceCollection services)
    {
        services.AddDbContext<ApplicationDbContext>(options =>
            options.UseSqlServer(Configuration.GetConnectionString("DefaultConnection")));

        services.AddDbContext<FeaturesContext>(options =>
        options.UseSqlServer(Configuration.GetConnectionString("DefaultConnection")));

        services.AddDefaultIdentity<IdentityUser>(options => options.SignIn.RequireConfirmedAccount = true)
            .AddEntityFrameworkStores<ApplicationDbContext>();

        services.AddSingleton<IHttpContextAccessor, HttpContextAccessor>();
        services.AddFeatureManagement().AddFeatureFilter<UserFeaturesFilter>();
        services.AddControllersWithViews();
        services.AddRazorPages();
    }
Now, run the Add-Migration -ContextName FeaturesContext command followed by Update-Databse command to update the database
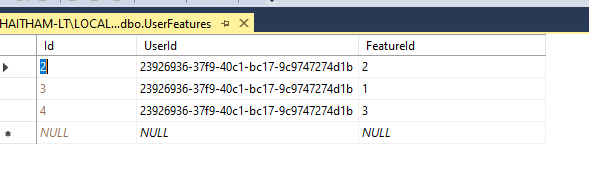
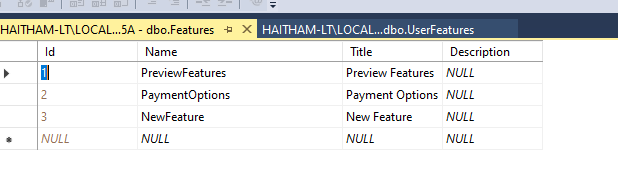
Once you did all above steps, you can mark any controller with the new feature name and edit the database to add a record to the UserFeature table. You wil have to register first and get your user id from AspNetUsers table, and you also have to add a record in the Features table. The feature name has to be the name used in the appsettings.json file
Now try to open your controller, it should work fine, once you remove the record from UserFeatures table, it should show page not found.
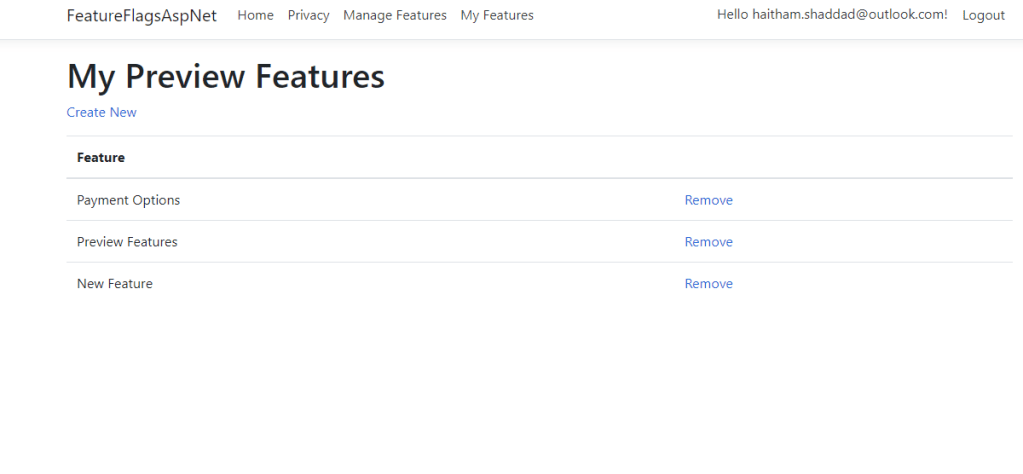
Let users choose what features they want
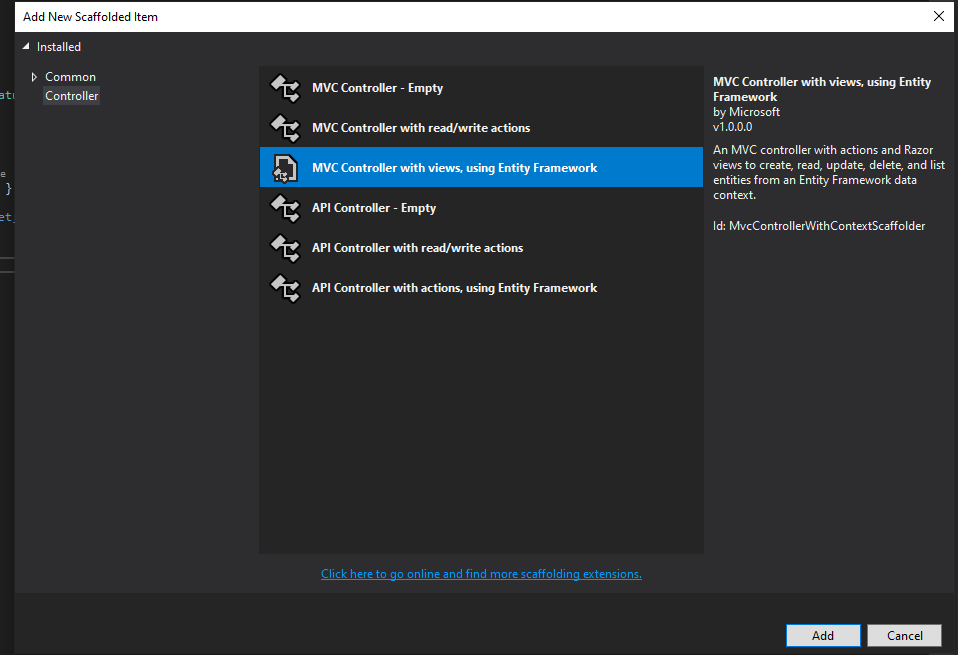
To allow users to choose the preview features they want, you can create a new page and show all the features from Features table and let the user save their choice. The easiest way to do that is to create a new controller and choose MVC Controller based on Entity Framework, this will create a CRUD screens for the UserFeatures table
You can also create the same for Features table to let the admin manage the features.

Informing users about new features
When you deploy a new feature, you need to let the users know about this feature, this can happen using an email, or a tooltip that appears for users or just having a menu link that shows all preview features just like Azure DevOps does. You can for example put the page URL in the Features table and implement a middleware that checks the current request path and check if there are any features that has the same URL and show a popup for the user to choose this feature.
Source code
I have added all the source code for this article on GitHub, you can download and run the sample app. It has the complete solution.
If you have any questions or suggestions, please let me know.
