Create an Angular todo list with azure static web apps Part 2

In the previous post , we created the first part of our todo list that will be deployed to Azure Static Web App service. In this post, we will add the backend as an Azure Function

List ToDos Azure Function

Create a new folder with the name api then make sure you have Azure Functions extension install in VS code. Press F1, this will show the command window in vs code, type functions and select Azure Functions: Create New Project, choose api\GetTodoList as the folder for the Azure Function, choose JavaScript as the language (As per today, Static Web Apps only support JavaScript functions), HttpTriger as the trigger and GetTodoList as the function name and finally Anonymous as the authentication method. This will create all the files needed for you function.

Get Todos implementation

Now, let’s put a dummy implementation for the GetToDos function.

Edit the index.js file with the following code. This will return 4 Todos. The implementation can be changed later to connect to any other data source

module.exports = async function (context, req) {
    context.log('JavaScript HTTP trigger function processed a request.');
    const responseMessage =  [
         { Title : "Read Microfronts book", IsCompleted : false},
         { Title : "Post a blog about Project Tye", IsCompleted : false},
         { Title : "Get some exercises", IsCompleted : true},
         { Title : "Do more stuff", IsCompleted : false},
    ];

    context.res = {
        // status: 200, /* Defaults to 200 */
        body: responseMessage
    };
}

Go to your Az Functions Tools and run the function, it should show the funcion URL in the console window

Hit http://localhost:7071/api/GetTodoList in your browser and you should be able to see the results in JSON

You can follow the same steps to create another function to add and edit Todo.

Deploy the API to Azure Static Web App

Commit and push the changes to your GitHub Repo and watch GitHub actions building and packaging the application. All the code in the repo will be built and packaged including the Azure Function.

Validating deployment

Once the GitHub action finishes and show a success mark, open Azure Portal and go to your Azure Static Web App then click Functions on the left menu. You should be able to see the GetTodoList function there.

Function Configuration

Once you have the function deployed, you can add configuration keys under Configuration section. One of the configuration is APPINSIGHTS_INSTRUMENTATIONKEY that can be used to link your static web app to an application insights instance which will recive all the logs made by your function using the context.log function.

Testing your API

Its time to make sure everything works fine. Click the overview tab then click on the URL for the site, it should open the static site web created in previous post. To access the API, you have to append api/FUNCTION_NAME. in our case, it will be URL/api/GetTodoList

Inspect function behavior with application insights

Since our function is now working fine, a bonus point would be to check the logs generated from it. After you create an application insights instance and add a configuration key APPINSIGHTS_INSTRUMENTATIONKEY with the app insights instrumention key, invoke the function few times then go to your app insights instance and click Search from the left menu. You should be able to see the logs

As you can see above, not only you can see the messages logged from the function but also from the azure functions runtime.

In next post, we will link the SPA to our APIs and do more fancy stuff.

The source code can be found on my GitHub repository. All you need to do is to fork it, create a new static web app and link it to the repo. https://github.com/haitham-shaddad/ng-todo-list-az-static-webapp

Advertisement

Create Azure Bot Service from Scratch using Empty Asp.Net Core

To create a new Azure Bot Service Project, you can use the easy way by utilising the Azure Bot Service SDK Templates which you can download here. You will also need the Bot Service SDK which is a list of nuget packages. Current version is 4

Once you downloaded the bot template, installed it, you should find a new project template in visual studio. You can choose a project name, click Ok and you will end up with an echo bot that repeats what you say.

Visual Studio project

But this isn’t fun. In this post, I will create an empty asp.net project and add the needed boilerplate to make it a bot. Lets get started

Open Visual Studio (I am using VS 2019 Preview 2). CLick New Project, select Asp.net Core Web Application, name is HelloAzureBot and Choose Empty as the project template. Then click Ok

Adding reference to Bot Service SDK

To enable bot service in our asp.net core web app, we will need to add reference to the Bot SDK packages. We need the following packages:

  • Microsoft.Bot.Builder
  • Microsoft.Bot.Builder.Integration.AspNet.Core
  • Microsoft.Bot.Configuration
  • Microsoft.Bot.Connector
  • Microsoft.Bot.Schema

You can add it via NuGet Package manager Console, Manage NuGet Packages dialog or you just edit the project file and add the following to it:


<PackageReference Include="Microsoft.Bot.Builder" Version="4.2.2" />
<PackageReference Include="Microsoft.AspNetCore.Razor.Design" Version="2.2.0" PrivateAssets="All" />
<PackageReference Include="Microsoft.Bot.Builder.Integration.AspNet.Core" Version="4.2.2" />
<PackageReference Include="Microsoft.Bot.Configuration" Version="4.2.2" />
<PackageReference Include="Microsoft.Bot.Connector" Version="4.2.2" />
<PackageReference Include="Microsoft.Bot.Schema" Version="4.2.2" />

Your project file should look like this now:

Injecting Bot Service in Asp.Net Core

Now, lets inject the Bot Service into asp.net core middleware. This will basically create an endpoint that will accept post requests sent to /api/messages .
Open startup.cs file and in Configure method, add the following line. Don’t forget to remove the default middleware that print hello world.

app.UseBotFramework();

Now, our solution is ready to create a new Bot.
Create a new class and name it EchoBot. Make it inherits from IBot interface and implement the OnTurnAsync. This is the method that get called when its your bot’s turn to speak to the user.

    public class EchoBot : IBot
    {
        public async Task OnTurnAsync(ITurnContext turnContext, CancellationToken cancellationToken = default(CancellationToken))
        {
            await turnContext.SendActivityAsync($"Hi, You said: {turnContext.Activity.Text}");
        }
    }

This is a very simple bot that does nothing but echo what you say. To send a message to the user, we use the TurnContext.SendActivtyAsync. Note that activity is any thing (message, voice, card ..) going between the user and the bot.

Tell Bot service about your Bot

Now, your project is ready except that it does not know about your Bot.We injected the Bot Service in the asp.net core middleware but we didn’t tell it about the echo bot. Its the same process as configuring MVC in Configure method but we have to also inject it a service in the ConfigureServices method. Now open startup.cs file again and edit the ConfigureServices method to match the following:

        public void ConfigureServices(IServiceCollection services)
        {
            services.AddBot<EchoBot>();
        }

Testing the Echo Bot

The bot is ready now to accept chat requests. Press F5 to run your project. It will open the browser with a new windows that tells you that no page can be found. This is normal as we didn’t inject any middleware to handle the root URL. In the SDK template, it uses static HTML file under wwwroot that has an introduction to the service. But this is not mandatory.

To test the bot, we will need a channel to talk to it. Microsoft released the bot emulator for that purpose. It allows you to connect and chat with your bot without deploying it to Azure Bot Service. The current emulator version is 4. But for some reason, it just does not work with me for local bots. It needs the bot to be deployed to Azure or at least create an Azure Bot Service and configure the Bot URL to be your local bot. You will expose the bot to Azure using ngrok. Another option is to just use Emulator V3 which you can easily provide the Bot URL which takes the format http://localhost:PORT/api/messages.

Bot Emulator

Download the Bot Emulator V3 from here and install it then run it. On the top, add the URL for your Bot in the format mentioned before and hit enter. Start playing around and enter any message and you should receive the reply with: Hi, You said: YOUR_MESSAGE.

You will notice that you will immediately receive the messages: “Hi, You said: and Hi, You said:” just after you entered the Bot URL. This is because the OnTurnAsync method is called when the user joins and when the bot joins or when you send a message. To filter, you have to add the following to your OnTurnAsync method

        public async Task OnTurnAsync(ITurnContext turnContext, CancellationToken cancellationToken = default(CancellationToken))
        {
            if (turnContext.Activity.Type == ActivityTypes.Message)
            {
                await turnContext.SendActivityAsync($"Hi, You said: {turnContext.Activity.Text}");
            }
        }

You can check if the activity type is ActivityTypes.ConversationUpdate and then check the turnContext.Activity.MembersAdded property and use that to send a message to welcome the new members. ex: John has joined the conversation.

Handling Errors

When your bot encounters an issue or unhandled exception, you can catch that exception through an error handler. You can configure that in the ConfigureServices method when you call the AddBot method. The Startup.cs should be as below. We utilise the OnTurnError handler to send a message to the user informing him/her that something went wrong and log the exception.

 public class Startup
    {
        public ILoggerFactory LoggerFactory { get; }

        public Startup( ILoggerFactory loggerFactory)
        {
            this.LoggerFactory = loggerFactory;
        }

        // This method gets called by the runtime. Use this method to add services to the container.
        // For more information on how to configure your application, visit https://go.microsoft.com/fwlink/?LinkID=398940
        public void ConfigureServices(IServiceCollection services)
        {
            services.AddBot<EchoBot>(options =>
            {
                // Creates a logger for the application to use.
                ILogger logger = this.LoggerFactory.CreateLogger<EchoBot>();

                // Catches any errors that occur during a conversation turn and logs them.
                options.OnTurnError = async (context, exception) =>
                {
                    logger.LogError($"Exception caught : {exception}");
                    await context.SendActivityAsync("Sorry, it looks like something went wrong.");
                };
            });
        }

        // This method gets called by the runtime. Use this method to configure the HTTP request pipeline.
        public void Configure(IApplicationBuilder app, IHostingEnvironment env)
        {
            if (env.IsDevelopment())
            {
                app.UseDeveloperExceptionPage();
            }

            app.UseBotFramework();
        }
    }

.Bot File

The emulator that comes with SDK V4 uses a .bot file that describes the bot, the services that the bot uses and the URL where it runs.
A typical .bot file contains the following:

{
  "name": "HelloAzureBot",
  "services": [
    {
      "type": "endpoint",
      "name": "development",
      "endpoint": "https://localhost:44331/api/messages",
      "appId": "",
      "appPassword": "",
      "id": "1"
    }
  ],
  "padlock": "",
  "version": "2.0"
}

The content of the file is self explanatory but the most important details are the name and endpoint. This is what tells the Emulator how to reach your bot.
If the bot is deployed on Azure Bot Service, you will need to provide the appId and appPassword

That will be the end of our post. In the next post, we will talk about the state management. If you didn’t read the previous post, please do.

Download Attachments in Single Page App and Asp.Net Core

Introduction

If you have a SPA built with any JavaScript framework and it has an attachment feature, you must hit the part where you need to allow the user to download an attachment and the App is authenticating users using Tokens.

The problem

With normal forms authentication based on cookies the browser will simply send the authentication cookie with each request to your web server without you doing anything. If you have a link that will allow the user to download a file from your server, the browse will automatically send the authentication cookie when the user clicks the link. This makes it so easy for you. But if you are using token based authentication, it is your responsibility to send a token for each request sent to the server via Ajax by using the Authorization header.

Unfortunately, you cannot control the headers sent to the server if the user is opening a link in a new browser window and the user will end up with unauthorized request.

The solution

Download the file using Ajax Request

In this solution, you have to request the endpoint that downloads the file using Ajax Request which will include the authorization header and then get all the file content in a variable and push the content to the user. This works fine if the file size is very small. But imagine the case when you are downloading a 500MB file. This is not going to work since the file is stored in a JavaScript variable before the download takes place.

Make the API that download the attachment anonymous

If the endpoint that downloads the file doesn’t require authentication then we are good. But now the file will be available for every one to download. So, we have to find a way to secure the file even when the endpoint is anonymous.

If you have some experience with Azure Storage, you may have heard of Azure Storage Shared Access Signature. The idea is simple. When the user requests a file, generate a token, save it to a temporary storage  and append it to the URL of the download file endpoint. When the user clicks the link, the endpoint will be called and the token will be validated against the temporary storage and if it matches then send the file contents. This way we will be sure that the link was generated by the application to that user. Still, if the link was shared to another user, he will be able to download the file. But this is another issue that we can worry about later.

Implementation

We will create a new asp.net core site with an endpoint to download files but I will not create a SPA in this article. That will be left for the reader. I will test the idea though using Postman.

Open Visual Studio, Create a new project of type “Asp.NET Core Web Application” then Choose “API” in the next dialog. You can still choose “Web Application (Model-View-Controller)”. I will leave authentication to the default “No Authentication”.

Right Click on the Controllers folder and choose “New Controller”, choose “API Controlller – Empty” and name it AttachmentsController. You should end up with the following

[Produces("application/json")]
[Route("api/Attachments")]
 //[Authorize]
public class AttachmentsController : Controller
{
}

Notice that I have commented the [Authorize] attribute since I didn’t setup authentication in this demo. In real life scenario, you will setup authentication and authorization using Token based Authentication.

Create a folder named Services and then create a new interface called ISecureUrlGenerator. The content should look like the following:

   public interface ISecureUrlGenerator
    {
        string GenerateSecureAttachmentUrl(string id, string url);
        bool ValidateUrl(string url, string id);
        bool ValidateToken(string id, string token);
    }

Now, add class to implement the previous interface

using Microsoft.Extensions.Caching.Memory;
using System;
using System.Collections.Generic;

namespace SecureAttachmentsDownload.Services
{
    public class SecureUrlGenerator : ISecureUrlGenerator
    {
        private readonly IMemoryCache memoryCache;

        public SecureUrlGenerator(IMemoryCache memoryCache)
        {
            this.memoryCache = memoryCache ?? throw new ArgumentNullException(nameof(memoryCache));
        }

        public string GenerateSecureAttachmentUrl(string id, string url)
        {
            var token = Guid.NewGuid().ToString().ToLower();
            StoreToken(id, token);
            var separator = url.Contains("?") ? "&" : "?";
            return $"{url}{separator}token={token}";
        }

        public bool ValidateToken(string id, string token)
        {
            var tokens = memoryCache.Get(id);
            if (tokens != null && tokens.Contains(token))
                return true;

            return false;
        }

        public bool ValidateUrl(string url, string id)
        {
            var uri = new Uri(url);
            var queryStringParams = uri.Query.Split("&");
            foreach (var param in queryStringParams)
            {
                var values = param.Split("=");
                if (values[0].ToLower() == "token")
                {
                    return ValidateToken(id, values[1]);
                }
            }

            return false;
        }

        private bool IsTokenValid(string id, string token)
        {
            var tokens = memoryCache.Get(id);
            if (tokens != null && tokens.Contains(token))
                return true;

            return false;
        }

        private void StoreToken(string id, string token)
        {
            var tokens = memoryCache.Get(id);
            if (tokens == null)
                tokens = new List();
            tokens.Add(token);

            memoryCache.Set(id, tokens);
        }
    }
}

In this implementation, I am storing the tokens in asp.net core memory cache. To enable this feature, you have to add the caching service in Starup.cs file

public void ConfigureServices(IServiceCollection services)
        {
            services.AddMemoryCache();
            services.AddMvc();
        }

You can replace the memory cache with a database if you want the tokens to be permanent and in this case you have to add an expiration date.

Before we utilize the secure URL genrator, we need a class to hold the attachments metadata since the user will request the list of attachments first and then download it.
Create a folder called Models and put the following class in it.

namespace SecureAttachmentsDownload.Models
{
    public class AttachmentMetadata
    {
        public int Id { get; set; }

        public string DownloadUrl { get; set; }

        public string Name { get; set; }

        public int FileSize { get; set; }
    }
}

Now, lets get to the part where we utilise our secure URL generator.
The flow will be as below:

  1. The user requests endpoint to return a list of attachments to be displayed to the user. Here, the DownloadUrl will have the token already. This will be secured by tokens
  2. The SPA will display this list to the user as links or buttons that the user can click to download the file. The href for the anchor tag will be the DownloadURl property
  3. The user will click the link to download the attachment
  4. The AttachmentController will be called and the endpoint will validate the token and return the file or else a 401

Open the AttachmentsController file and add the following 2 action methods

  using System.Collections.Generic;
using System.IO;
using System.Linq;
using Microsoft.AspNetCore.Authorization;
using Microsoft.AspNetCore.Hosting;
using Microsoft.AspNetCore.Mvc;
using SecureAttachmentsDownload.Models;
using SecureAttachmentsDownload.Services;

namespace SecureAttachmentsDownload.Controllers
{
    [Produces("application/json")]
    [Route("api/Attachments")]
    //[Authorize]
    public class AttachmentsController : Controller
    {
        private readonly ISecureUrlGenerator _secureUrlGenerator;
        private readonly IHostingEnvironment _hostingEnvironment;

        private readonly List Attachments = new List()
            {
                new AttachmentMetadata
                {
                    Id = 1,
                    Name = "bitcoin.pdf",
                    ContentType = "application/pdf",
                    FileSize = 1024
                },
                  new AttachmentMetadata
                {
                    Id = 2,
                    Name = "report 1.pdf",
                    FileSize = 3024
                },
                  new AttachmentMetadata
                {
                    Id = 3,
                    Name = "report 2.pdf",
                    FileSize = 2024
                }
            };

        public AttachmentsController(ISecureUrlGenerator secureUrlGenerator, IHostingEnvironment hostingEnvironment)
        {
            _secureUrlGenerator = secureUrlGenerator;
            _hostingEnvironment = hostingEnvironment;
        }

        [HttpGet]
        [Route("")]
        public IActionResult Get()
        {
            foreach (var attachment in Attachments)
            {
                var url = Url.Action(nameof(AttachmentsController.Get), "Attachments", new { attachment.Id }, Url.ActionContext.HttpContext.Request.Scheme);
                attachment.DownloadUrl = _secureUrlGenerator.GenerateSecureAttachmentUrl(attachment.Id.ToString(), url);
            }

            return Ok(Attachments);
        }

        [HttpGet]
        [Route("{id}")]
        [AllowAnonymous]
        public IActionResult Get(int id, string token)
        {
            if (!_secureUrlGenerator.ValidateToken(id.ToString(), token))
                return Forbid();

            var attachment = Attachments.FirstOrDefault(a => a.Id == id);
            if (attachment == null)
                return NotFound();

            var stream = new FileStream($"{_hostingEnvironment.WebRootPath}\\Files\\{attachment.Name}", FileMode.Open);

            return File(stream, attachment.ContentType);
        }
    }
}

Now run the application and open the URL /api/Attachments. You will get the following excepttion:

InvalidOperationException: Unable to resolve service for type ‘SecureAttachmentsDownload.Services.ISecureUrlGenerator’ while attempting to activate ‘SecureAttachmentsDownload.Controllers.AttachmentsController’.

To fix it, open the startup.cs file and add the following line to the ConfigureServices method

  public void ConfigureServices(IServiceCollection services)
        {
            services.AddMemoryCache();
            services.AddScoped ();
            services.AddMvc();
        }

Now open the URL api/attachments again and you should see the following JSON response

[
{
"id": 1,
"downloadUrl": "http://localhost:53098/api/Attachments/1?token=b78763c2-0109-4c12-b771-5f5cc5d19017",
"name": "bitcoin.pdf",
"fileSize": 1024,
"contentType": "application/pdf"
},
{
"id": 2,
"downloadUrl": "http://localhost:53098/api/Attachments/2?token=12497a4a-8f08-44ba-b9f6-914c4b484cc5",
"name": "report 1.pdf",
"fileSize": 3024,
"contentType": null
},
{
"id": 3,
"downloadUrl": "http://localhost:53098/api/Attachments/3?token=8647bb52-e47f-4580-8149-0b1d238ab0e2",
"name": "report 2.pdf",
"fileSize": 2024,
"contentType": null
}
]

As you can see, the downloadUrl property has the absolute URL for the file and the `token` query string parameter is appended. If you open the first link in a new browser window, the Action Get(id) will be called and the token will be bound to the parameter token.
In my implementation, I have put some files in a folder called Files under the wwwroot folder. But in actual projects, you may retrieve the files from a Database, FTP or any Document Management System.

If you want to make sure that it is really working, just try to change any character in the token query string and you should get a forbid response from the server. In this example you will get an exception: InvalidOperationException: No authenticationScheme was specified, and there was no DefaultForbidScheme found.
This is because I didn’t configure the authentication middleware.

You can find the source code for this article on GitHub.

This implementation has as flaw. The list of attachments are returned with the download URL and the tokens are saved in memory. If the user didn’t click the link but after sometime, the tokens may have been already expired. So, either you save the tokens in a DB or you before clicking the link, fire an Ajax request to an endpoint that gets the metadata for a single attachment. This way, the downloadUrl will be always fresh and working.

If you have any questions or suggestions, please leave a comment below.

Web API with windows authentication on asp.net Core 2

Most REST services that are being built using asp.net core now are using token based authentication either using asp.net core authentication middleware or third party products such as Identity Server. But, sometimes you only need to build your APIs for intrenal use within your organization who happens to be using Windows Authentication.

In this point, I will explain how to build a web API that utilizes AD for authentication and AD groups for authorization and how to integrate it with authorization policies.

Creating the project

Open Visual Studio 2017, Create new asp.net core Web Application and name it AspnetCoreWindowsAuth, then press Ok. Choose Web API as a project Template and Change the authentication method to Windows then press Ok to create the project.

If you select the project in the solution explorer and press F4, you will find nothing to set the authentication mode to Windows and enable/disable anonmous access just like you used to do in normal MVC web application. This is because it is moved to the launchsettings.json file under the properties folder. If you want to change it, you have to open the file and edit the value of the json property iisSettings which looks like below:

IIS SettingsYou can also modify the URL and SSL settings.

Now, if you run the project, it will run just fine and you can call the default Values controller and see the output and even windows authentication will be working as well and you can get the name of the logged in user using the User.Identity.Name property and it will return the Domain\\username although we didn’t add any authentication code yet in the pipeline

Add windows authentication middleware

Now, lets add the authentication middleware into the request processing pipeline. Add the line  app.UseAuthentication(); in the Configure method just before the  app.UseMvc(); . Remeber that the middlewares run in the same order they were added in the Configure method.

Add the following code in the ConfigureServices method before the services.AddMvc();

services.Configure(options =>
{
options.AutomaticAuthentication = true;
});

services.AddAuthentication(IISDefaults.AuthenticationScheme);

To make sure this is working fine, you can edit the Authorize attribute on the ValuesController and add the role name which should be an AD group name, ex: Employees

[Authorize(Roles ="Employees")]

Now you have asp.net core working fine with Active Directory and you can can authenticate the users according to the AD groups they belong to.

Using Authorization Policies

If you need more fine grained control over your controllers and you need to add more authorizastion logc, then you can go for authorization policies and it is really easy to configure as you can see below. Just add the following lines in the ConfigureServices method before the AddMvc statement

services.AddAuthorization(options =>
{
options.AddPolicy("OnlyEmployees", policy =>
{
policy.AddAuthenticationSchemes(IISDefaults.AuthenticationScheme);
policy.RequireRole(""S-1-5-4");
});
});

Here we defined a policy called OnlyEmployees and it requires the users to be windows authenticated and in the Role named Employees which is eventually mapped to AD group named employees. Notice that I didn’t write the name Employees in the RequireRole method. Instead, the value “S-15-4” was used, which is the SID for the AD Group named Employees. I found that this is how the group names are mapped to Roles in asp.net core and even if you tried to retrive the list of claims that the user have, it will translate to all SIDs of the groups that the user belongs to in AD.

To utilize this policy you have to annotate the controller or method with it as below

[Authorize(Policy = "OnlyEmployees")]
[Route("api/[controller]")]
public class ValuesController : Controller
{

}

By now you should have a working solution that depends on windows authentication and AD groups. Notice that this will only work with windows and most probably IIS.

You can find the code on GitHub if you want to use it or add to it.

https://github.com/haitham-shaddad/aspnetcore-windows-auth

Using GenFu to fill your database with dummy data

When you deliver a training or present a session or even start a new project, you want some test data pre-filled in your application instead of having to start with a fresh empty database.

Sometimes you don’t even need a database, you just want to display a list of customers in a grid to show your audience something, so, lets assume you have a Customer class that has the following definition

public class Customer
    {
        public int Id { get; set; }
        public string FirstName { get; set; }
        public string LastName { get; set; }
        public string Genger { get; set; }
        public string PhoneNumber { get; set; }
        public string Address { get; set; }
        public DateTime BirthDate { get; set; }
    }

You would normally do the following in your code:

 public ActionResult Index()
        {
            var listOfCustomers = new List<Customer>();

            listOfCustomers.Add(new Customer { Id = 1, FirstName = "John", LastName = "Smith", Address = "Someaddress", BirthDate = DateTime.Now.Subtract(TimeSpan.FromDays(9000)) });
            listOfCustomers.Add(new Customer { Id = 1, FirstName = "Mark", LastName = "Johnson", Address = "Someaddress", BirthDate = DateTime.Now.Subtract(TimeSpan.FromDays(9000)) });
            listOfCustomers.Add(new Customer { Id = 1, FirstName = "Jackson", LastName = "Clark", Address = "Someaddress", BirthDate = DateTime.Now.Subtract(TimeSpan.FromDays(9000)) });
            listOfCustomers.Add(new Customer { Id = 1, FirstName = "Emillia", LastName = "Smith", Address = "Someaddress", BirthDate = DateTime.Now.Subtract(TimeSpan.FromDays(9000)) });

            return View(listOfCustomers);
        }

And the results would be:

list of customers

Seems good but not very satisfying and requires a lot of work specially if you want to show a lot of records to have paging for example.

GenFu is a very exciting library that can save you all this time, it uses code to generate real-time person information including names, address, birth date  and a lot more.

To use GenFu, all you have to do is to install its package using NuGet package manager, so  from VS, select tools -> NuGet Package Manager -> Package Manager Console and type the following command

install-package GenFu

Then replace the code written above to create list of customers with the following code:

  public ActionResult Index()
        {
            var listOfCustomers = A.ListOf<Customer>(20);

            return View(listOfCustomers);
        }

With just one line of code, it will create a 20 records with real data, and the results will be like this:

list of customers with genfu.PNG


To use GenFu to pre fill your database with some records, you can add the same line of code inside the Seed method in your Migration class, just like below

 
 internal sealed class Configuration : DbMigrationsConfiguration<GenFuDemo.Models.CustomersContext>
    {
        public Configuration()
        {
            AutomaticMigrationsEnabled = false;
        }

        protected override void Seed(GenFuDemo.Models.CustomersContext context)
        {
            context.Customers.AddOrUpdate(c => c.FirstName, A.ListOf<Customer>(20).ToArray());
        }
    }

This method will run when you run the update-database command and the data will be inserted into the Customer table

To read more about GenFu, you can visit its GitHub repository, it offers more features like customizing the way it generates or giving hints about some properties that it may not understand, for ex: if you have a property named NightNumber, which is a phone number, in this case you can instruct GenFu using its Fluent APIs to generate phone numbers for the property NightNumber

Building a LOB application with MVC 5 – Part 5 – Views

This is the sixth part of building line of business application using MVC 5, you can read the previous parts through the following links

  1. Building a LOB application with MVC 5 – Part 0
  2. Building a LOB application with MVC 5 – Part 1
  3. Building a LOB application with MVC 5 – Part 2 – Models and Generic Repository
  4. Building a LOB application with MVC 5 – Part 3 – EntityFramework
  5. Building a LOB application with MVC 5 – Part 4 – Controllers, Routes and Areas

In the previous part, we introduced controllers, routes and areas and we created the needed controllers and areas.

In this part, we will introduce views, so by the end of this post, we will finally have something that we can see.

What are Views?

We talked about the M and C, so we have the V from MVC remaining, in web forms, we mainly have the logic and view in one place (aspx), but in MVC, the presentation of the your data is the responsibility of the View, your controller intercept the request, call the business logic, and select how it wants to display the data.

You can display it as a text, Image, Chart, HTML or a downloadable file, in web forms you would have to create a separate web form for each view, but in MVC, you only have to duplicate the view part.

So, for now, lets just say that Views are this pieces that we see the system through it, it used to display the  information passed to it from the controller to the users and capture information from the users and forward it to the controller for updates

What is View Engine?

When MVC was released, the views were aspx pages and you had to write these annoying opening and closing tags from web forms era, but later you had the option to either use web forms rendering or the new views engine called Razor.

Razor is much more clean way of writing your views, basically it is all HTML unless you started with @ symbol, this is where the compiler assumes that you want to have a server side code

The View Engine is responsible for translating the written code either in aspx or Razor syntax and produce the final HTML, you can access the list of installed view engines by calling the  ViewEngines.Engines property, you can also add a new custom engine to this list by implementing the interface IViewEngine.

As you can see below, MVC 5 is shipped with 2 view engines

  1. WebFormViewEngine which renders the ASPX pages into HTML
  2. RazorViewEngine which renders the .cshtml files used in razor to HTML

view engines.PNG

When you expand the RazorViewEngine, you will see the following:

razor view engine details.PNG

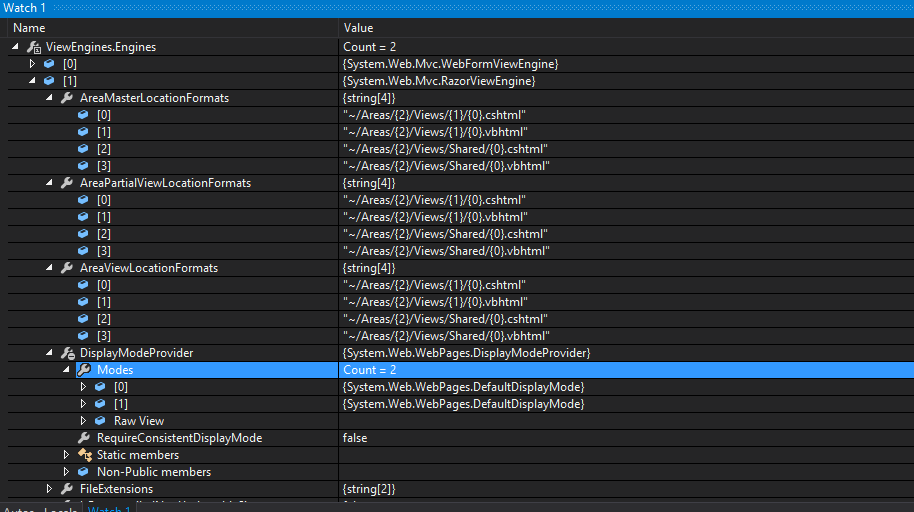
As you can see above and as we stated in previous posts, MVC uses conventions over configuration, so by default the controller action will search for a view with the same action name inside a folder with the same controller name without the word Controller inside the Views folder, you can change these conventions by editing the corresponding property in the view engine and make sure to add this code in the Global.asax to make sure it is executed first thing when the application starts.

Layout Page (Master Page)

MVC has the same concept of Master page in web forms, only it is called Layout page here, by default the layout is set for any view unless you set the property Layout to null as below

layout null

if you didn’t do that, then the view will inherit the default Layout which is by convention again resides in Views\Shared\_Layout.cshtml

You can have more than one layout in your project, and you can set the layout for the view by setting the Layout property to the custom layout path, ex:


Layout = "~/Views/Shared/_CustomLayoutPage.cshtml";

Razor Syntax

Razor syntax is very similar to normal HTML unless when it starts with @ symbol, to have more details about it, please read more from microsoft site Razor Syntax

Passing data from Controllers to views

Since the view will be displaying data to the end users, we nee to pass this data from the controllers into the view, this happens in 2 ways

Strongly Typed Views

With strongly typed views, the view knows what is the data type of the model and you can reference the properties of the model inside your view code by using the Model property, visual studio supports  intellisense for this.

you can set the model type for the view by adding the following lines at the begenning of the view

@model AppointmentManager.Web.Models.AddPhoneNumberViewModel

To see it in action, you can open the file \Views\Manage\AddPhoneNumber.cshtml and examine the code

You can pass the data from your action to the view by adding the model object into the View method as below, if you used View() without any value and tried to access the Model  object inside the view, it will throw a null exception

pass model to view.PNG

Weakly Typed Views

In this type, you don’t specify the type of the model, you just pass the data you need to the view using 3 predefined properties:

  1. ViewBag, this is a dynamic object, so you can simply write ViewBag.Message = “Hello” in your action and in the view you can read it by adding @ViewBag.Message, the ViewBag variables are available only for the current view, so if you have an action called Index and you set a message variable inside it, you can access it only in the Index view, if you navigated to another action, then you can’t access it from there
  2. ViewData, this is the same as the ViewBag except it is a dictionay, so to add a key to it from your controller you either use ViewData.Add(“Key”,”Value”), or you can simply write ViewData[“Key”]=”value” and in your view just write @ViewData[“Key”]
  3. TempData, this is the same as teh ViewBag except that its lifecycle is a little bit longer, you can access it from the next action, so if you set the value of a variable called Message in your Create action that is called when the user post a form then you redirected to the Index action, you can then call teh Message variable from the Index action, this can be used to show a confirmation message when the user is redirected fom a page to another, note that after the redirection, the variable will be lost, so you can’t use it again.

Create Views

To create a view, you can go select the folder inside the Views folder where you want to add your view, right click and select Add -> View

Or you can go to your controller, put the cursor inside the action that you wants to generate view for it, and right click then select Add View.

Lets do that together.

Expand Areas, then Admin, right click Controllers and add an Empty Controller named ServiceTypes, this will be used to administer service types.

Add a project reference to the following projects inside the web project

  1. AppointmentManager.Models
  2. AppointmentManager.Repository
  3. AppointmentManager.Repository.EntityFramework

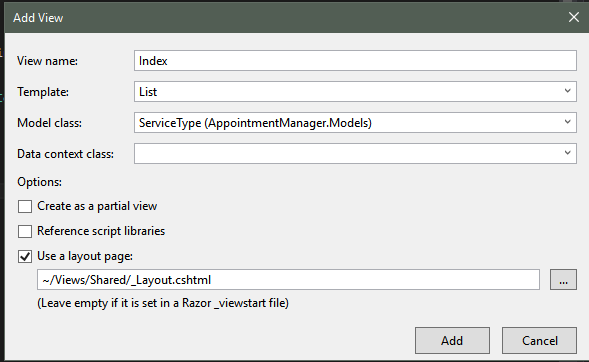
Right Click inside the Index action and choose Add View, leave the view name as is to avoid writing the name explicitly inside the action, choose the template as List, this will create a listing page, you can find the rest of templates for CRUD operations, select the model class that VS will use to generate the view using scaffolding technique, you can choose the Layout page then click Add

create view
Once done, the generated view file will be opened in VS and you can inspect the code, the first thing you will notice is the word @Html is mentioned a lot

HTML Helpers

If you have a form that accepts a username and password, you can write it as below

<input type="text" name="username" id="username" value="" />
<input type="password" name="password" id="password" value="" />

And if the model property was changed then you have to revist your HTML and update it to be the same as your model, also this is a lot of code to be written, so MVC offrers HTML helpers to save your time, the above code can be replaced by:

 @Html.TextBoxFor(m => m.Email)
 @Html.LabelFor(m => m.Password)

The above code will generate the same code and you can add more properties like css classes and other attributes.

To read more about HTML helpers and how you can create your own helpers, please visit this link


Model Binding

Now, the user browsed to your application, clicked register, and he is redirected now to the /Account/Register which means the account controller and register action, we have a register view which draws some input fields to capture the user information, the user adds the required information and clicked Submit.

In web forms, we used to do a lot of person.Name = txtName.Text

But in MVC, we don’t have to do that as MVC does it for us using something called Model Binding

When your action accepts a parameter and the user submit an request to this action, MVC automatically create an instance of this object and start to fill its properties from the request body, query string, route values, all these sources called Value Providers, you can add a custom value provider by going through the following post

MVC fill the object properties with request parameters that has the same name, so, if you have a class called Customer, and inside it you have FirstName and LastName, then MVC inspect the request for a query string or form values with the same names.

If the default model binder doesn’t meet your expectations, you can create your own, to read more please see MVC Model Binders

Scaffolding

Remember when we added a view and chose the template type as List and the model type as ServiceType and suddenly we have a listing screen? this is called Scaffolding and it happens using T4 Templates that visual studio runs.

To customize these templates, you have to do the following:

  1. Open C:\Program Files (x86)\Microsoft Visual Studio 12.0\Common7\IDE\Extensions\Microsoft\Web\Mvc\Scaffolding\Templates
  2. Create a folder called CodeTemplates in the web project root directory
  3. Copy the template you want into this folder and customize it, ex: MvcControllerEmpty, open it and customize it the way you want.

After that, create a new item from this template by following the same normal procedure, Right Click the project file-> Add -> New

You will see the updates you made applied to the newly created file, VS is smart enough to override the template with the one in your project.

Annotations and Validations

HTML Helpers can use any annotation attributes defined for each class property and it will use it generate the correct input control and add the right validation.

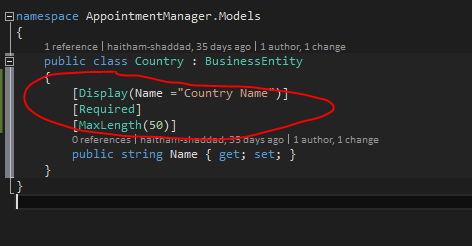
Ex: When we add the Required, MaxLength and Display attribute to the Name property inside the Country class, it will generate an extra validation for the textbox generated in the view, it will make the field required and has a max length of 50 charactres, it will also change the label from Name to Country Name

annotation

Not only this, but it will also impact the EntityFramework code first, when you run the application, EF will compare the model with the database and finds that the Name property has been changed and ti will ask you to add another migration in order to mark the Name column as Required and has a max length of 50

The same will apply when the ViewState.IsValid property is called in the Controller Action, this will make your validation consistent from the UI layer up to the data access layer.

Imagine if you followed the first way of adding just plain HTML code like the example above, you would have to add all the validation yourself, but now HTML helpers removed all this burden

You can now go ahead and generate views and add annotations for all the entities and controllers, if you have any questions, please leave a commant


You can get the full source code from GitHub Repository https://github.com/haitham-shaddad/AppointmentManager

Building a LOB application with MVC 5 – Part 0

There are a lot of tutorials and blog posts about MVC, Web API and other Asp.Net technologies, but it has been always a problem getting all these parts together in once place and utilize it to build something bigger.

In this post, I will start a series where we will introduce and build a complete functioning lin of business web application using Asp.Net MVC 5, I will start with introducing the business behind the application, and in each part, we will introduce a new feature of MVC and use it to build a new feature in our LOB application, this will allow us to know how to use MVC in practical example and we will also go deep dive in each feature to build more advanced features.

Introduction to the LOB Application

The application we are going to build together is called Appointment Manager, it will be a flexible application that allows users to register either as service provider or consumer, below are the list of features for each role

  1. Service providers. ex:doctors, mechanics, carpenters
    1.  Check his Calendar
    2. View appointment details
    3. View ratings for his work
    4. Select which services he provides
    5. Manage his available time slots for each service
  2. Service consumers
    1. Browse service categories
    2. Browse service providers in a specific category
    3. View specific service provider details, history and rating
    4. Book an appointment
    5. Check his Calendar
    6. Rate a service Provider
  3. Admin
    1. Manage Service Categories
    2. Manage Attribute for each service category, ex: Mechanic category will have Car model, Year and his services will include Oil change, A/C, …
  4. Shared Features
    1. Register
    2. Login, Logout
    3. Edit Profile

By the end of this series we will have the application built and we will have full knowledge of MVC 5 framework

Introdction to the Technical Part

In each part, we will introduce a key component in MVC and use it to build another feature in the application, below are the features we are going to discuss in MVC

  1. Introduction to MVC
  2. Models
  3. View
  4. Controllers
  5. Routing
  6. Localization
  7. Bootstrap
  8. EntityFramework
  9. Identity and Security
  10. Bootstrap
  11. SignalR

Setting up ALM

Since this will be a real business application, we want to apply everything we do in the real life, and the first thing is to decide about how are we going to manage the application life-cycle management, fortunately, Microsoft offers a full platform for that;TFS, In our series, I will use Team services or TFS Online with GitHub as our source code repository, You can also use TFS on premise, Microsoft offers TFS express for free, you can download and install it and use it through the series

I will start by creating the project and then enter the list of features into a user stories.

Since TFS online support Git, I will use it as our source code control and I will link it later to GitHub

Create the project on TFS Online

In order to be able to use TFS online, you have to have a visual studio account, if you don’t already have one,go to VisualStudio.com and register using your MS Account, it is free

  1. Open your browser and navigate to https://[your account].visualstudio.com
  2. Under “Recent Projects & Teams” Click New TFS New
  3. Enter the Project name, description, Process Template and Version control as Git, TFS support different process templates such as Scrum and CMMI, if you have different needs, you can create a new template and customize it, we won’t go deeper here but you can read more about TFS templates from this link https://msdn.microsoft.com/en-us/library/ms243782.aspxNew Project
  4. Once the project is created, clink on “Navigate to the project” button
  5. Once the page is loaded, you will see a dashboard from where you can see everything about your project, ex: Code, Sprint burn down chart and user stories
  6. Click on Backlog link in the Work widget to start editing the user storiesTFS dashboard
  7. Once the page is loaded, you can add the story by typing the story title in title field and press enter or click Add button, if you can’t see the title field, just click the New link as shown in the screenshot belowbacklog

After the story is added, you can double click it to open the edit dialog which will enable you to add all the details, once this is done, click the Save icon on the top rightedit story

  1. TFS offers you the ability to categorize your user stories into something called Features, think of it as sub-modules to group the related features together, You can click Features from the left menu and add the needed features, then go to the backlog  by clicking the Stories link and Click the Mapping icon and make sure it is On, this will open a panel on the right with the list of features defined, drag the user stories from the left and drop it over the feature

So far, we talked about the application we want to build, we configured its source control and added its requirement.

In the next part we will introduce MVC 5, Create the project structure and build the home page for the application.

You can get the full source code from GitHub Repository https://github.com/haitham-shaddad/AppointmentManager