Create an Angular todo list with azure static web apps Part 4

In this series about Azure static web apps, we created an Angular Todo list app, an Azure function using JavaScript and linked both together. If you want to have a look at the previous parts, here are the links

In this post, we will store the todos in Cosmos DB and read it from our Azure function.

Create Cosmos DB

Azure Cosmos DB gives you a free account with upto 400 RU/s. You can use it for this demo. Go to Azure Portal, Click New Resource -> Under Databases select Azure Cosmos DB, choose the API as SQL API and add the account name, resource group and region and leave everything else with the default value then click Review + Create then Create.

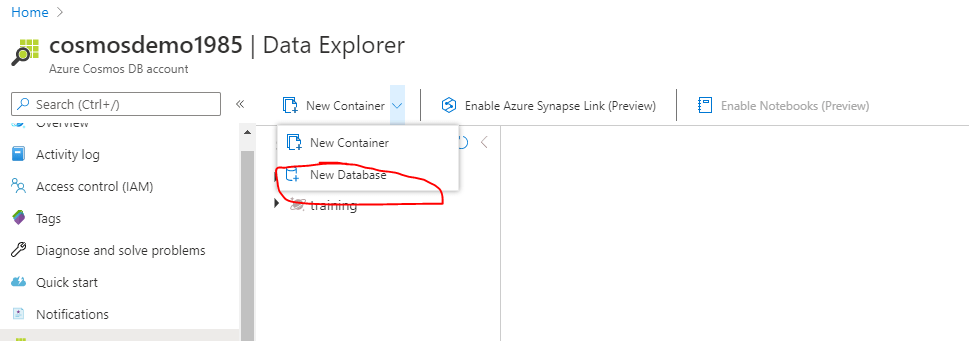
Once the Azure Cosmos DB account is created, open it and go to Data Explorer and from the toolbar click New Database and give it a name

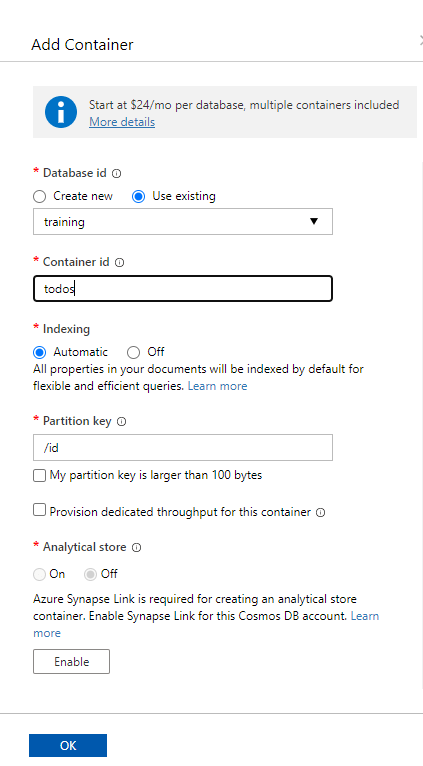
Once the database is created, click the three dots near the database name and click New Container. Provide a name for the container and type /id as the partition key then click ok

From the left menu click Keys and copy the PRIMARY CONNECTION STRING.

Azure Function Settings

To connect to the Azure Cosmos DB, we we will need to store the connection string somewhere. For this purpose, we will use the file local.settings.json under api folder.

Add a new key under the values key and name it CosmosConnectionString and paste the Cosmos DB connection string copied earlier.

{
  "IsEncrypted": false,
  "Values": {
    "AzureWebJobsStorage": "",
    "FUNCTIONS_WORKER_RUNTIME": "node",
    "CosmosConnectionString":""
  },"Host": {
    "CORS": "*"
  }
}

The local.settings.json file is not added to Git and should not be. This should include the connection strings and any secrets used locally.

Connect to Cosmos from the APIs

We have the database ready now and the connection string is set in our api. To read data from Cosmos, we need to install the package @azure/cosmos. Open command prompt and navigate to the api folder that has the function project and run the following command

npm i @azure/cosmos

Now open the index.js file inside the api/GetTodoList folder and paste the following code

const CosmosClient = require('@azure/cosmos').CosmosClient;

module.exports = async function (context, req) {
    context.log('JavaScript HTTP trigger function processed a request.');
    let cosmosClient = new CosmosClient(process.env['CosmosConnectionString']);
    let database = cosmosClient.database('todos');
    let container = database.container('todolist');
    let {resources} = (await container.items.query('SELECT c.id,c.title,c.isCompleted FROM c').fetchAll());

    context.res = {
        // status: 200, /* Defaults to 200 */
        body: resources
    };
}

The code is straight forward, in line 1, we imported the CosmosClient class which will be used to connect to Cosmos DB. This is like an EntityFramework DBContext. Line 5,6, and 7 we create a client instance, use it to get a reference to the database and the container that has our data.

In line 8, we query the container to return only the id, title and isCompleted fields and return the results.

You can see that the field names are now pascal named (title instead of Title), you will have to update the binding in the TodoList component

 <td><input type="checkbox" [checked]="todo.isCompleted" disabled></td>

Test

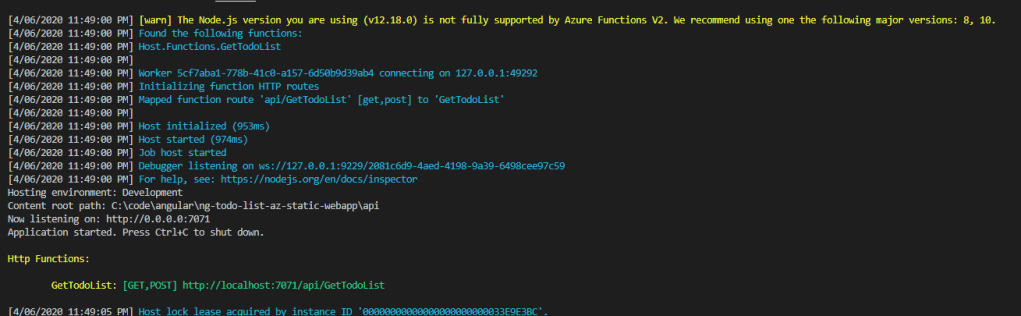
Run your api project with func start and your Angular app with ng serve. You should see an empty list. Go back to your Cosmos DB instance in Azure Portal, click Data Explorer, select the db then the container and choose Items. You can add a new item by clicking the New Item button on the toolbar and then click Save. Repeat the process to add few items

Now try to refresh your app and you should see the data displayed in the Angular app

Deployment

Commit and push your changes and wait for the workflow action to finish. If you tried your site now it will not work as the function has no idea about the connection string. To add a new connection string, open your Azure Static Web App, click on Configuration and then click Add. Type CosmosConnectionString as the name and paste the connection string for the Cosmos DB in the value field. Save and refresh your app and now you should see the application displaying the data you saved in Cosmos DB

Source code: https://github.com/haitham-shaddad/ng-todo-list-az-static-webapp

Create an Angular todo list with azure static web apps Part 3

In part one of the serious, we created the SPA with Angular, deployed it to Azure Static Web Apps. In Part 2, we created the API part. In this post, we will link the both the Frontend with the Backend.

Create the Listing Component

Open CMD and navigate to the folder that has your angular app then run the command ng g c TodoList. This will generate an Angular component with the name TodoListComponent. Open the code for this component and put the following code.

<h1>Your Todos</h1>
<table>
    <thead> 
        <tr>
            <th>Todo</th>
            <th>Complete</th>
        </tr>
    </thead>
    <tbody>
        <tr *ngFor="let todo of todos">
            <td>{{todo.Title}}</td>
            <td><input type="checkbox" checked="{{todo.Complete}}" readonly></td>
        </tr>
    </tbody>
</table>
import { TodoService } from './../todo.service';
import { Component, OnInit } from '@angular/core';

@Component({
  selector: 'app-todo-list',
  templateUrl: './todo-list.component.html',
  styleUrls: ['./todo-list.component.scss'],
})
export class TodoListComponent implements OnInit {
  todos: any;
  constructor(private todoService: TodoService) {}

  ngOnInit(): void {
    this.todoService.getTodoList().then((response) => response.json()).then(data =>{
       this.todos = data;
       console.log(data);
    });
  }
}

table{
    width:100%;
    border: 1px;
}

table tr th{
    background-color: lightslategray;
}

table tr td{
    text-align: center;
}

The first part is the HTML and the second is the component code and the third is the CSS.

Create the Todo Service

To communicate with the API, we will create an Angular service. Navigate to the app folder under the src directory and run the command ng g s Todo. This will create a new service with the name TodoService. The code should look like this

import { Injectable } from '@angular/core';

@Injectable({
  providedIn: 'root'
})
export class TodoService {


 getTodoList() {
    return fetch('api/GetTodoList');
  }
}

The getTodoList function calls the fetch method to make an Ajax request to the API. Notice the URL is just api/GetTodoList because our Angular app and the API runs in the same domain and the paths will be relative. If you are running it locally, the path would be prefixed with the correct URL. Ex:  return fetch('http://localhost:7071/api/GetTodoList');

Routing

Nowe we need to make the default route redirects to the TodoComponent. Open the app\app-routing.module.ts and change it as below:

import { SaveToDoComponent } from './save-to-do/save-to-do.component';
import { TodoListComponent } from './todo-list/todo-list.component';
import { NgModule } from '@angular/core';
import { Routes, RouterModule } from '@angular/router';

const routes: Routes = [
  {
    component: TodoListComponent,
    path: '',
  },
  {
    component: TodoListComponent,
    path: 'todolist',
  },
  {
    component: SaveToDoComponent,
    path: 'new',
  },
];

@NgModule({
  imports: [RouterModule.forRoot(routes)],
  exports: [RouterModule],
})
export class AppRoutingModule {}

Open the app.component.html and remove all the code after the style and only leave the <router-outlet></router-outlet>.

Testing our changes

Now commit and push the changes and wait for the GitHub action to run. Once deployment is completed, try your site and it should look like this:

Now you have a fully functioning SPA running in Azure Static Web App. In the next articles, we will refine it more to connect to a storage backend and do more authentication.

You can try the source code yourself at https://github.com/haitham-shaddad/ng-todo-list-az-static-webapp

Create an Angular todo list with azure static web apps Part 2

In the previous post , we created the first part of our todo list that will be deployed to Azure Static Web App service. In this post, we will add the backend as an Azure Function

List ToDos Azure Function

Create a new folder with the name api then make sure you have Azure Functions extension install in VS code. Press F1, this will show the command window in vs code, type functions and select Azure Functions: Create New Project, choose api\GetTodoList as the folder for the Azure Function, choose JavaScript as the language (As per today, Static Web Apps only support JavaScript functions), HttpTriger as the trigger and GetTodoList as the function name and finally Anonymous as the authentication method. This will create all the files needed for you function.

Get Todos implementation

Now, let’s put a dummy implementation for the GetToDos function.

Edit the index.js file with the following code. This will return 4 Todos. The implementation can be changed later to connect to any other data source

module.exports = async function (context, req) {
    context.log('JavaScript HTTP trigger function processed a request.');
    const responseMessage =  [
         { Title : "Read Microfronts book", IsCompleted : false},
         { Title : "Post a blog about Project Tye", IsCompleted : false},
         { Title : "Get some exercises", IsCompleted : true},
         { Title : "Do more stuff", IsCompleted : false},
    ];

    context.res = {
        // status: 200, /* Defaults to 200 */
        body: responseMessage
    };
}

Go to your Az Functions Tools and run the function, it should show the funcion URL in the console window

Hit http://localhost:7071/api/GetTodoList in your browser and you should be able to see the results in JSON

You can follow the same steps to create another function to add and edit Todo.

Deploy the API to Azure Static Web App

Commit and push the changes to your GitHub Repo and watch GitHub actions building and packaging the application. All the code in the repo will be built and packaged including the Azure Function.

Validating deployment

Once the GitHub action finishes and show a success mark, open Azure Portal and go to your Azure Static Web App then click Functions on the left menu. You should be able to see the GetTodoList function there.

Function Configuration

Once you have the function deployed, you can add configuration keys under Configuration section. One of the configuration is APPINSIGHTS_INSTRUMENTATIONKEY that can be used to link your static web app to an application insights instance which will recive all the logs made by your function using the context.log function.

Testing your API

Its time to make sure everything works fine. Click the overview tab then click on the URL for the site, it should open the static site web created in previous post. To access the API, you have to append api/FUNCTION_NAME. in our case, it will be URL/api/GetTodoList

Inspect function behavior with application insights

Since our function is now working fine, a bonus point would be to check the logs generated from it. After you create an application insights instance and add a configuration key APPINSIGHTS_INSTRUMENTATIONKEY with the app insights instrumention key, invoke the function few times then go to your app insights instance and click Search from the left menu. You should be able to see the logs

As you can see above, not only you can see the messages logged from the function but also from the azure functions runtime.

In next post, we will link the SPA to our APIs and do more fancy stuff.

The source code can be found on my GitHub repository. All you need to do is to fork it, create a new static web app and link it to the repo. https://github.com/haitham-shaddad/ng-todo-list-az-static-webapp

Azure Functions anatomy – Part 2 – What is inside a Function App?

In the previous post (Azure Functions 2.0 Anatomy- Part 1), we saw the structure of a function app. In this part, I will explain the different components of an Azure Function.

Components

Every Azure Function 2.0 consists of the following components:

  • Trigger
  • Bindings (one of which is the trigger). Binding can be input or output
  • Value Converter/Binder
  • Listener

A binding can be a Blob file, a queue message, an event from event hub or event grid or any custom binding developed by anyone. One of these bindings can initiate the function call and in this case it is called a Trigger.
A binding can also be Input or Output. Input binding delivers data to the function and output binding is used by the function to write data.

Now, assume we have the following function and its configuration

        [FunctionName("SampleFunction")]
        public static void Run([QueueTrigger("myqueue-items", Connection = "AzureWebJobsStorage")]string myQueueItem, [Blob("sample-output")]Stream output, TraceWriter log)
        {
            log.Info($"C# Queue trigger function processed: {myQueueItem}");
        }

This function has 2 binding parameters. myQueueItem which is both an input binding and a trigger, and output which is an output binding.

How Azure Functions call this method and convert the queue message to a string and the stream to a Blob file?

Binding, Listener, Value Provider and Converter

When the azure function app starts, it scans all functions that exist in the app directory like we saw in the previous post, and for each function it reads the input, output and trigger from the function config JSON file.

The scanning process uses a descriptor provider which creates the input binding, output binding, trigger and an invoker

Once all functions are loaded, it tried to load the types for each function that was developed outside the portal. It uses the scriptFile and EntryPoint as you can see below. The entry point in the previous code snippet is FunctionApp1.Function1.Run method that exist in the assembly FunctionApp1.dll

{
  "generatedBy": "Microsoft.NET.Sdk.Functions-1.0.14",
  "configurationSource": "attributes",
  "bindings": [
    {
      "type": "timerTrigger",
      "schedule": "0 */5 * * * *",
      "useMonitor": true,
      "runOnStartup": false,
      "name": "myTimer"
    }
  ],
  "disabled": false,
  "scriptFile": "../bin/FunctionApp1.dll",
  "entryPoint": "FunctionApp1.Function2.Run"
}

Each function app can either have a DLL function or a function created by portal. But not both.

Now, lets see what are the other components inside a binding:

  • Listener (IListener): This one has a method named StartAsync, which basically start listening for an event to trigger the function. For Azure Blob trigger, it scans the logs for new or modified files. For Queue trigger, it check for new messages in the specified queue.
  • Value Provider (IValueProvider): Once the listener has the event that should trigger the function, it uses the value provider to fill all input parameters. If the trigger was a blog trigger, then the value will be the file, the metadata, the name and content of the file itself. For a Queue, it will be content of the message and so on and so forth.
  • Value Converter (IAsyncConverter): This will be used to convert the values found in the value provider to all the input parameters configured for the function. In the previous example, StorageQueueMessageToStringConverter will be used to convert the CloudQueueMessage instance to the string parameter named myQueueItem. The same will be used to write data to output parameters, the framework will choose the best converter that matches the Output parameter type (Stream) and the type of variable that will be used to write to stream, ex: String or any Stream Writer.
  • Executor (ITriggerExecutor): Now we know that the function should be triggered, we have the data from input binding and we bound all input parameters, now we need to call the function body. This takes place using an implementation of ITriggerExecutor which can use reflection to call the function or in a very special case, it may get executed as a web hook like the case with HTTP trigger.

In the next post, I will dig more into Azure Function App to explore the extensions and host.

Azure Functions 2.0 anatomy – Part 1

In these series of posts, I will explain the internals of Azure Functions and how it works. By the end of it, you should be able to understand what happens once an Azure Function is deployed till the moment it is triggered and invocation completes.

Is it a Web App?

Yes, every Azure Function App that uses .Net as a Language runs as as.net core web app. When the app starts, it loads all your functions and proxies and set up the routes and listeners for each function.

Web App Structure

Just like any other Azure Web App, it consists of the following folders:

  • data: This folder contains another folder named “functions” which has another folder called extensions. The extensions folder has a list of all extensions installed to your Functions App. Each file has a reference to a nuget package that has the extension implementation.
  • Log Files
  • site: it has the wwwroot which hosts the asp.net core web app and all the functions
Data -> Functions folder structure

But for Azure Functions App, the following folders are added:

.nuget

Contains all nuget packages installed when you install a new extension. A reference for each extension installed exist in a file under: data\functions\extensions. The sample extension file below specify the package :Microsoft.Azure.WebJobs.Extensions.ServiceBus

In Azure Functions 1.0, it was running on .Net 4.6 and the runtime already included all the supported triggers and bindings. But, with version 2.0, the runtime only includes http and timer binding and all the other bindings can be developed and installed separately using extensions. This allows you to develop your own extensions and upload it without the need to wait for a new version of Azure Functions.

{
  "Id": "d3a33dd0-3941-4acf-a303-72773995901d",
  "Status": 1,
  "StartTime": "2019-01-02T02:49:23.5568341+00:00",
  "EndTime": "2019-01-02T02:50:50.1029788+00:00",
  "Error": null,
  "Properties": {
    "id": "Microsoft.Azure.WebJobs.Extensions.ServiceBus",
    "version": "3.0.0"
  }
}

ASP.NET

This folder contains all data protection keys used in the web app

To have a look at this folder structure and explore it yourself, use the following URL: https://%5BFUNCTION_APP_NAME%5D.scm.azurewebsites.net/DebugConsole

wwwroot folder structure

wwwroot folder structure

As you can see, there are 3 folders. Each folder represent a single function. All DLLs for each function exist in the bin folder.

The host.json file by default only has the version number for the function

{
  "version": "2.0"
}

Inside each function, there is a function.json file that has the configuration for this function.

{
  "generatedBy": "Microsoft.NET.Sdk.Functions-1.0.14",
  "configurationSource": "attributes",
  "bindings": [
    {
      "type": "timerTrigger",
      "schedule": "0 */5 * * * *",
      "useMonitor": true,
      "runOnStartup": false,
      "name": "myTimer"
    }
  ],
  "disabled": false,
  "scriptFile": "../bin/FunctionApp1.dll",
  "entryPoint": "FunctionApp1.Function2.Run"
}

The Azure Functions run-time use this file to load the metadata for each function during application startup. The most important properties are the scriptFile which points to the DLL that has the code and the entryPoint that has the exact c# method name that will be executed when the function triggers.
The configurationSource specifies where to read the function configuration such as connection strings for the blob storage or service bus. attributes means it will be retrieved from code.
The binding key lists all bindings for this function. For this sample, it is a timer and it is the trigger, so it has a single binding. For others, it can be bindings that represents input, output and a trigger.

In the next post, I will explain the internals of each function, and how the bindings and triggers works.

How Azure Functions Blob Trigger works

Introduction

Azure functions enable you to quickly build a piece of functionality that can be triggered by an external system such as Azure Blob Storage, Storage Queue, CosmoDB, Event Hub and the list goes on. In this post, I will explain how Azure Blob Trigger works.

Sample Function

If you created a new Azure Function using Visual Studio, you will end up with the following code:

 public static class Function1
    {
        [FunctionName("Function1")]
        public static void Run([BlobTrigger("samples-workitems/{name}", Connection = "")]Stream myBlob, string name, TraceWriter log)
        {
            log.Info($"C# Blob trigger function Processed blob\n Name:{name} \n Size: {myBlob.Length} Bytes");
        }
    }

The secret lies in the attribute [BlobTrigger]. It accepts the path to the storage container which Azure Web Jobs will monitor. As you know, Azure Functions is based on Azure Web Jobs, so the same triggers are used.

How Azure Web Job knows about a file that is being added, updated or removed to a container?

Run the sample app you just created in visual studio, it should work on the local storage emulator. Now, you should be able to invoke the function by creating a blob container called samples-workitems in your development storage account and you should end up with the following structure.

blob container

You can see the container “samples-workitems” which Azure Web Jobs will monitor and invoke the function whenever a file is changed there. But there is also another container named “azure-webjobs-hosts” which is the secret for how Azure monitor the files in that container.

If you opened that container, you will find a folder called “blobreceipts” which has a folder for the function name.

Inside the folder with the function name, there are some other folders with strange names like below

etags

These strange names are the ETag of each blob file added, edited or removed. So, when you change a file in any container, Web Jobs will create a new folder here with the new version ETag for that file and inside this folder you will find the same structure of the file being edited. In our case, there should be a folder called samples-workitems and inside this folder the file that was modified.

When a new file is added, Azure will check if  its ETag exist in the azure-webjobs-hosts folder and if not, then it will call the Azure Function. This way it will prevent duplicate calls for the same file. This pattern is called blob receipt.

Note that this process depends on Azure Blob Storage Logging which can take up to 10 minutes to write to the container azure-webjobs-hosts to improve performance. If you need your function to trigger faster then consider using Storage Queue trigger instead.