In this series about Azure static web apps, we created an Angular Todo list app, an Azure function using JavaScript and linked both together. If you want to have a look at the previous parts, here are the links
In this post, we will store the todos in Cosmos DB and read it from our Azure function.
Create Cosmos DB
Azure Cosmos DB gives you a free account with upto 400 RU/s. You can use it for this demo. Go to Azure Portal, Click New Resource -> Under Databases select Azure Cosmos DB, choose the API as SQL API and add the account name, resource group and region and leave everything else with the default value then click Review + Create then Create.
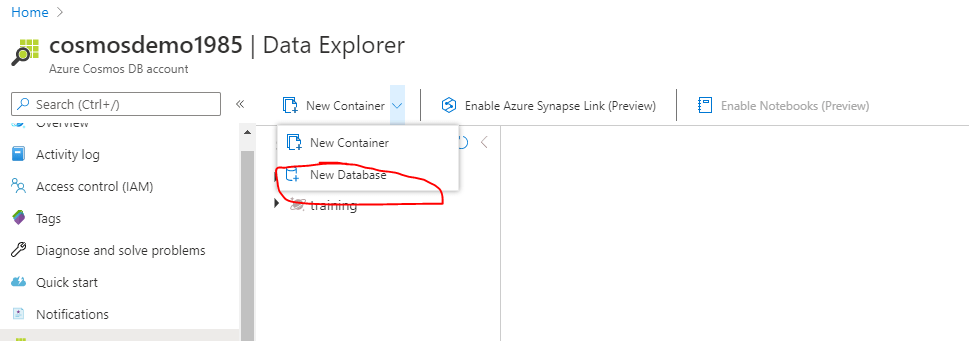
Once the Azure Cosmos DB account is created, open it and go to Data Explorer and from the toolbar click New Database and give it a name
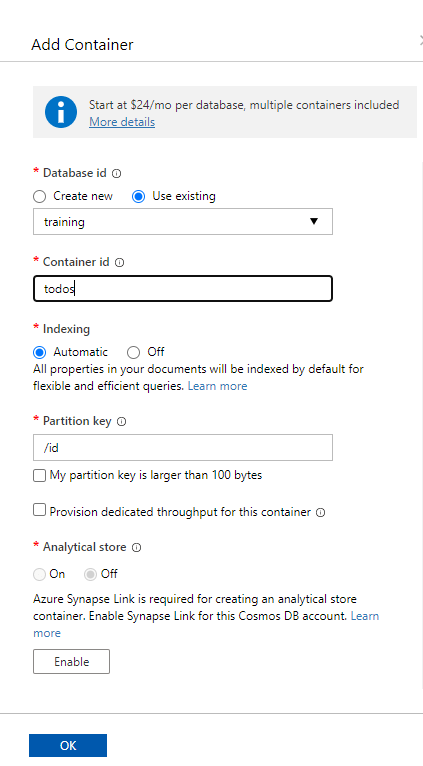
Once the database is created, click the three dots near the database name and click New Container. Provide a name for the container and type /id as the partition key then click ok
From the left menu click Keys and copy the PRIMARY CONNECTION STRING.
Azure Function Settings
To connect to the Azure Cosmos DB, we we will need to store the connection string somewhere. For this purpose, we will use the file local.settings.json under api folder.
Add a new key under the values key and name it CosmosConnectionString and paste the Cosmos DB connection string copied earlier.
The local.settings.json file is not added to Git and should not be. This should include the connection strings and any secrets used locally.
Connect to Cosmos from the APIs
We have the database ready now and the connection string is set in our api. To read data from Cosmos, we need to install the package @azure/cosmos. Open command prompt and navigate to the api folder that has the function project and run the following command
npm i @azure/cosmos
Now open the index.js file inside the api/GetTodoList folder and paste the following code
const CosmosClient = require('@azure/cosmos').CosmosClient;

module.exports = async function (context, req) {
    context.log('JavaScript HTTP trigger function processed a request.');
    let cosmosClient = new CosmosClient(process.env['CosmosConnectionString']);
    let database = cosmosClient.database('todos');
    let container = database.container('todolist');
    let {resources} = (await container.items.query('SELECT c.id,c.title,c.isCompleted FROM c').fetchAll());

    context.res = {
        // status: 200, /* Defaults to 200 */
        body: resources
    };
}
The code is straight forward, in line 1, we imported the CosmosClient class which will be used to connect to Cosmos DB. This is like an EntityFramework DBContext. Line 5,6, and 7 we create a client instance, use it to get a reference to the database and the container that has our data.
In line 8, we query the container to return only the id, title and isCompleted fields and return the results.
You can see that the field names are now pascal named (title instead of Title), you will have to update the binding in the TodoList component
Run your api project with func start and your Angular app with ng serve. You should see an empty list. Go back to your Cosmos DB instance in Azure Portal, click Data Explorer, select the db then the container and choose Items. You can add a new item by clicking the New Item button on the toolbar and then click Save. Repeat the process to add few items
Now try to refresh your app and you should see the data displayed in the Angular app
Deployment
Commit and push your changes and wait for the workflow action to finish. If you tried your site now it will not work as the function has no idea about the connection string. To add a new connection string, open your Azure Static Web App, click on Configuration and then click Add. Type CosmosConnectionString as the name and paste the connection string for the Cosmos DB in the value field. Save and refresh your app and now you should see the application displaying the data you saved in Cosmos DB
In part one of the serious, we created the SPA with Angular, deployed it to Azure Static Web Apps. In Part 2, we created the API part. In this post, we will link the both the Frontend with the Backend.
Create the Listing Component
Open CMD and navigate to the folder that has your angular app then run the command ng g c TodoList. This will generate an Angular component with the name TodoListComponent. Open the code for this component and put the following code.
The first part is the HTML and the second is the component code and the third is the CSS.
Create the Todo Service
To communicate with the API, we will create an Angular service. Navigate to the app folder under the src directory and run the command ng g s Todo. This will create a new service with the name TodoService. The code should look like this
import { Injectable } from '@angular/core';

@Injectable({
  providedIn: 'root'
})
export class TodoService {


 getTodoList() {
    return fetch('api/GetTodoList');
  }
}
The getTodoList function calls the fetch method to make an Ajax request to the API. Notice the URL is just api/GetTodoList because our Angular app and the API runs in the same domain and the paths will be relative. If you are running it locally, the path would be prefixed with the correct URL. Ex: return fetch('http://localhost:7071/api/GetTodoList');
Routing
Nowe we need to make the default route redirects to the TodoComponent. Open the app\app-routing.module.ts and change it as below:
Open the app.component.html and remove all the code after the style and only leave the <router-outlet></router-outlet>.
Testing our changes
Now commit and push the changes and wait for the GitHub action to run. Once deployment is completed, try your site and it should look like this:
Now you have a fully functioning SPA running in Azure Static Web App. In the next articles, we will refine it more to connect to a storage backend and do more authentication.
In the previous post , we created the first part of our todo list that will be deployed to Azure Static Web App service. In this post, we will add the backend as an Azure Function
Create a new folder with the name api then make sure you have Azure Functions extension install in VS code. Press F1, this will show the command window in vs code, type functions and select Azure Functions: Create New Project, choose api\GetTodoList as the folder for the Azure Function, choose JavaScript as the language (As per today, Static Web Apps only support JavaScript functions), HttpTriger as the trigger and GetTodoList as the function name and finally Anonymous as the authentication method. This will create all the files needed for you function.
Get Todos implementation
Now, let’s put a dummy implementation for the GetToDos function.
Edit the index.js file with the following code. This will return 4 Todos. The implementation can be changed later to connect to any other data source
module.exports = async function (context, req) {
    context.log('JavaScript HTTP trigger function processed a request.');
    const responseMessage =  [
         { Title : "Read Microfronts book", IsCompleted : false},
         { Title : "Post a blog about Project Tye", IsCompleted : false},
         { Title : "Get some exercises", IsCompleted : true},
         { Title : "Do more stuff", IsCompleted : false},
    ];

    context.res = {
        // status: 200, /* Defaults to 200 */
        body: responseMessage
    };
}
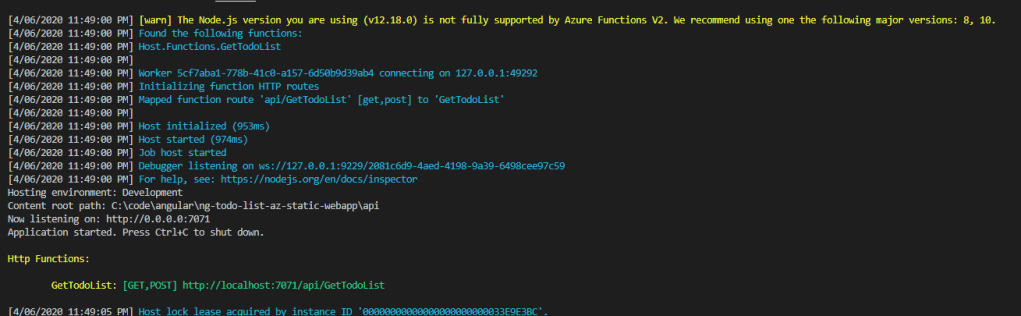
Go to your Az Functions Tools and run the function, it should show the funcion URL in the console window
You can follow the same steps to create another function to add and edit Todo.
Deploy the API to Azure Static Web App
Commit and push the changes to your GitHub Repo and watch GitHub actions building and packaging the application. All the code in the repo will be built and packaged including the Azure Function.
Validating deployment
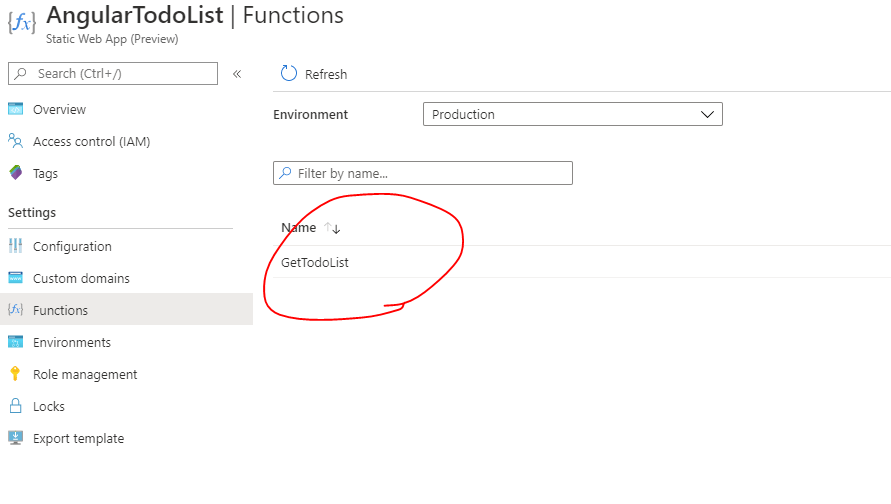
Once the GitHub action finishes and show a success mark, open Azure Portal and go to your Azure Static Web App then click Functions on the left menu. You should be able to see the GetTodoList function there.
Function Configuration
Once you have the function deployed, you can add configuration keys under Configuration section. One of the configuration is APPINSIGHTS_INSTRUMENTATIONKEY that can be used to link your static web app to an application insights instance which will recive all the logs made by your function using the context.log function.
Testing your API
Its time to make sure everything works fine. Click the overview tab then click on the URL for the site, it should open the static site web created in previous post. To access the API, you have to append api/FUNCTION_NAME. in our case, it will be URL/api/GetTodoList
Inspect function behavior with application insights
Since our function is now working fine, a bonus point would be to check the logs generated from it. After you create an application insights instance and add a configuration key APPINSIGHTS_INSTRUMENTATIONKEY with the app insights instrumention key, invoke the function few times then go to your app insights instance and click Search from the left menu. You should be able to see the logs
As you can see above, not only you can see the messages logged from the function but also from the azure functions runtime.
In next post, we will link the SPA to our APIs and do more fancy stuff.
This article is part of [#ServerlessSeptember](https://aka.ms/ServerlessSeptember2020). You’ll find other helpful articles, detailed tutorials, and videos in this all-things-Serverless content collection. New articles from community members and cloud advocates are published every week from Monday to Thursday through September.
Azure static web app is connected to GitHub repo, and the first thing to do is to create a new repo under your github account. Once you create it, clone it to your local machine and run the following commands. Make sure you have angular-cli tools installed
ng new AzTodoList
Choose yes for routing and select your preferred css processor and hit enter to create the project and install all needed packages. Once all packages are installed, run ng serve to make sure the app works fine. You should have something like this running on port 4200
Make sure all files exist in the root folder where you cloned the GitHub repo. If you cloned the repo in a folder called ToDoList and then ran the command ng new inside it, it will create another subfolder. If this happened, make sure to move the files in the inner folder to the ToDoList folder. Otherwise, the GitHub action won’t work since it will fail to determine the programing language used. Your folder structure should look like this:
Now commit the source code with git add . to add all files followed by git commit -m "Initial commit" and finally git push origin master to push the files to GitHub.
Create Azure Static Web App
Open Azure portal and create a new static web app, log in to your GitHub account and choose the ToDoList app
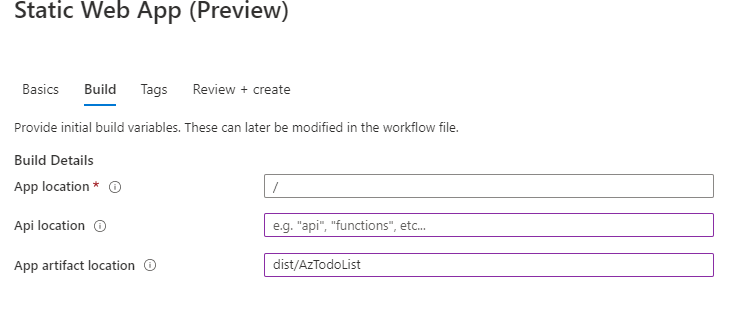
Click on Next: Build to move to the next screen and configure it as below. The artifact location is dist/AzTodoList but it can be different in your case depending on your angular project name. You can get the exact path from your angular.json file or run ng build and check your folder structure.
When you create the app, it will automatically created the necessary CI/CD on GitHub using GitHub Actions and you can view that by clicking on the link “Thank you for using Azure Static Web App! We have not received any content for your site yet. Click here to check the status of your GitHub Action runs.” . You can view the build status by going to your GitHub repo and click Actions
As you can see above, it failed few times because I put the Angular app in a folder inside the repo. Once I moved all the files from within the inner folder to the root folder, it worked.
Test the app
Now go back to your Azure Portal and in the overview tab for the static web app, click Browse and this is what you should see
In the next post, we will add the APIs that will be used to retrieve, add and delete ToDos
In my preview post about implementing preview features in asp.net core, I explained how to introduce the concept of feature flags in your application and manage it with the default appsettings.json.
Managing your features from appsettings is not the best approach as it requires application restarts which will distrupt the application users.
In this post, I will explain how to do the configuration with a tool that was built just for this.
Azure App Configuration has feature management feature that allows you to manage your features, turn it on or off and set the filters for each feature flag. It also enables auto refresh which basically allows you to change a feature and this change will reflect immediately in your application.
Register Azure App Configuration as a Configuration Source
Asp.net core supports multiple configuration sources. When you call the CreateDefaultBuilder method in Program.cs, it automatically registers the following configuration sources for your application
appsettings.json
appsettings.{environment}.json
user secrets
environment variables
command line arguments
The registration happens in the same order above. You can have a look at the source code in this link If a specific key exists in a configuration source, you can override its value by adding it in the next configuration source. Ex: If the key ConnectionStrings:DefaultConnection exist in appsettins.json and also exist in user secrets, the one in user secrets will be used. This is good to override some values in your local dev environment such as passwords and connection strings to avoid pushing it to your source control
To register azure app config as an additional config source, you can add the following in Program.cs after installing the package Microsoft.Azure.AppConfiguration.AspNetCore
From line 2-15, you can see that we are configuration the application configuration by adding a new configuration source in line 5. In line 7, we are reading the connection string from the previous configuration sources. This way you can add your connection string in appsettings.json or user secrets, I have added it here in appsettings.json under the name AzureAppConfig:ConnectionString. From line 8-11, we are configuring the caching time for the configuration. If you configure it for 5 seconds, the keys from azure app config will be cached and no requests will be done to azure app config to get the latest updates. Line 12 simply asks Azure App Configuration SDK to include the features when it reads all configurations and finally we use the connection string to connect to the azure config instance.
Creating Azure App Config
Log in to Azure Portal and create a new App Configuration resource. You can only create one free app configuration per subscription. Once it is created, go to Access Keys from the left menu and copy either the primary or secondary connection string and update your appsettings file
Now you should be all set. If you run the application and navigate to https://localhost:44375/PreviewFeatures, you should be able to see the page if your feature configuration allows it.
So far, we didn’t add any features to our Azure App Config instance yet, this means the application will fall back to the appsettings.json
Add Features in Azure App Configuration
To start managing your features from Azure App Config, Click Feature Manager from the left menu and Choose Add then type the feature name as PreviewFeatures and choose Off then click add
Now refresh the URL https://localhost:44375/PreviewFeatures, and if the feature PreviewFeatures was enabled in appsettings, it will still appear. So what are we doing wrong?
Enable Auto Refresh
By default, the Azure App Configuration does not do auto refresh in your asp.net core. You have to register a middleware that does that by adding the following line in the Configure method inside Startup.cs
app.UseAzureAppConfiguration();
Now, if you run the application again, the first time it starts, it will get the most recent values from Azure App Config and now you should see the PreviewFeatures controller not working. But if you enabled it again from azure portal by toggling the On/Off flag from the Feature Manager page, and wait for 5 seconds, you should refresh and see that the PreviewFeatures is now working again.
Notice that the toggle turns on or off the feature for everyone. If you need to use the feature filter, then click the 3 dots and choose Edit. Under Filters, click add and type the feature filter name, in this case UserFeatures which we created previously. Notice how the state changed from On/Off to Conditional. Now when you refresh, the filter will be executed to decide if the feature should be enabled or disabled for each user.
I have included all the updates on GitHub repo. Feel free to ask me any questions
Feature flags are a way to turn on or off a specific feature in your application. This enables you to hide a feature on production if it is not ready for end users. It can also allow you to give the user the option to enable/disable preview feature as they like. As you can see below, Azure DevOps keeps showing the preview feature tooltip for users to try preview features. A preview feature can be a new page, a new section in a page or a new way of rendering the page.
Feature flags come handy in these situations:
Ship half-finished features: You can always ship features to production and switch off its feature flag to hide it from users. Experimentation: Deploy a new feature and target specific user group or allow user to experiment these features and provide feedback. Test in production & Kill a feature: If your feature is incomplete, you can release it and let users try it. if the feature misbehaved, you can simply kill it for everyone as if it was not there in the first place Trunk-based development: Usually with every feature, you have a feature branch and eventually these branches get merged to the master branch. But now everyone can work on the same branch and release their code to production and switch off their features till it is complete.
Feature Management
With the introduction of Azure App Configuratio, the team introduced a library to manage feature flags in asp.net core. It does not depend on Azure App Configuration though, and you can configure it with appsettings.json
Lets write some code
Create a new asp.net web application (MVC) and choose the Individual Authentication to get the identity database and everything ready for user registration and login
Once the project is created, add a reference to the nuget package Microsoft.FeatureManagement.AspNetCore
Startup.cs changes
You need to inject feature management into the services collection by appending the following line to the ConfigureServices method
The feature management has to read the configuration for which features exist and which are enabled or disabled. In this article, we will use appsettings.json. By default, it looks for a section called FeatureManagement
We defined the features, now we want to use them in the code. Create a new controller with an Index method and annotate the controller with the attribute [FeatureGate]. This attribute accepts the feature name defined in FeatureManagmenet section above. If you try now to run your application and access the path /PreviewFeatures, it should show the message “This is a preview feature controller”. If you change the value from true to false in appsettings for the key WelcomeFeature and refresh the page, it will show page not found. You can override this behavior by using a custom feature disabled handler by calling the UseDisabledFeaturesHandler method after calling AddFeatureManagement().
    [FeatureGate("WelcomeFeature")]
    public class PreviewFeaturesController : Controller
    {
        private readonly ILogger<PreviewFeaturesController> _logger;

        public PreviewFeaturesController(ILogger<PreviewFeaturesController> logger)
        {
            _logger = logger;
        }

        public IActionResult Index()
        {
            return Content("This is a preview feature controller");
        }
    }
Feature Filters
When you add a feature and want the users to select it, the last thing to do is to hard code this logic. With feature filters, you can defer the logic to enable/disable features to custom logic. Each feature filter has a a method called EvaluateAsync. This method returns a boolean indicating whether or not to enable the feature
Add feature filter
Create a new class called UserFeaturesFilter and append the following code
[FilterAlias("UserFeatures")]
public class UserFeaturesFilter : IFeatureFilter
{
    private readonly IServiceScopeFactory _scopeFactory;
    private readonly IHttpContextAccessor _httpContextAccessor;
    public UserFeaturesFilter(IServiceScopeFactory scopeFactory, IHttpContextAccessor httpContextAccessor)
    {
        _scopeFactory = scopeFactory ?? throw new ArgumentNullException(nameof(scopeFactory));
        _httpContextAccessor = httpContextAccessor ?? throw new ArgumentNullException(nameof(httpContextAccessor));
    }

    public async Task<bool> EvaluateAsync(FeatureFilterEvaluationContext context)
    {
        if (!_httpContextAccessor.HttpContext.User.Identity.IsAuthenticated)
            return false;

        using (var scope = _scopeFactory.CreateScope())
        {
            var featuresContext = scope.ServiceProvider.GetRequiredService<FeaturesContext>();
            var userManager = scope.ServiceProvider.GetRequiredService<UserManager<IdentityUser>>();

            var user = await userManager.GetUserAsync(_httpContextAccessor.HttpContext.User);
            var feature = featuresContext.Features.FirstOrDefault(a => a.Name.ToLower() == context.FeatureName.ToLower());

            if (user == null || feature == null)
                return false;

            var userFeature = featuresContext.UserFeatures.FirstOrDefault(f => f.UserId == user.Id && f.FeatureId == feature.Id);
            return userFeature != null;
        }
    }
}
The logic here is to get the current logged in user from the http context then retrieve the features that the user has chosen to subscribe for and if the feature name exist in the database then return true, otherwise, return false. To register this feature filter, you have to change startup.cs file with the following line
We added a new feature called PreviewFeatures and instead of using true or false as the value, we added the UserFeatures filter. To test this, we will add the reminder of code used in the feature filter.
Create a Feature and UserFeature classes
    public class Feature
    {
        public int Id { get; set; }
        public string Name { get; set; }
        public string Title { get; set; }
        public string Description { get; set; }

    }
    public class UserFeature
    {
        public int Id { get; set; }
        public string UserId { get; set; }
        public int FeatureId { get; set; }
        public Feature Feature { get; set; }
    }
Create a data context class that will contain these 2 entities
public class FeaturesContext : DbContext
{
    public FeaturesContext(DbContextOptions<FeaturesContext> options)
       : base(options)
    {
    }

    public DbSet<Feature> Features { get; set; }
    public DbSet<UserFeature> UserFeatures { get; set; }
}
Your ConfigureServices method should look like this after registering the new DbContext and add the needed services
Now, run the Add-Migration -ContextName FeaturesContext command followed by Update-Databse command to update the database
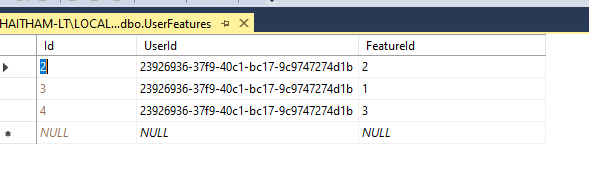
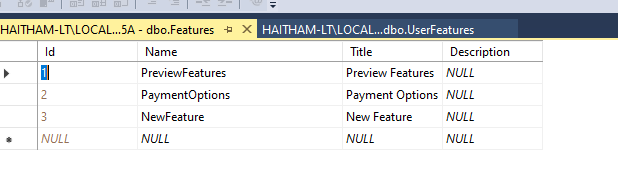
Once you did all above steps, you can mark any controller with the new feature name and edit the database to add a record to the UserFeature table. You wil have to register first and get your user id from AspNetUsers table, and you also have to add a record in the Features table. The feature name has to be the name used in the appsettings.json file
Now try to open your controller, it should work fine, once you remove the record from UserFeatures table, it should show page not found.
Let users choose what features they want
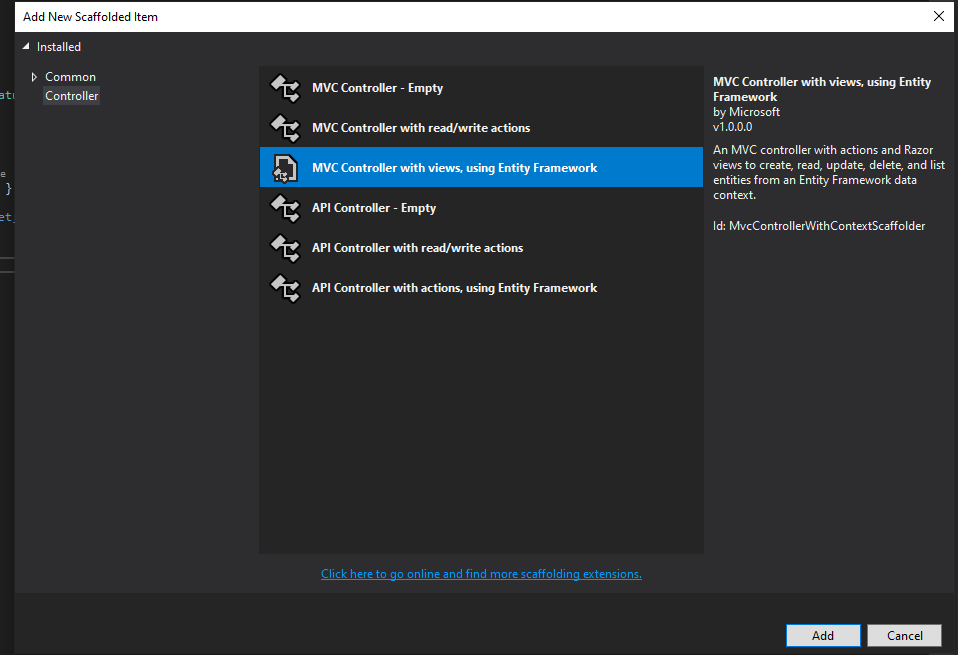
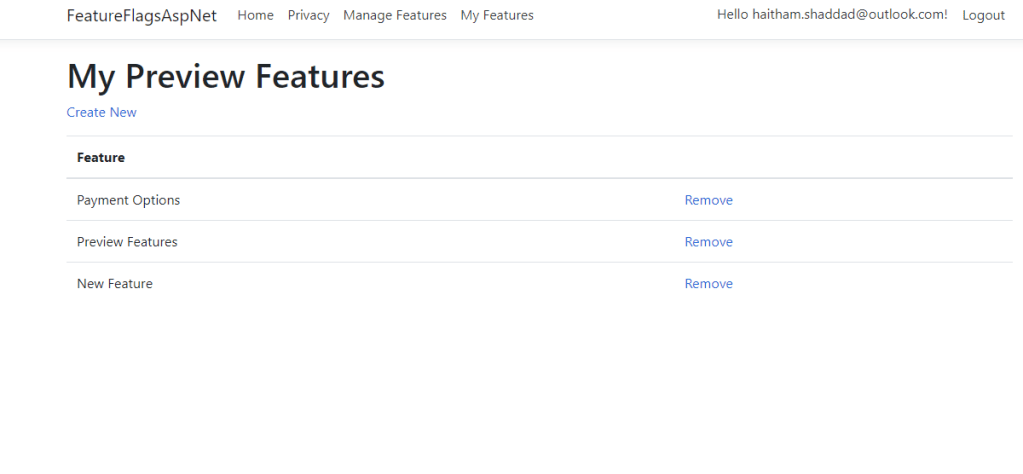
To allow users to choose the preview features they want, you can create a new page and show all the features from Features table and let the user save their choice. The easiest way to do that is to create a new controller and choose MVC Controller based on Entity Framework, this will create a CRUD screens for the UserFeatures table
You can also create the same for Features table to let the admin manage the features.
Informing users about new features
When you deploy a new feature, you need to let the users know about this feature, this can happen using an email, or a tooltip that appears for users or just having a menu link that shows all preview features just like Azure DevOps does. You can for example put the page URL in the Features table and implement a middleware that checks the current request path and check if there are any features that has the same URL and show a popup for the user to choose this feature.
Source code
I have added all the source code for this article on GitHub, you can download and run the sample app. It has the complete solution.
If you have any questions or suggestions, please let me know.
Asp.net core has abstracted the logging operations into the ILogger interface and instead of having too many frameworks for logging, you just need to add a logging provider such as Console, SeriLog, Windows Event Viewer. In this post, I will create a custom logging provider that logs to Azure table storage
Why Azure Table Storage?
Azure table storage can store petebytes of semi-structured data with high performance inserts and updates. It is also cheap which makes it very suitable for storing log messages. It also allow us to connect to the log messages from many tools such as Azure Storage explorer unlike the case when you log messages to the file system on an Azure App Service
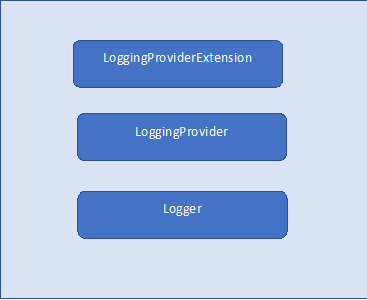
Structure of a custom logger
Logger
This is where the actual code for logging will exist and it must implement the ILogger
public class AzureTableLogger : ILogger
{
Microsoft.WindowsAzure.Storage.Table.CloudTable loggingTable;
    public AzureTableLogger(string connectionString, string tableName)
    {
        var storageAccount = Microsoft.WindowsAzure.Storage.CloudStorageAccount.Parse(connectionString);
        var cloudTableClient = storageAccount.CreateCloudTableClient();
        loggingTable = cloudTableClient.GetTableReference(tableName);
        loggingTable.CreateIfNotExistsAsync();
    }

    public IDisposable BeginScope<TState>(TState state)
    {
        return null;
    }

    public bool IsEnabled(LogLevel logLevel)
    {
        return true;
    }

    public void Log<TState>(LogLevel logLevel, EventId eventId, TState state, Exception exception, Func<TState, Exception, string> formatter)
    {
        var log = new LogEntity
        {
            EventId = eventId.ToString(),
            LogLevel = logLevel.ToString(),
            Message = formatter(state, exception),//exception?.ToString(),
            PartitionKey = DateTime.Now.ToString("yyyyMMdd"),
            RowKey = Guid.NewGuid().ToString()
        };

        var insertOp = TableOperation.Insert(log);
        loggingTable.ExecuteAsync(insertOp).GetAwaiter().GetResult();
    }
}

public class LogEntity : Microsoft.WindowsAzure.Storage.Table.TableEntity
{
    public string LogLevel { get; set; }
    public string EventId { get; set; }
    public string Message { get; set; }
}
As you can see, we just use the Azure Table Storage SDK to connect to the storage account and create a cloud table client. The logger accepts the table name and connection string as a constructor parameter which will be injected using the LoggingProvider. This is the minimum version of a logger and it needs a lot of improvement but it is good as a start.
LoggingProvider
public class AzureTableLoggerProvider : ILoggerProvider
{
    private readonly string connectionStringName;
    private readonly string tableName;

    public AzureTableLoggerProvider(string connectionString, string tableName)
    {
        connectionStringName = connectionString;
        this.tableName = tableName;
    }
    public ILogger CreateLogger(string categoryName)
    {
        return new AzureTableLogger(connectionStringName, tableName);
    }

    public void Dispose()
    {

    }
}
In this provider, we just use the two parameters passed in the constructor to create a new logger instance
LoggingProviderExtension
 public static class AzureTableLoggerExtensions
    {
        public static ILoggerFactory AddTableStorage(this ILoggerFactory loggerFactory, string tableName, string connectionString)
        {
            loggerFactory.AddProvider(new AzureTableLoggerProvider(connectionString, tableName));
            return loggerFactory;
        }
    }
This last block is not a must but its for the sake of clean code and clarity. In this step, we just inject our logging provider into the ILoggerFactory. When the application starts, we will have to call the AddTableStorage method to be able to use the new logger.
Add the provider in startup.cs
   public class Startup
    {
        // This method gets called by the runtime. Use this method to add services to the container.
        // For more information on how to configure your application, visit https://go.microsoft.com/fwlink/?LinkID=398940
        public void ConfigureServices(IServiceCollection services)
        {
            services.AddControllers();
        }

        // This method gets called by the runtime. Use this method to configure the HTTP request pipeline.
        public void Configure(IApplicationBuilder app, IWebHostEnvironment env, ILoggerFactory loggerFactory)
        {
            if (env.IsDevelopment())
            {
                app.UseDeveloperExceptionPage();
            }
            loggerFactory.AddTableStorage("LoggingSample", "UseDevelopmentStorage=true");
            app.UseRouting();
            app.UseEndpoints(endpoints =>
            {
                endpoints.MapDefaultControllerRoute();
            });
        }
    }
Now, our application is ready to log messages to Azure Table Storage. The sample above is using local storage emulator and will create a table named LoggingSample. Lets create a controller and log some messages
    [ApiController]
    [Route("[controller]")]
    public class CustomersController : Controller
    {
        private ILogger<CustomersController> logger;

        public CustomersController(ILogger<CustomersController> logger)
        {
            this.logger = logger;
        }

        public IActionResult Index()
        {
            logger.LogInformation("This is a message from customers controller");
            return Ok();
        }
    }
In the Index action, we called the logger to add a test message. Notice that you don’t have to specify anything other than the ILogger. Asp.net core DI will inject the proper logger at runtime.
Notice the new columns added to the table such as EventId and LogLevel. These are properties in the LogEntity classes added in the first code snippet. Notice also that it logs all messages logged by the asp.net infrastructure not just the test message that we added
Next steps
Our next step would be adding a middleware that will show a nice UI that will display log messages. This can come handy when you want to debug something and need to see the error messages
Before asp.net core, we only had the web.config file to configure and read the application settings from code. The framework didn’t have a plugable way of adding an extra configuration providers. Any other confiruation data sources meant a custom solution and custom code to read and update configuration keys.
With asp.net core, we got the new appsettings.json as one source of configuration. Along with it came the environment variables, other files, secret keys that can be used to omit connection strings and passwords from being stored on source control.
Things event got better with Azure App Service that has a settings/configuration section that can override the application settings and connection strings sections. This applies to both asp.net framework and asp.net core.
Isn’t this enough already?
It is good as a start. but, it has a major issue. If you change any value in your configuration keys, it means the application must be restarted which affects the logged in users and may cause data loss. Another issue is that our application code and configuration exists in the same place which contradicts with the twelve factor . These configuration keys cannot also be shared with other applications except using copy/paste
Azure App Configuration
Azure App Configuration is a service that is still in preview that can be a central place for all your configuration keys and feature flags. It is so easy to add it to your asp.net core configuration provider using the provided nuget packages.
Add the need packages
First, install the package Microsoft.Azure.AppConfiguration.AspNetCore . You may need to check that you enabled prerelease versions if you are using visual studio
In your Program.cs file, add the following code which will inject Azure app configuration as a configuration provider. Notice that you will have to add a key named “AppConfig” in your connectionStrings section in appsettings.json that will store the connection string for your Azure App Configuration
public static IWebHostBuilder CreateWebHostBuilder(string[] args) =>
    WebHost.CreateDefaultBuilder(args)
        .ConfigureAppConfiguration((hostingContext, config) =>
        {
            var settings = config.Build();
            config.AddAzureAppConfiguration(settings["ConnectionStrings:AppConfig"]);
        })
        .UseStartup<Startup>();
Now, your application is ready to read any configuration keys from Azure App Configuration. All you need to do is to create a new instance by following this link
Reuse your existing configuration keys
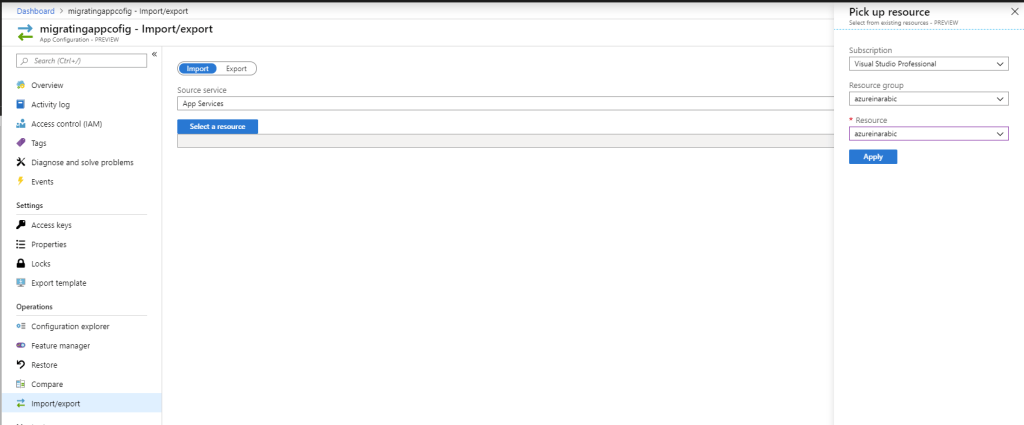
It’s not only too easy to add Azure App Configuration to your asp.net core app but also migrating your existing keys. You don’t want to end up with a situation where you have to spend hours moving your keys manually or writing scripts to do it. Azure App Configuration can do that for you.
As you can see above, it is too simple. Just choose Import/export from the left menu then choose where you want App Configuration to import the values from:
App Configuration: you can import the values from another Azure App Configuration instance
App Service: which can be perfect in our case since it will import the values from your Azure App Service
Configuration File: you can pass the appsettings.json directly and it will import the values from there
Once you did that, you will have all keys/connection strings imported and ready to go.
Conclusion
Azure App Configuration is a great service that still in preview but it enables you to offload your application from configuration keys and connection strings. It also has the auto refresh which will allow your app to always have the latest config keys without the need to restart your application and impact your users. It also has feature management which is a great addition but we will talk about it in future posts.
When you chat with a bot built with Azure Bot Service, you will have to maintain user state. Example, the options that the user chose last time, or the usernames of all users in a conversation.
Conversation State Types
Azure Bot Service has 3 different states:
User State This state is related to the user on a specific channel regardless how many conversation they have. So, if the user is chatting with a bot from Facebook channel and connected to the same bot in another conversation , any values saved in user state will be visible in both chats. This is useful in scenarios where you want to save an info about the user like the username or preference that will be used in all conversation for this user.
Conversation State This state is scoped to the conversation only but not to each user. If you have 3 users chatting with the bot, any data saved in conversation state will be shared across all users. This is used in cases where the data saved is not related to a specific user such as statistics. If the user connected to another session with the bot, the info saved her will not be visible in the other conversation
Private Conversation State Here, the framework manages the state for each user in each conversation. Imagine a scenario where the user is submitting a ticket. You want the ticket info to be scoped to this conversation only because they may be submitting another ticket with another conversation.
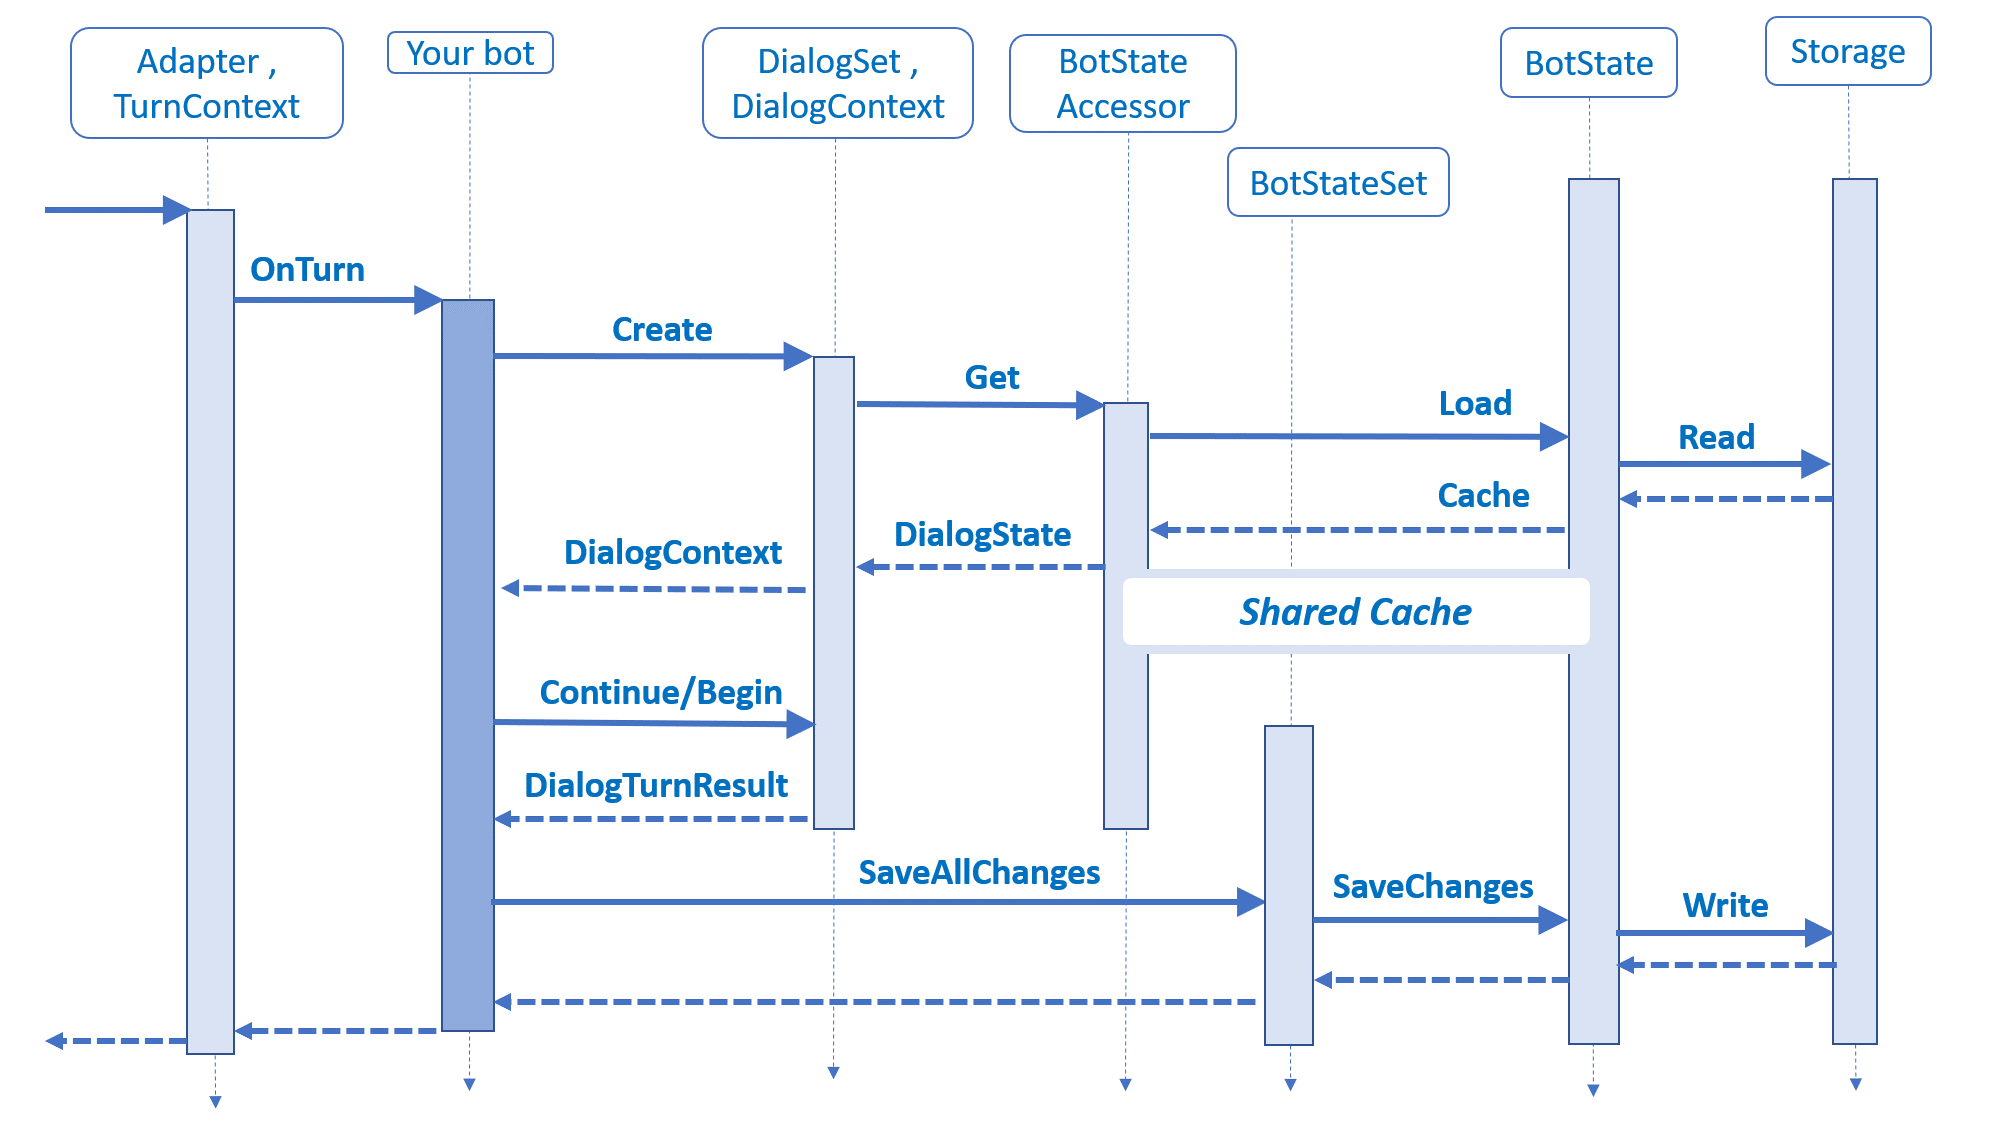
The state storage saves each data in a key/value store. The keys used for each state type is as below:
User Sate: {Activity.ChannelId}/users/{Activity.From.Id}#YourPropertyName
By default, the state variables are stored in memory. But you can change that from the startup.cs. In the example below, I have configured it to use Azure Table storage to store the state, this makes it persistent. You can create your own state by inheriting from IStorage
Next, you configure which state types you want to use, in this example, I use the conversation state. To use the user state, you have to create an instance of UserState and add it as a singleton just like conversation state.
public void ConfigureServices(IServiceCollection services)
        {
          //IStorage dataStore = new MemoryStorage();
          IStorage dataStore = new Microsoft.Bot.Builder.Azure.AzureBlobStorage("connection string", storageContainer);

          var conversationState = new ConversationState(dataStore);
            services.AddSingleton(conversationState);
        }
Now, its time to use the state in our bot. To do that, you have to use a property accessor which allows you to read and update data to the state storage. Note that calling the GetAsync and SetAsync on the state accessor doesn’t actually save the state data in the storage system. You have to call the SaveChangesAsync as you can see from the sequence diagram above.
To understand more about state property accessors and how to use it to read and update data into bot state, go through this link
To create a new Azure Bot Service Project, you can use the easy way by utilising the Azure Bot Service SDK Templates which you can download here. You will also need the Bot Service SDK which is a list of nuget packages. Current version is 4
Once you downloaded the bot template, installed it, you should find a new project template in visual studio. You can choose a project name, click Ok and you will end up with an echo bot that repeats what you say.
But this isn’t fun. In this post, I will create an empty asp.net project and add the needed boilerplate to make it a bot. Lets get started
Open Visual Studio (I am using VS 2019 Preview 2). CLick New Project, select Asp.net Core Web Application, name is HelloAzureBot and Choose Empty as the project template. Then click Ok
Adding reference to Bot Service SDK
To enable bot service in our asp.net core web app, we will need to add reference to the Bot SDK packages. We need the following packages:
Microsoft.Bot.Builder
Microsoft.Bot.Builder.Integration.AspNet.Core
Microsoft.Bot.Configuration
Microsoft.Bot.Connector
Microsoft.Bot.Schema
You can add it via NuGet Package manager Console, Manage NuGet Packages dialog or you just edit the project file and add the following to it:
Now, lets inject the Bot Service into asp.net core middleware. This will basically create an endpoint that will accept post requests sent to /api/messages . Open startup.cs file and in Configure method, add the following line. Don’t forget to remove the default middleware that print hello world.
app.UseBotFramework();
Now, our solution is ready to create a new Bot. Create a new class and name it EchoBot. Make it inherits from IBot interface and implement the OnTurnAsync. This is the method that get called when its your bot’s turn to speak to the user.
    public class EchoBot : IBot
    {
        public async Task OnTurnAsync(ITurnContext turnContext, CancellationToken cancellationToken = default(CancellationToken))
        {
            await turnContext.SendActivityAsync($"Hi, You said: {turnContext.Activity.Text}");
        }
    }
This is a very simple bot that does nothing but echo what you say. To send a message to the user, we use the TurnContext.SendActivtyAsync. Note that activity is any thing (message, voice, card ..) going between the user and the bot.
Tell Bot service about your Bot
Now, your project is ready except that it does not know about your Bot.We injected the Bot Service in the asp.net core middleware but we didn’t tell it about the echo bot. Its the same process as configuring MVC in Configure method but we have to also inject it a service in the ConfigureServices method. Now open startup.cs file again and edit the ConfigureServices method to match the following:
        public void ConfigureServices(IServiceCollection services)
        {
            services.AddBot<EchoBot>();
        }
Testing the Echo Bot
The bot is ready now to accept chat requests. Press F5 to run your project. It will open the browser with a new windows that tells you that no page can be found. This is normal as we didn’t inject any middleware to handle the root URL. In the SDK template, it uses static HTML file under wwwroot that has an introduction to the service. But this is not mandatory.
To test the bot, we will need a channel to talk to it. Microsoft released the bot emulator for that purpose. It allows you to connect and chat with your bot without deploying it to Azure Bot Service. The current emulator version is 4. But for some reason, it just does not work with me for local bots. It needs the bot to be deployed to Azure or at least create an Azure Bot Service and configure the Bot URL to be your local bot. You will expose the bot to Azure using ngrok. Another option is to just use Emulator V3 which you can easily provide the Bot URL which takes the format http://localhost:PORT/api/messages.
Bot Emulator
Download the Bot Emulator V3 from here and install it then run it. On the top, add the URL for your Bot in the format mentioned before and hit enter. Start playing around and enter any message and you should receive the reply with: Hi, You said: YOUR_MESSAGE.
You will notice that you will immediately receive the messages: “Hi, You said: and Hi, You said:” just after you entered the Bot URL. This is because the OnTurnAsync method is called when the user joins and when the bot joins or when you send a message. To filter, you have to add the following to your OnTurnAsync method
        public async Task OnTurnAsync(ITurnContext turnContext, CancellationToken cancellationToken = default(CancellationToken))
        {
            if (turnContext.Activity.Type == ActivityTypes.Message)
            {
                await turnContext.SendActivityAsync($"Hi, You said: {turnContext.Activity.Text}");
            }
        }
You can check if the activity type is ActivityTypes.ConversationUpdate and then check the turnContext.Activity.MembersAdded property and use that to send a message to welcome the new members. ex: John has joined the conversation.
Handling Errors
When your bot encounters an issue or unhandled exception, you can catch that exception through an error handler. You can configure that in the ConfigureServices method when you call the AddBot method. The Startup.cs should be as below. We utilise the OnTurnError handler to send a message to the user informing him/her that something went wrong and log the exception.
 public class Startup
    {
        public ILoggerFactory LoggerFactory { get; }

        public Startup( ILoggerFactory loggerFactory)
        {
            this.LoggerFactory = loggerFactory;
        }

        // This method gets called by the runtime. Use this method to add services to the container.
        // For more information on how to configure your application, visit https://go.microsoft.com/fwlink/?LinkID=398940
        public void ConfigureServices(IServiceCollection services)
        {
            services.AddBot<EchoBot>(options =>
            {
                // Creates a logger for the application to use.
                ILogger logger = this.LoggerFactory.CreateLogger<EchoBot>();

                // Catches any errors that occur during a conversation turn and logs them.
                options.OnTurnError = async (context, exception) =>
                {
                    logger.LogError($"Exception caught : {exception}");
                    await context.SendActivityAsync("Sorry, it looks like something went wrong.");
                };
            });
        }

        // This method gets called by the runtime. Use this method to configure the HTTP request pipeline.
        public void Configure(IApplicationBuilder app, IHostingEnvironment env)
        {
            if (env.IsDevelopment())
            {
                app.UseDeveloperExceptionPage();
            }

            app.UseBotFramework();
        }
    }
.Bot File
The emulator that comes with SDK V4 uses a .bot file that describes the bot, the services that the bot uses and the URL where it runs. A typical .bot file contains the following:
The content of the file is self explanatory but the most important details are the name and endpoint. This is what tells the Emulator how to reach your bot. If the bot is deployed on Azure Bot Service, you will need to provide the appId and appPassword
That will be the end of our post. In the next post, we will talk about the state management. If you didn’t read the previous post, please do.