
In the previous part of building line of business application with MVC 5, we have setup the project on TFS Online, added the user stories and introduced the application business, if you didn’t read it already, please go ahead and read it from the below link
Building a LOB application with MVC 5 – Part 0
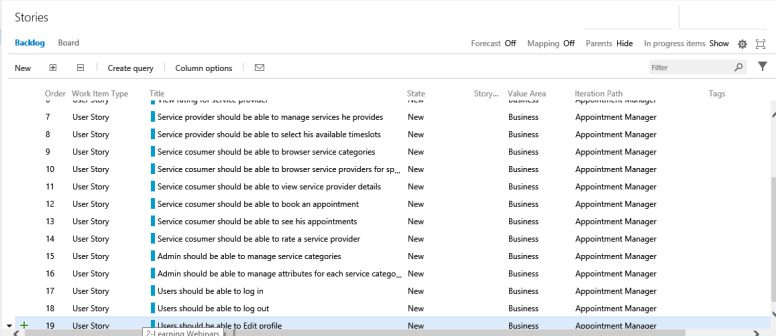
After you are done, The project backlog should be similar to the below screenshot
In this part, we will start with an introduction to MVC, Create the solution structure and go through the moving parts.
Introduction to MVC
For many years we have been using Web Forms, Creating pages, user controls and custom dynamic controls, but when the project size gets bigger, it gets complicated and the whole framework was also tied to .Net framework release which was slow.
In 2009, Microsoft released the first version of MVC and it was not tied to .Net framework release cycle which made the release cycle of MVC much faster.
Now we have MVC 5.2 and in few months we should have MVC 6 which is a complete rewrite of MVC, but we won’t talk about it in this series.
MVC makes it easier to maintain a larger project and a large team, and as we will see, you can divide the project into sub-projects using something called Areas.
MVC has 3 main components
-
Models
Contains your model classes, DTO, and your business services, normally the business logic layer will be in a different assembly
-
Views
This is how your model and content will be represented, MVC can render your data in HTML view, JSON, Stream or even file.
-
Controllers
The controller will accept the user request, acting as a front end dispatcher, validate the user input, call the business logic and choose what view to use in order to render the data
You can read more about MVC through Microsoft official site http://www.asp.net/mvc
Create Solution structure
Now, lets open Visual Studio and create the project structure, you will notice that we will create a lot of projects, and I will explain what is the usage of each one.
- Open visual studio as Administrator, I am using VS 2015 Enterprise, But if you have VS 2013, it should be the same experience
- Click View Menu-> Team Explorer in order to link the project to TFS
- Click the green icon > Manage Connections > Connect to Team Project
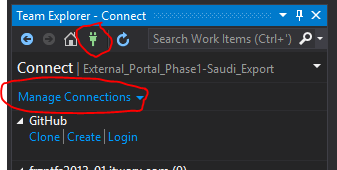
- In the popup, click Servers -> Add
- Enter the link for your visual studio account, ex: https://%5Byouraccount%5D.visualstudio.com
- Visual studio will authenticate you and add the server to the list of TFS servers
- Make sure the server is selected in the “Select team foundation server” drop down
- Select the team project from the list on the right, in our case it is Appointment Manager
- Click Connect

- Once the dialog is closed, you will find the server name and below it there will be a list of projects you already have, click the Appointment Manager
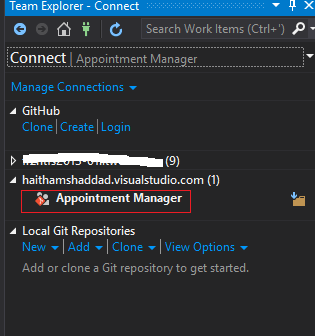
- Once the project is selected, it will ask you to clone the project into your local machine, click on “Clone this repository” link and choose a folder on your H.D and click Clone

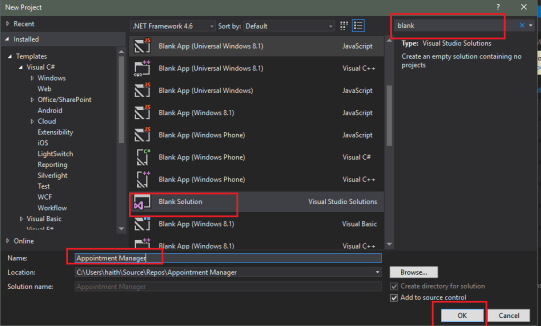
- Once the project is cloned to your local work-space, you will click on the “New” link under the Solutions in the screenshot above, this will open the New VS project dialog
- Type blank in the search text box and find the “Blank Solution” template, Enter the name as “Appointment Manager”, the location will be the folder that you chose when you cloned the project, keep it as is
- Now from the menu, click View -> Solution Explorer
- Right click the Solution and select Add->New Project
- Select Windows from the left tree, and Class Library from the list of project templates
- Enter the name for the project as AppointmentManager.Models, we will explain later what is this used for, once the project is created, delete the default class Class1.cs
- Repeast Steps 14 till 17 for the following projects
- AppointmentManager.Repository
- AppointmentManager.Repository.EntityFramework
- AppointmentManager.Services
- AppointmentManager.CrossCutting
- Add another project but in this time select web from the left tree, and “Asp.Net Web Application”, name the project AppointmentManager.Web
- Another dialog will open, select MVC and keep the Authentication as Individual User Accounts for now, your screen should be similar to this

By this, you have created the solution structure, I will explain below what will each project be used for
Solution Structure in Details
Now, you should see something like the below in your visual studio solution, I will explain now what each project will be used for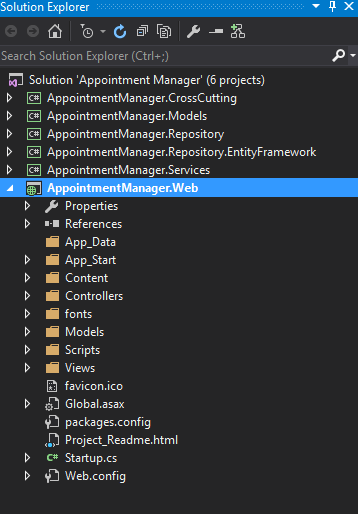
AppointmentManager.CrossCutting
This project will contain all the classes that will be used across all layers, ex: Logging, caching, security and any other utility classes
AppointmentManager.Models
This project will contain all entity classes related to our bunsiness, these classes will be mainly plain old CLR objects (POCO), it has no business logic, just the properties in each class and any other attributes like Required, Length.
Sample of these classes are: Appointment, ServiceProvider, Booking..
AppointmentManager.Repository
This project will contain everything related to data access layer, however it won’t contain a specific implementation, here will be only the abstraction, ex: IAppointmentRepostitory will describe all methods needed for the appointment data access
AppointmentManager.Repository.EntityFramework
This will contain the implementation for the interfaces defined in AppointmentManager.Repository project using Entity Framework, this will make it easy for us later to change the implementation to other ORM or data access
AppointmentManager.Services
This will contain all the business logic layer code, any data access will be delegated to the repository layer.
AppointmentManager.Web
This project will contain all the UI stuff, like MVC Views, JavaScript, CSS, Bundeling, Configuration, and User request handling and validation
This layer will call the service layer to handle any business logic layer.
So the flow will be as the below diagram
So far, we have created the project structure, explained what is each part and if you set the startup project to AppointmentManager.Web and run the project, you will have a web application running with the default template.
In the next series, we will start adding some functionality to the application and will discuss more about the web project structure
