
This is the fifth part of building line of business application using MVC 5, you can read the previous parts through the following links
- Building a LOB application with MVC 5 – Part 0
- Building a LOB application with MVC 5 – Part 1
- Building a LOB application with MVC 5 – Part 2 – Models and Generic Repository
- Building a LOB application with MVC 5 – Part 3 – EntityFramework
In the previous part, we introduced EntityFramework code first migration and created the generic repository using EF, then we applied the migration to create a database and ran some unit tests to make sure our Repository layer is working fine.
In this part, we will introduce Controllers, routes and areas
MVC Controllers
The “C” in MVC, if you recall some design patters, you may heard of the Front Controller pattern, this is basically the guy at the front door who receives the request, validate it, call whatever services for you and later forward you to the suitable view.
To understand how controllers work and how the URL you type in the browser is mapped to a piece of code, lets see how the MVC application life-cycle works, but take into consideration that MVC is based on the same System.Web used in Web Forms, so they share some life cycle events
- A request is received by the IIS Server and forwarded to an MVC handler, this is a normal HTTP handler
- MVC handler gets the request and invokes the routing API which we will explain later and it examines the route table to see which controller and action should handles the request
- The MVC handlers creates the controller using the method CreateController from the interface IControllerFactory, the default implementation for this interface is DefaultControllerFactory, it simply create a new instance from the controller class, if your controller constructor doesn’t have parameter-less constructor, this method will fail and throw and exception, later when we see dependency injection, we will see how to override the default controller factory by calling ControllerBuilder.Current.SetDefaultControllerFactory in Application_Start in Global.asax.cs
- Invoke authentication filters, we will read more about filters and authentication in future posts
- Bind query string parameters, form values and route values to the action method parameters using the default model binder, we will see later how to build custom model binders
- Invoke the action and action filters
- Execute the results(View, Content, Empty, JSON, File) and any result filters
- Send the response to the user
You can read more about the MVC Application Life-Cycle here
Convention over Configuration
You can think of a controller as a way to group a module features together in one place, for ex: a CustomerController will have all the code related to Customers like Browse Services, view service details ..
By Default MVC 5 works with the convention over configuration model, it means you will not find a code that maps the exact URL to the exact controller name and action, nor you will find a config that tells how to relate the action name with the view page, this is all following a specific convention.
- URL mapping to controllers and actions is configured using routing template
- Every controller in the controllers folder will have a folder inside the Views folder with the same name without “Controller” word
- Every action inside controller will have a view inside the Views\controller folder with the action name unless you specified another view name explicitly
Now, lets create some controllers that will be used in out Appointment Manager application
- In the AppointmentManager.Web project, right click the Controllers folder and choose Add -> Controller
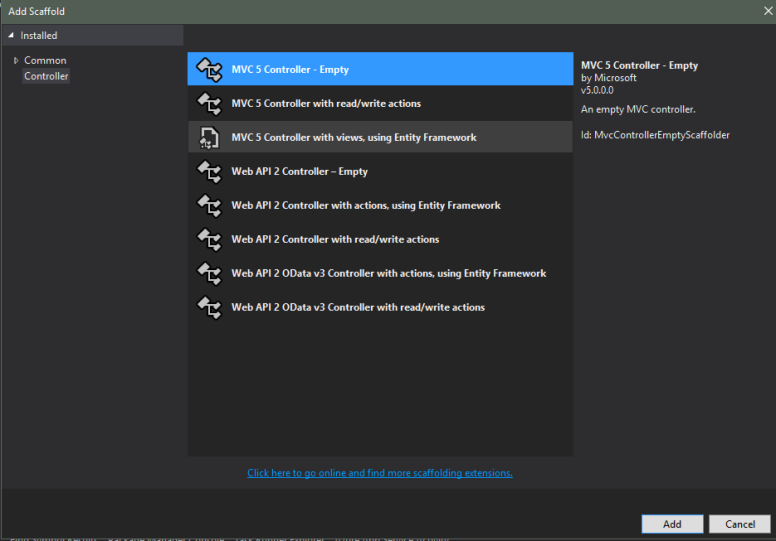
- You have 3 options, either an empty controller which is self explanatory , with read/write actions which is created with some get, post, delete and put methods, and the last one is used when you have an entity framework context inside your web project which is not recommended, this option created a CRUD controller for the selected entity, ex: if you selected our DB Context and choose the entity as Appointment, then it will generate CRUD for the appointment class, in our case, we will choose Empty
- Enter the name as “Customers” and Click Add, this will create an empty controller with a single action called Index
If you have a look at the Index action, you will find it has some few properties
 public ActionResult Index()
        {
            return View();
        }
- The method is public
- The return type is ActionResult or anything that inherits from IActionResult
- It used a helper method called View to return an object that inhers from ActionResult , there are many other help functions like File(), Json(), Empty()
By default the action has no view, and if you run the application now and navigated to http://localhost:16106/Customers/, you will have the following screen, your application may be running on a different port
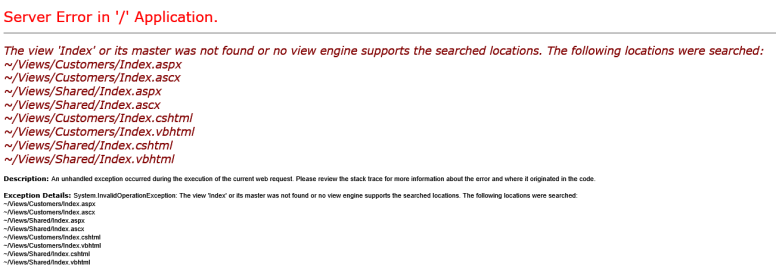
This is the convention over configuration part, it tried to find a view with the name Index which is the action name in the path View/Customers and Views/Shared, and since we didn’t specify a view name in the return View() method, then it fails.
To create a view, you can either go to related view folder for your controller and create a view with the same name as the action using Right Click, Add new item, and Select view.
or you can just right click in the action method and choose “Add View”
Now, Lets create the needed controllers along with its actions and views
- Customers
- Services
- Providers
- ProviderDetails
- BookAppointment
- Calendar
- ServiceProviders
- Calendar
- AppointmentDetails
- ManageServices
- AvailableTime
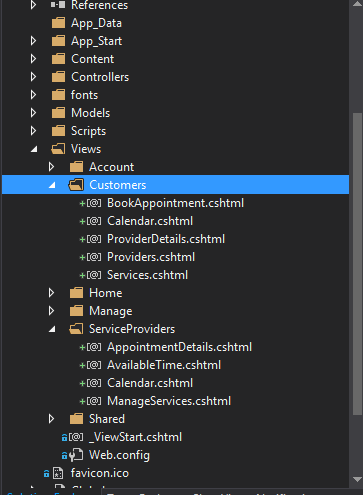
Create empty view for each action, after you are done, your views folder should be the same as below, you can of course change the name as you like, and you can now navigate to each path and make sure it opens without errors, the path should be controller name/action name, ex: Customers/Calendar
Routes
When we opened the URL http://localhost:16106/Customers, it automatically knew that URL should be handled by the Customes controller, the Index method, this is configured in the file App_Start\RouteConfig.cs
This is the content of the file:
 public class RouteConfig
    {
        public static void RegisterRoutes(RouteCollection routes)
        {
            routes.IgnoreRoute("{resource}.axd/{*pathInfo}");

            routes.MapRoute(
                name: "Default",
                url: "{controller}/{action}/{id}",
                defaults: new { controller = "Home", action = "Index", id = UrlParameter.Optional }
            );
        }
    }
the most important line is the one that defines the “Default” route, you can find the url property that has the value “{controller}/{action}/{id}”, and the line below it, it specifies default values from these placeholders, in this case if the URL was http://localhost:16106/ without anything else, this means the controller will be HomeController, and if you specify the controller but no action, like the case in http://localhost:16106/Customers, then, the action will have the default value “Index” which why the Index action is called when we didn’t specify it.
You can add as many routes as you want, but make sure to make the most specific at the top, think of it like exception handing, if you put a try and catch and inside the catch you put the root Exception class, then any other catches will not be called as the Exception class will map to all exceptions.
ex:
 routes.MapRoute(
                name: "Default",
                url: "{controller}/{action}/{id}",
                defaults: new { controller = "Home", action = "Index", id = UrlParameter.Optional }
            );

            routes.MapRoute(
               name: "Calendar",
               url: "Calendar",
               defaults: new { controller = "Customers", action = "Calendar", id = UrlParameter.Optional }
           );
In this case, the calendar route will never get a chance to fire, because the path: /calendar will be alreayd cought by the default route and the controller will be mapped to Calendar and you will find an exception that it can’t find any controller with the name Calendar, so you have to put the calendar route before the default route
There is also Attribute based routeing, where you simply put an attriibute before the action name or controller name like the below
 [Route(template:"Customers/BrowseServices")]
        public ActionResult Services()
        {
            return View();
        }
You can read more about attribute based route here on asp.net site
Areas
You noticed that we didn’t add a controller for the admin side, but in the admin case, we will have many controllers, ex: Services, ServiceCategories, Users …
It will be like a sub project, how can we isolate it from the rest of the project?
The answer is MVC Areas, it helps us to isolate business domains in a separate folder that can be handled by separate teams, in an eCommerce scenario, we would have an area for Shopping cart, another for inventory management, and another one for shipping
To create an area, right click the project itself and choose Add => Area and type Admin as the area name and click Add, you will have a new folder called Areas and inside it you will have the folder Admin and just inside this folder you will have the same project structure

create the following controllers inside the Admin area, to do that, follow the same instructions that we used to create the customers and service providers controllers but this time select the controllers folder inside the admin area
- Services
- ServiceCategories
- Users
- Reports
So far, we created the needed controllers, routes, and views, in the next post, we will start working on the views and add some UI that makes the application life.
